Do you feel scattered when you switch between different artificial intelligence tabs and lose your best prompts? This course will give you the opportunity to explore a variety of Generative Artificial Intelligence (Gen AI) tools in one place. The series will streamline your workflow using structured prompting, personalized instructions, and team-based projects. You also get 50 education-related prompts and 100 prompts for K-12 education. There are bonus sections with even more resources included. What's more, you c…
Do you feel scattered when you switch between different artificial intelligence tabs and lose your best prompts? This course will give you the opportunity to explore a variety of Generative Artificial Intelligence (Gen AI) tools in one place. The series will streamline your workflow using structured prompting, personalized instructions, and team-based projects. You also get 50 education-related prompts and 100 prompts for K-12 education. There are bonus sections with even more resources included. What's more, you can complete this course in any sequence you want, jumping to your favorite parts first.
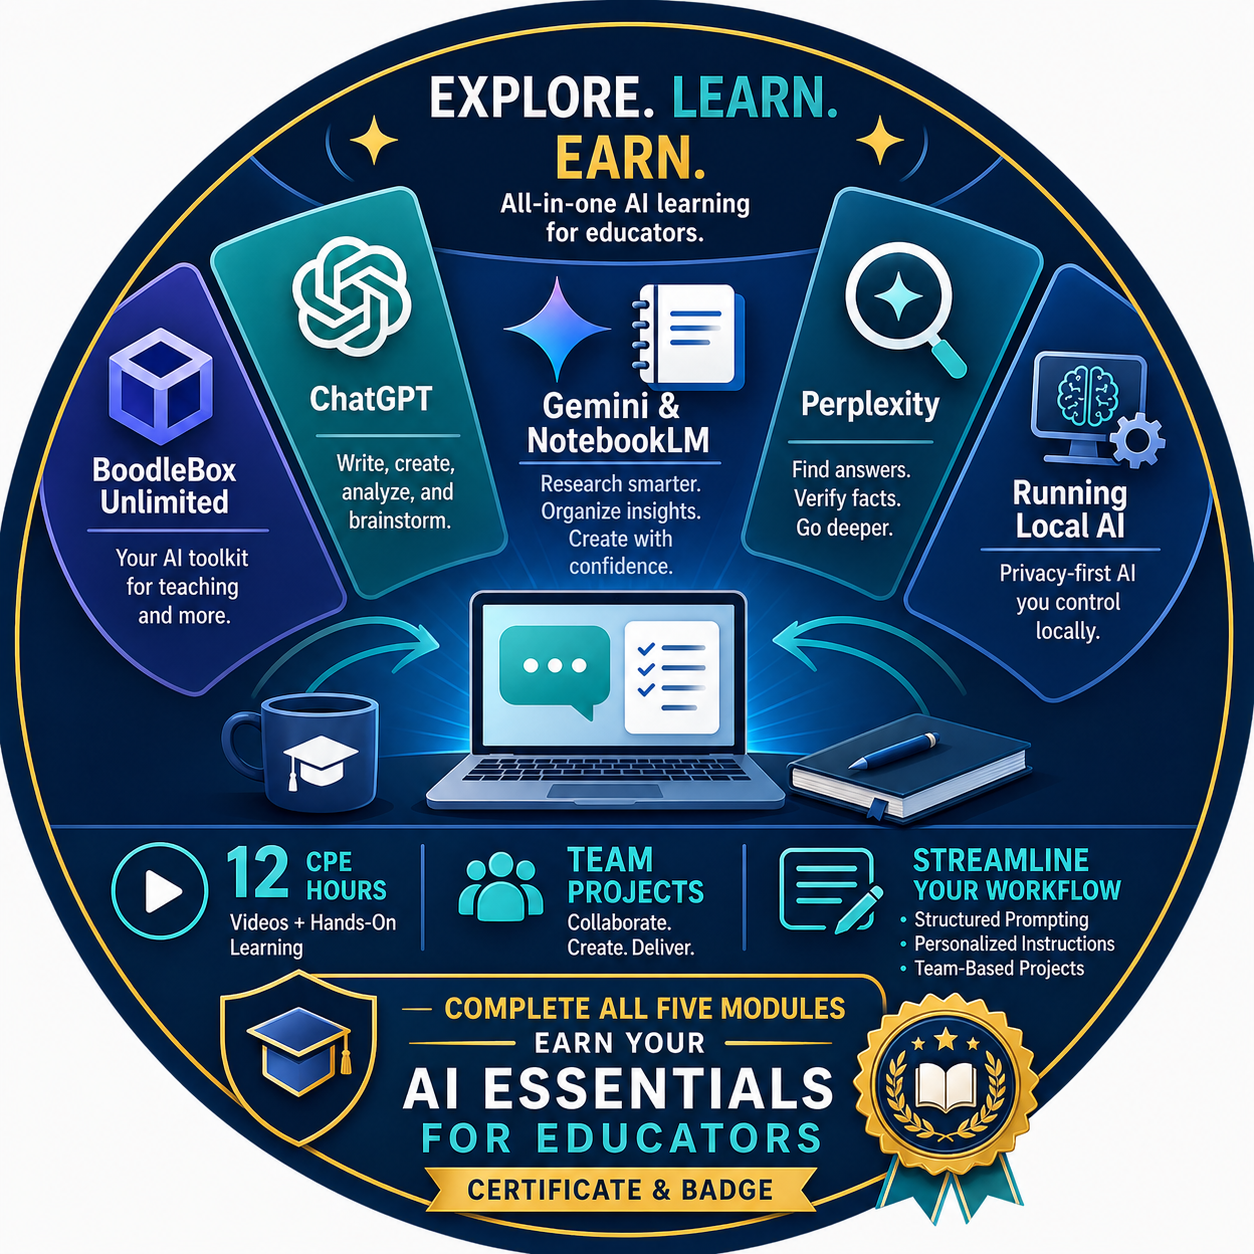
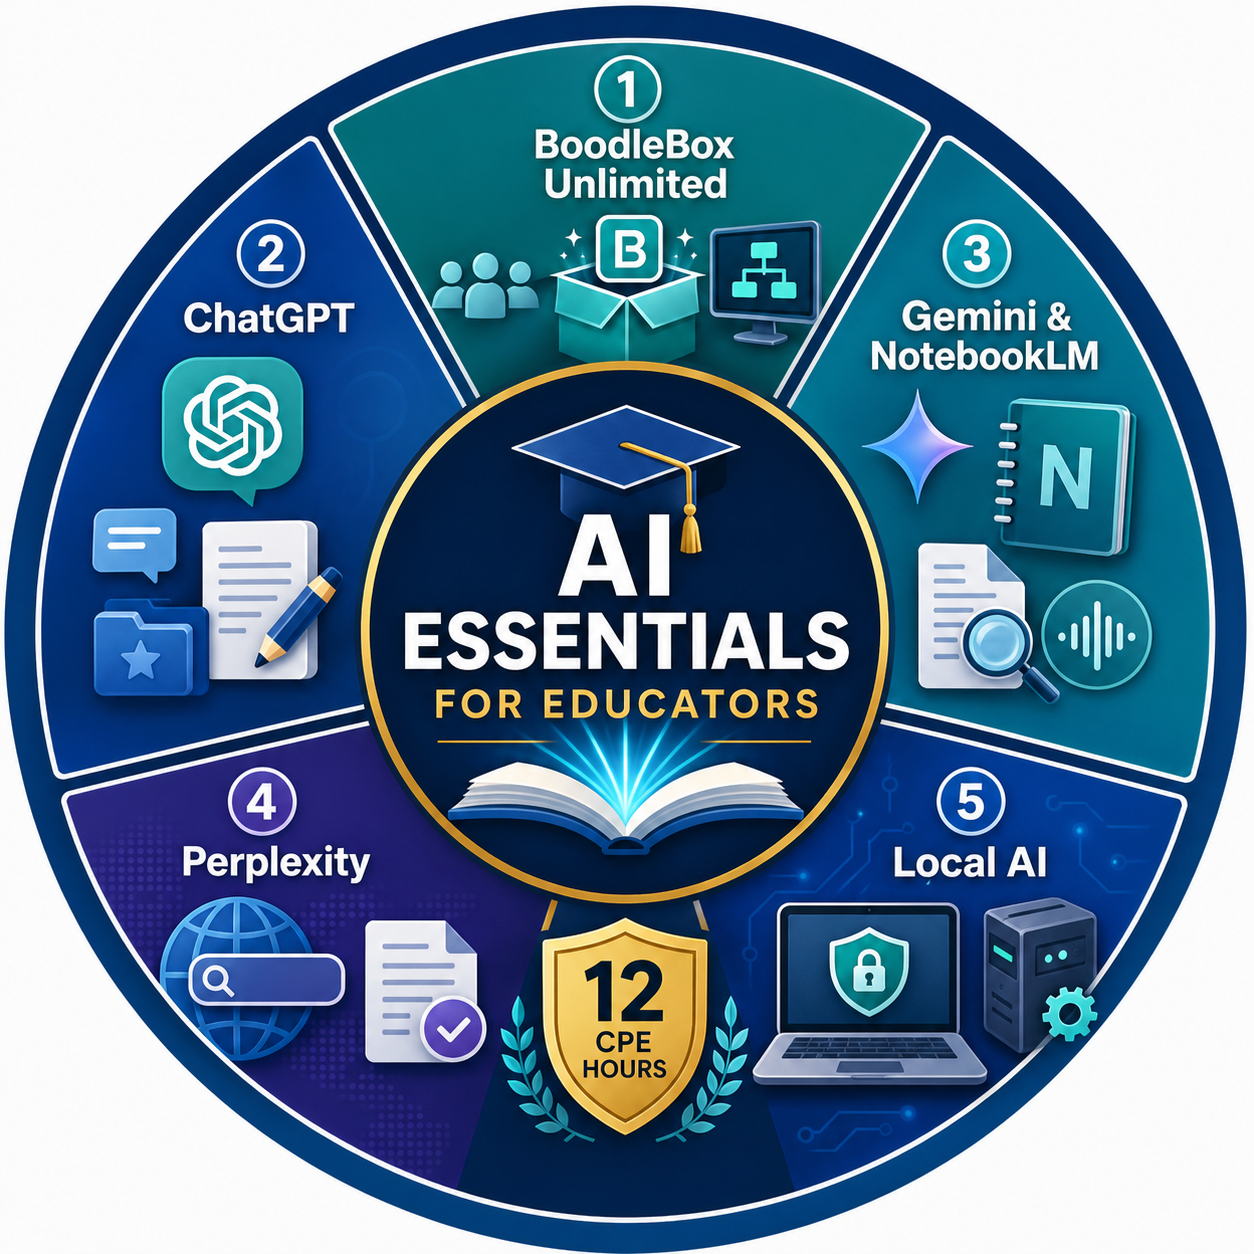
Earn 12 CPE hours for videos and hands-on learning that move you from an AI beginner to an architect of professional tools. Included are BoodleBox Unlimited with free code, ChatGPT, Gemini and NotebookLM, Perplexity, and Local AI. The focus in the first few is to provide you an overview of various chat models. The final module is intended for you to set up Gen AI on a local machine or device, provided it is powerful enough.
In this course, you will have the opportunity to earn CPE hours with individual certificates for these Generative AI tools:
BoodleBox Unlimited
ChatGPT
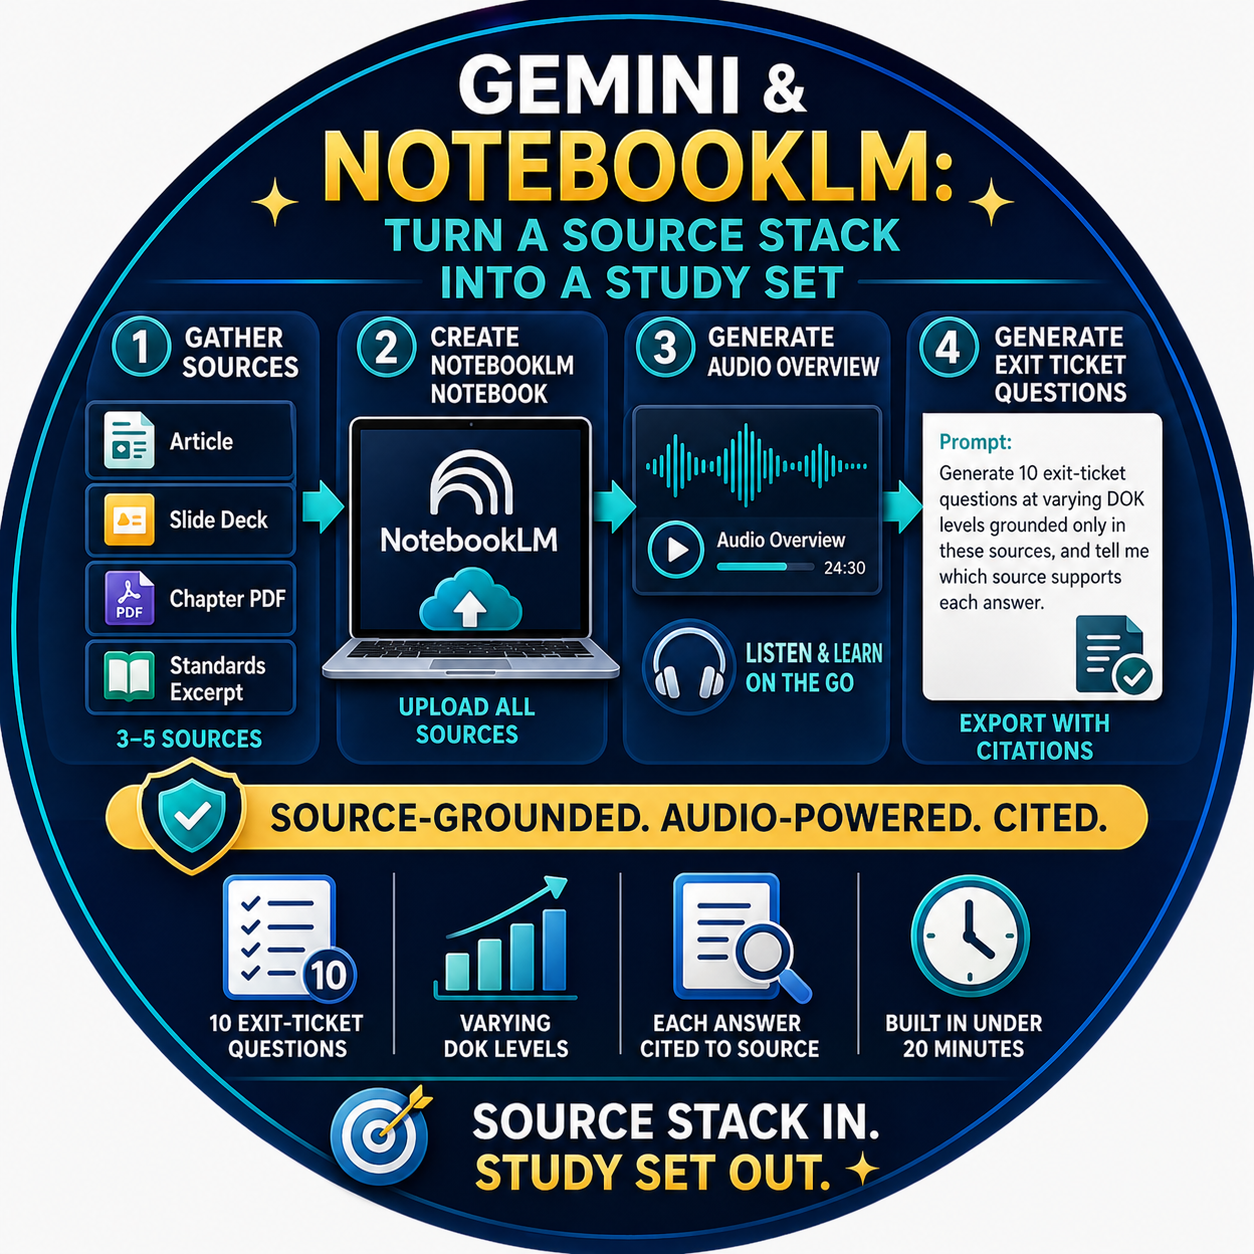
Gemini and NotebookLM
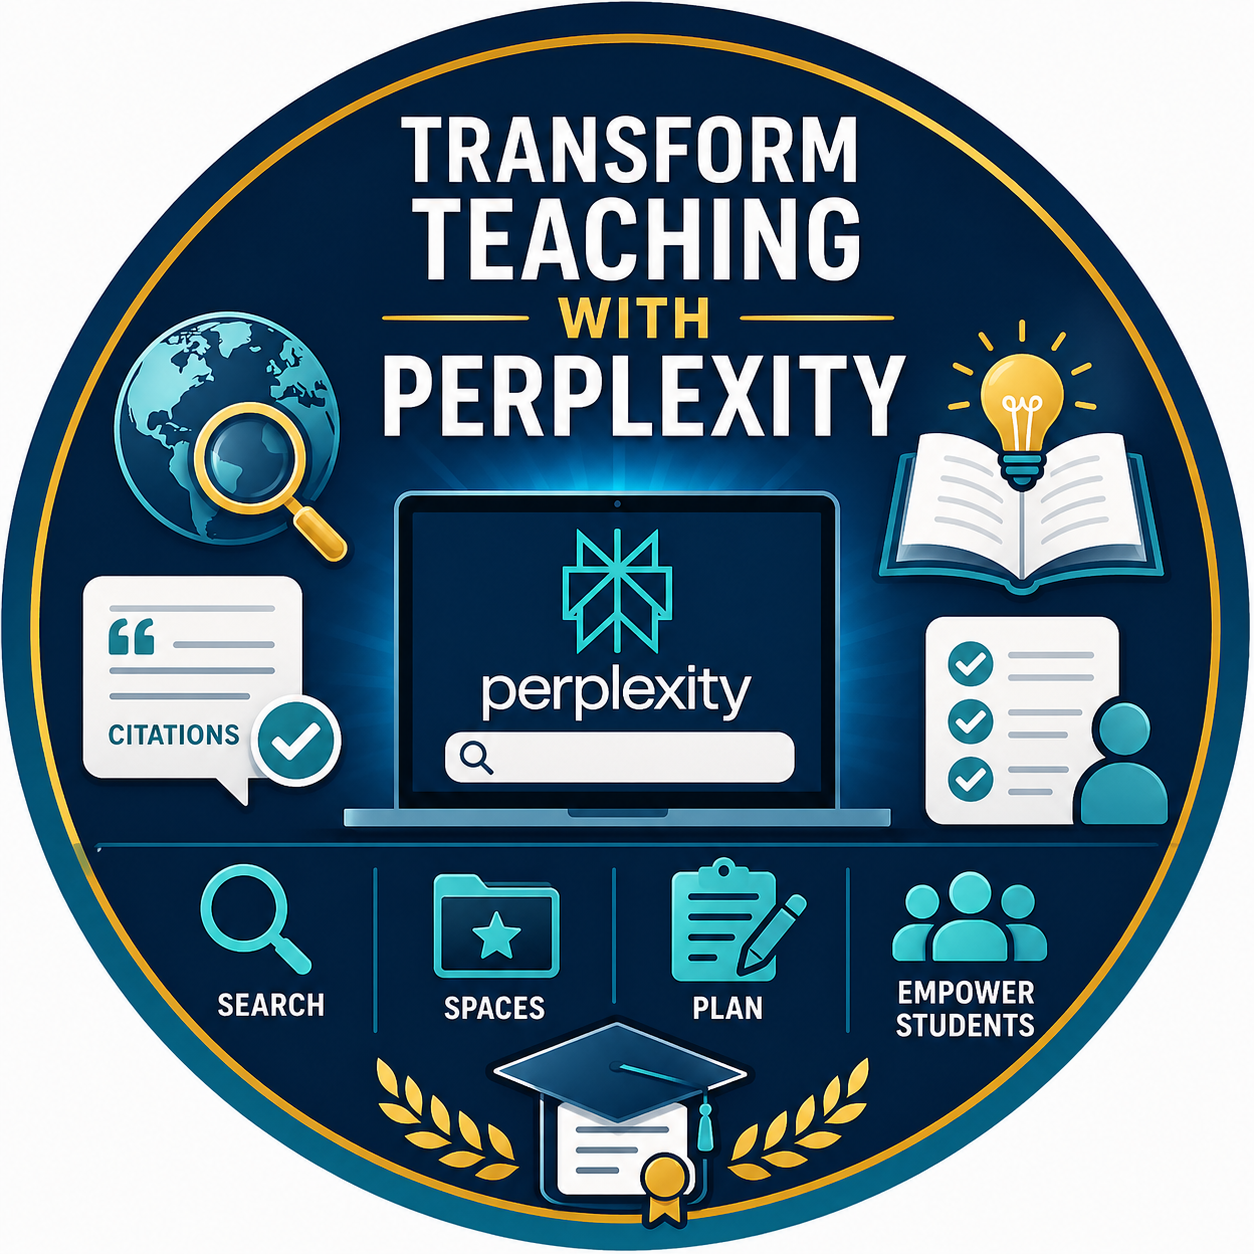
Perplexity
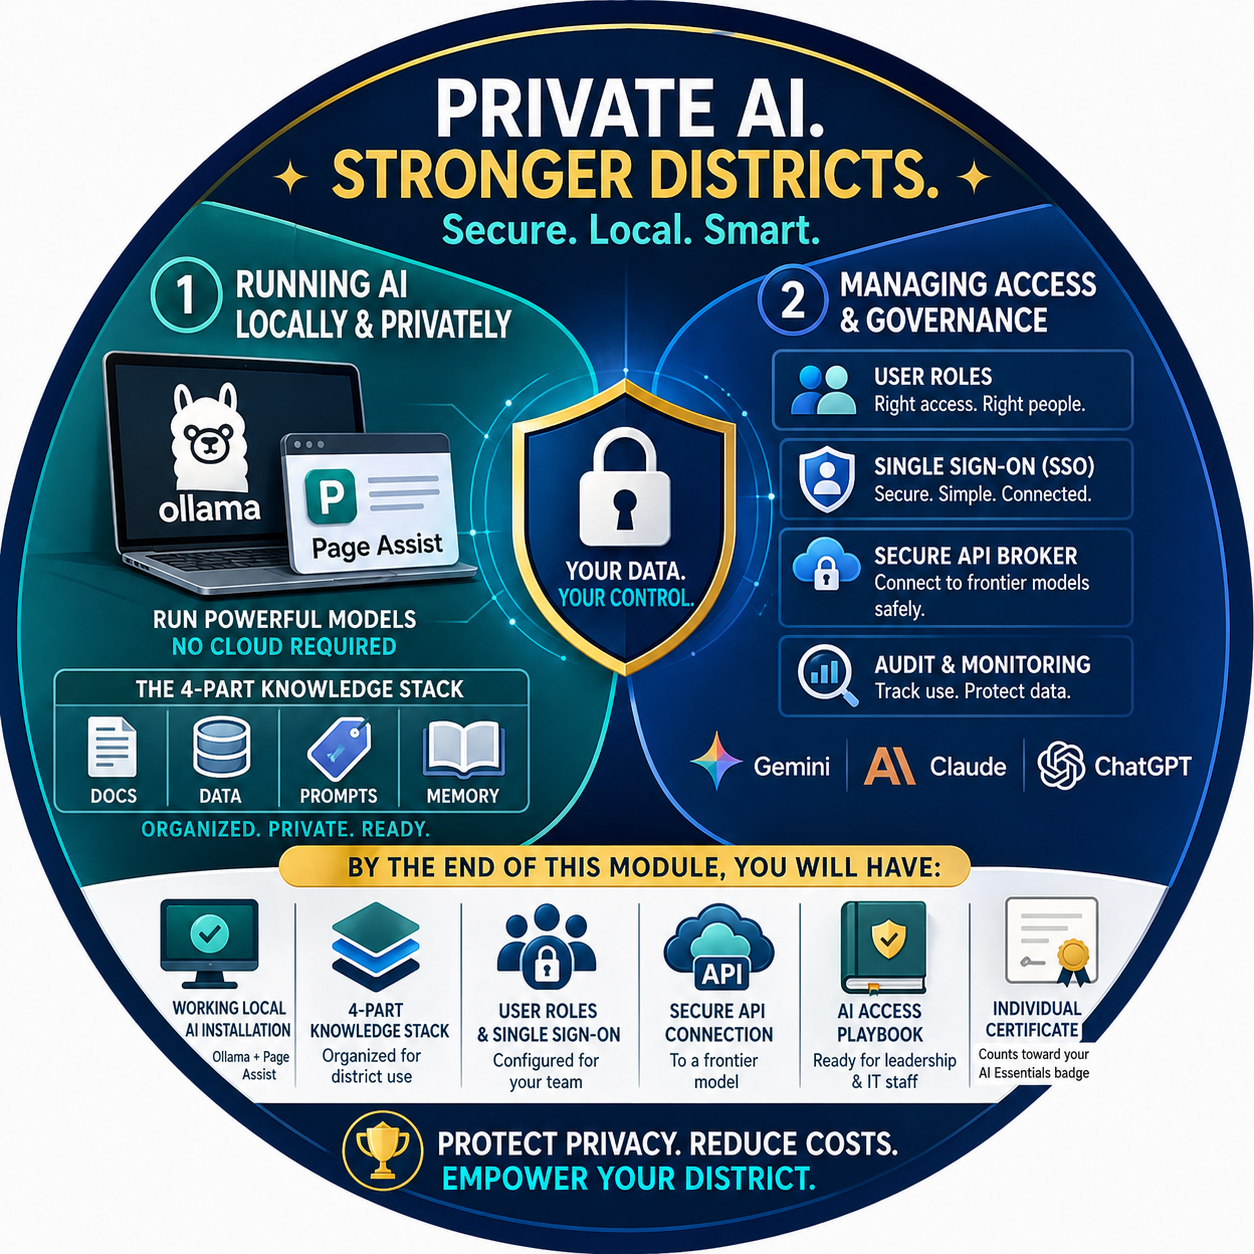
Running Local AI
When you complete all five modules, you receive the AI Essentials for Educators certificate and digital badge.
Do you feel scattered when you switch between different artificial intelligence tabs and lose your best prompts? This course gives you the chance to explore a variety of Generative Artificial Intelligence (Gen AI) tools in one place. You will streamline your workflow using structured prompting, personalized instructions, and team-based projects.
Earn 12 CPE hours through videos and hands-on learning that move you from an AI beginner to an architect of professional tools. Along the way, you will have the chance to earn an individual certificate for each tool:
BoodleBox Unlimited
ChatGPT
Gemini and NotebookLM
Perplexity
Running Local AI
When you complete all five modules, you receive the AI Essentials for Educators certificate and badge.
Lesson 2
Course Overview
View
Do you feel scattered when you switch between different artificial intelligence tabs and lose your best prompts? This course will give you the opportunity to explore a variety of Generative Artificial Intelligence (Gen AI) tools in one place. The series will streamline your workflow using structured prompting, personalized instructions, and team-based projects. Earn 12 CPE hours for videos and hands-on learning that move you from an AI beginner to an architect of professional tools. Included are BoodleBox Unlimited with free code, ChatGPT, Gemini and NotebookLM, Perplexity, and Local AI.
Module One - BoodleBox Unlimited
Work inside one platform that gives you access to many leading AI models without juggling multiple subscriptions or browser tabs. You will set up your account using the free access code included with this course, build "bots" tuned for specific instructional tasks, and use BoodleBox's team features to collaborate with colleagues on shared projects. By the end, you will have a multi-model workspace ready to use with your team.
Module Two - ChatGPT
Move beyond casual prompting and treat ChatGPT as a structured tool for instructional design, drafting, and feedback. You will write reusable prompts, set up custom instructions that match your role and grade level, and organize your work inside a Project space that keeps your best prompts and outputs in one place. Hands-on practice focuses on real classroom artifacts you can use the next day.
Module Three - Gemini and NotebookLM
Pair Google's flagship AI assistant with its source-grounded research notebook to do work that stays anchored in trusted documents. You will use Gemini for everyday drafting and Google Workspace integration, then shift into NotebookLM to build notebooks from your own materials, generate study guides and audio overviews, and ground responses in cited sources. This module is especially useful when you work with curriculum documents, research articles, and policy texts.
Module Four - Perplexity
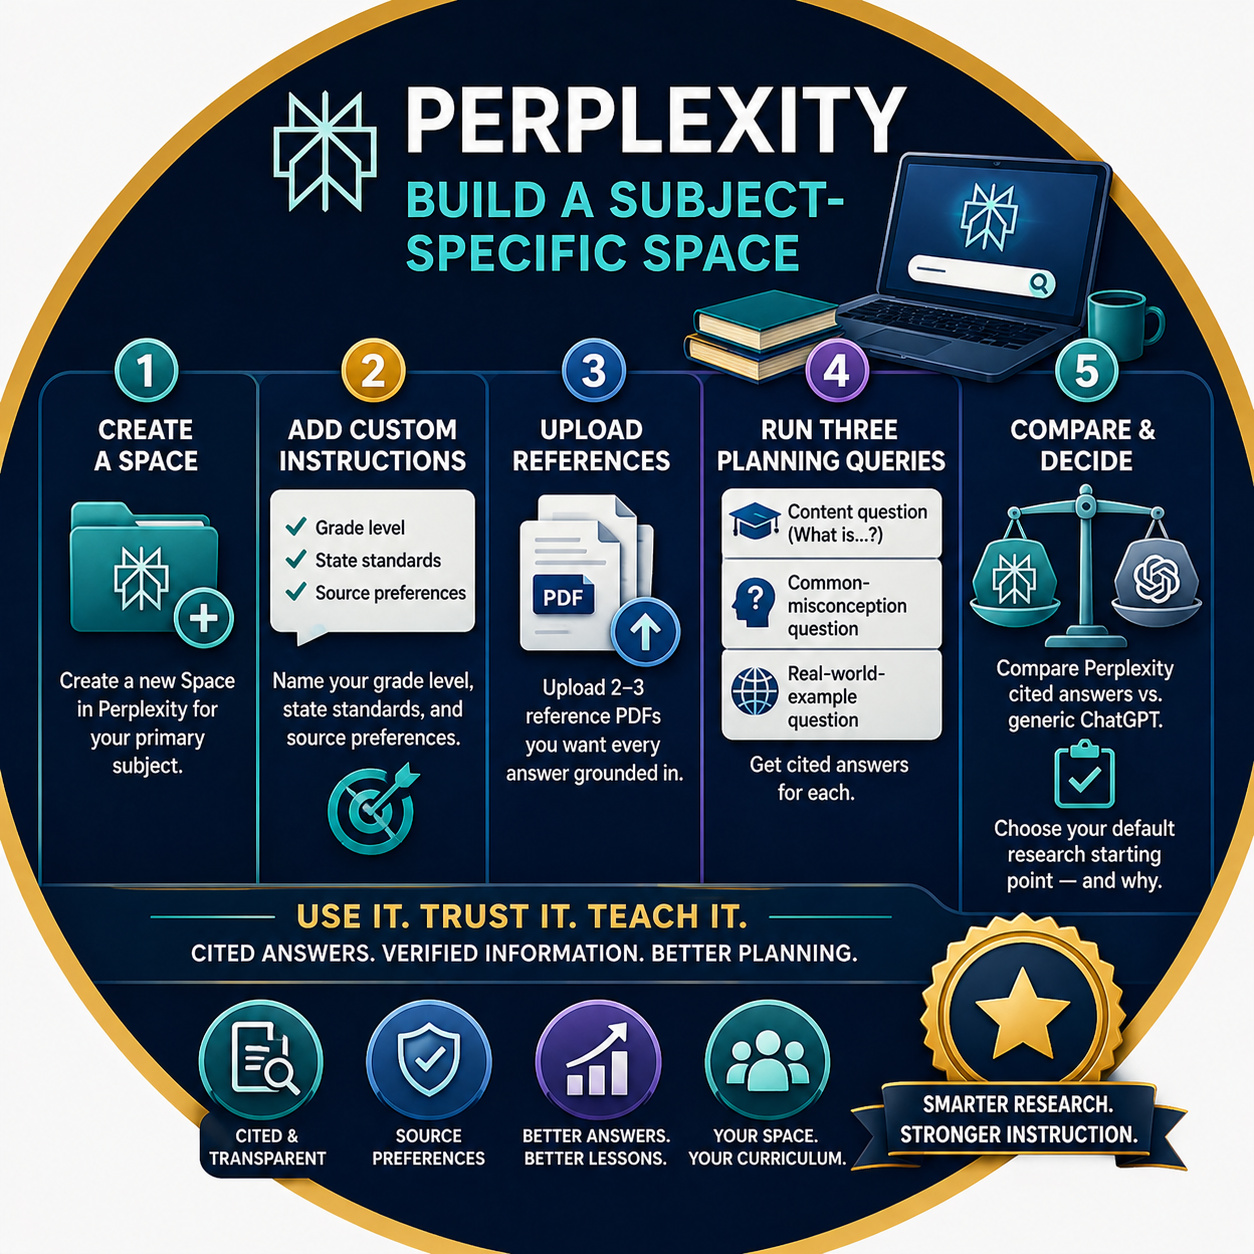
Use Perplexity as your live-web research partner when you need current information with citations attached. You will run focused searches, organize your work into Spaces, and refine answers through follow-up questions that go deeper than a single query. The module closes with strategies for verifying sources and teaching students to do the same.
Module Five - Local AI
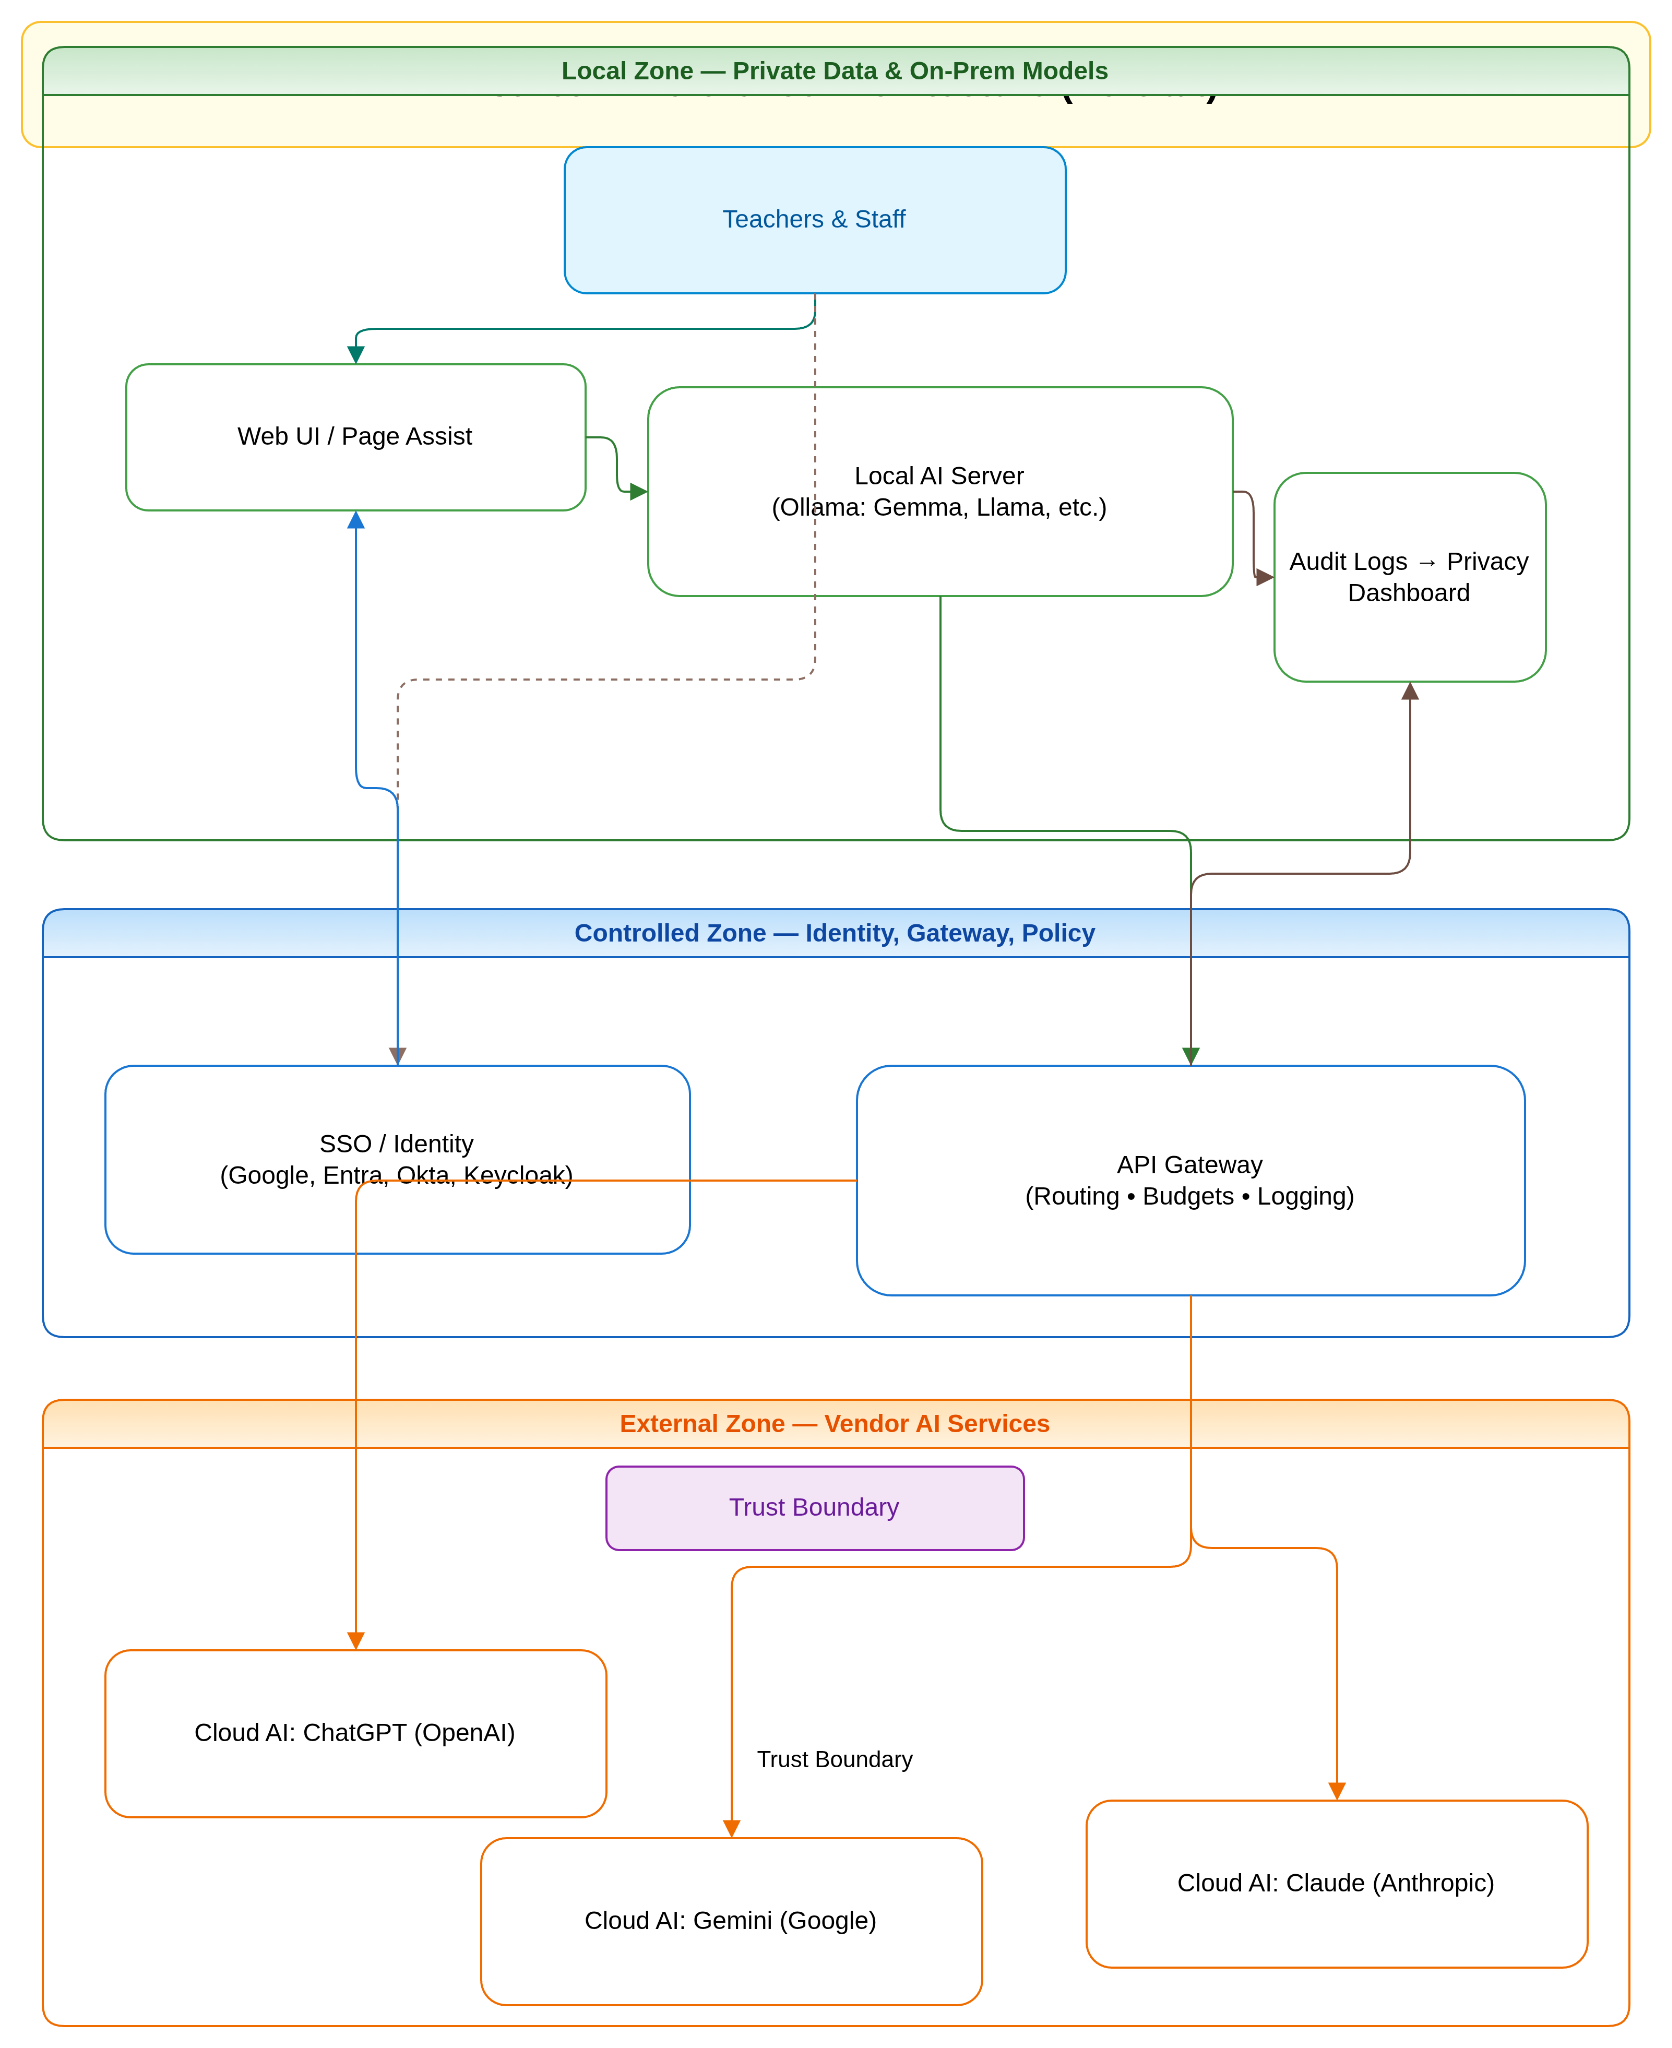
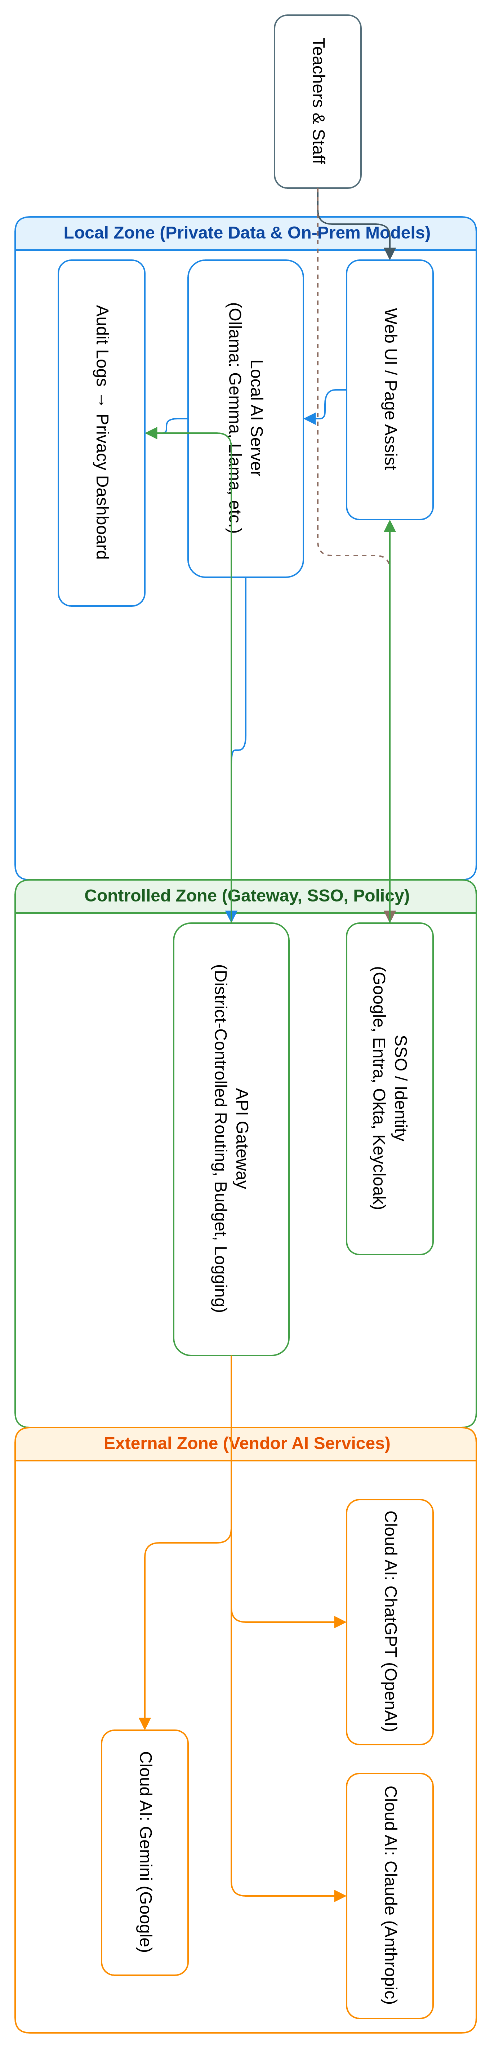
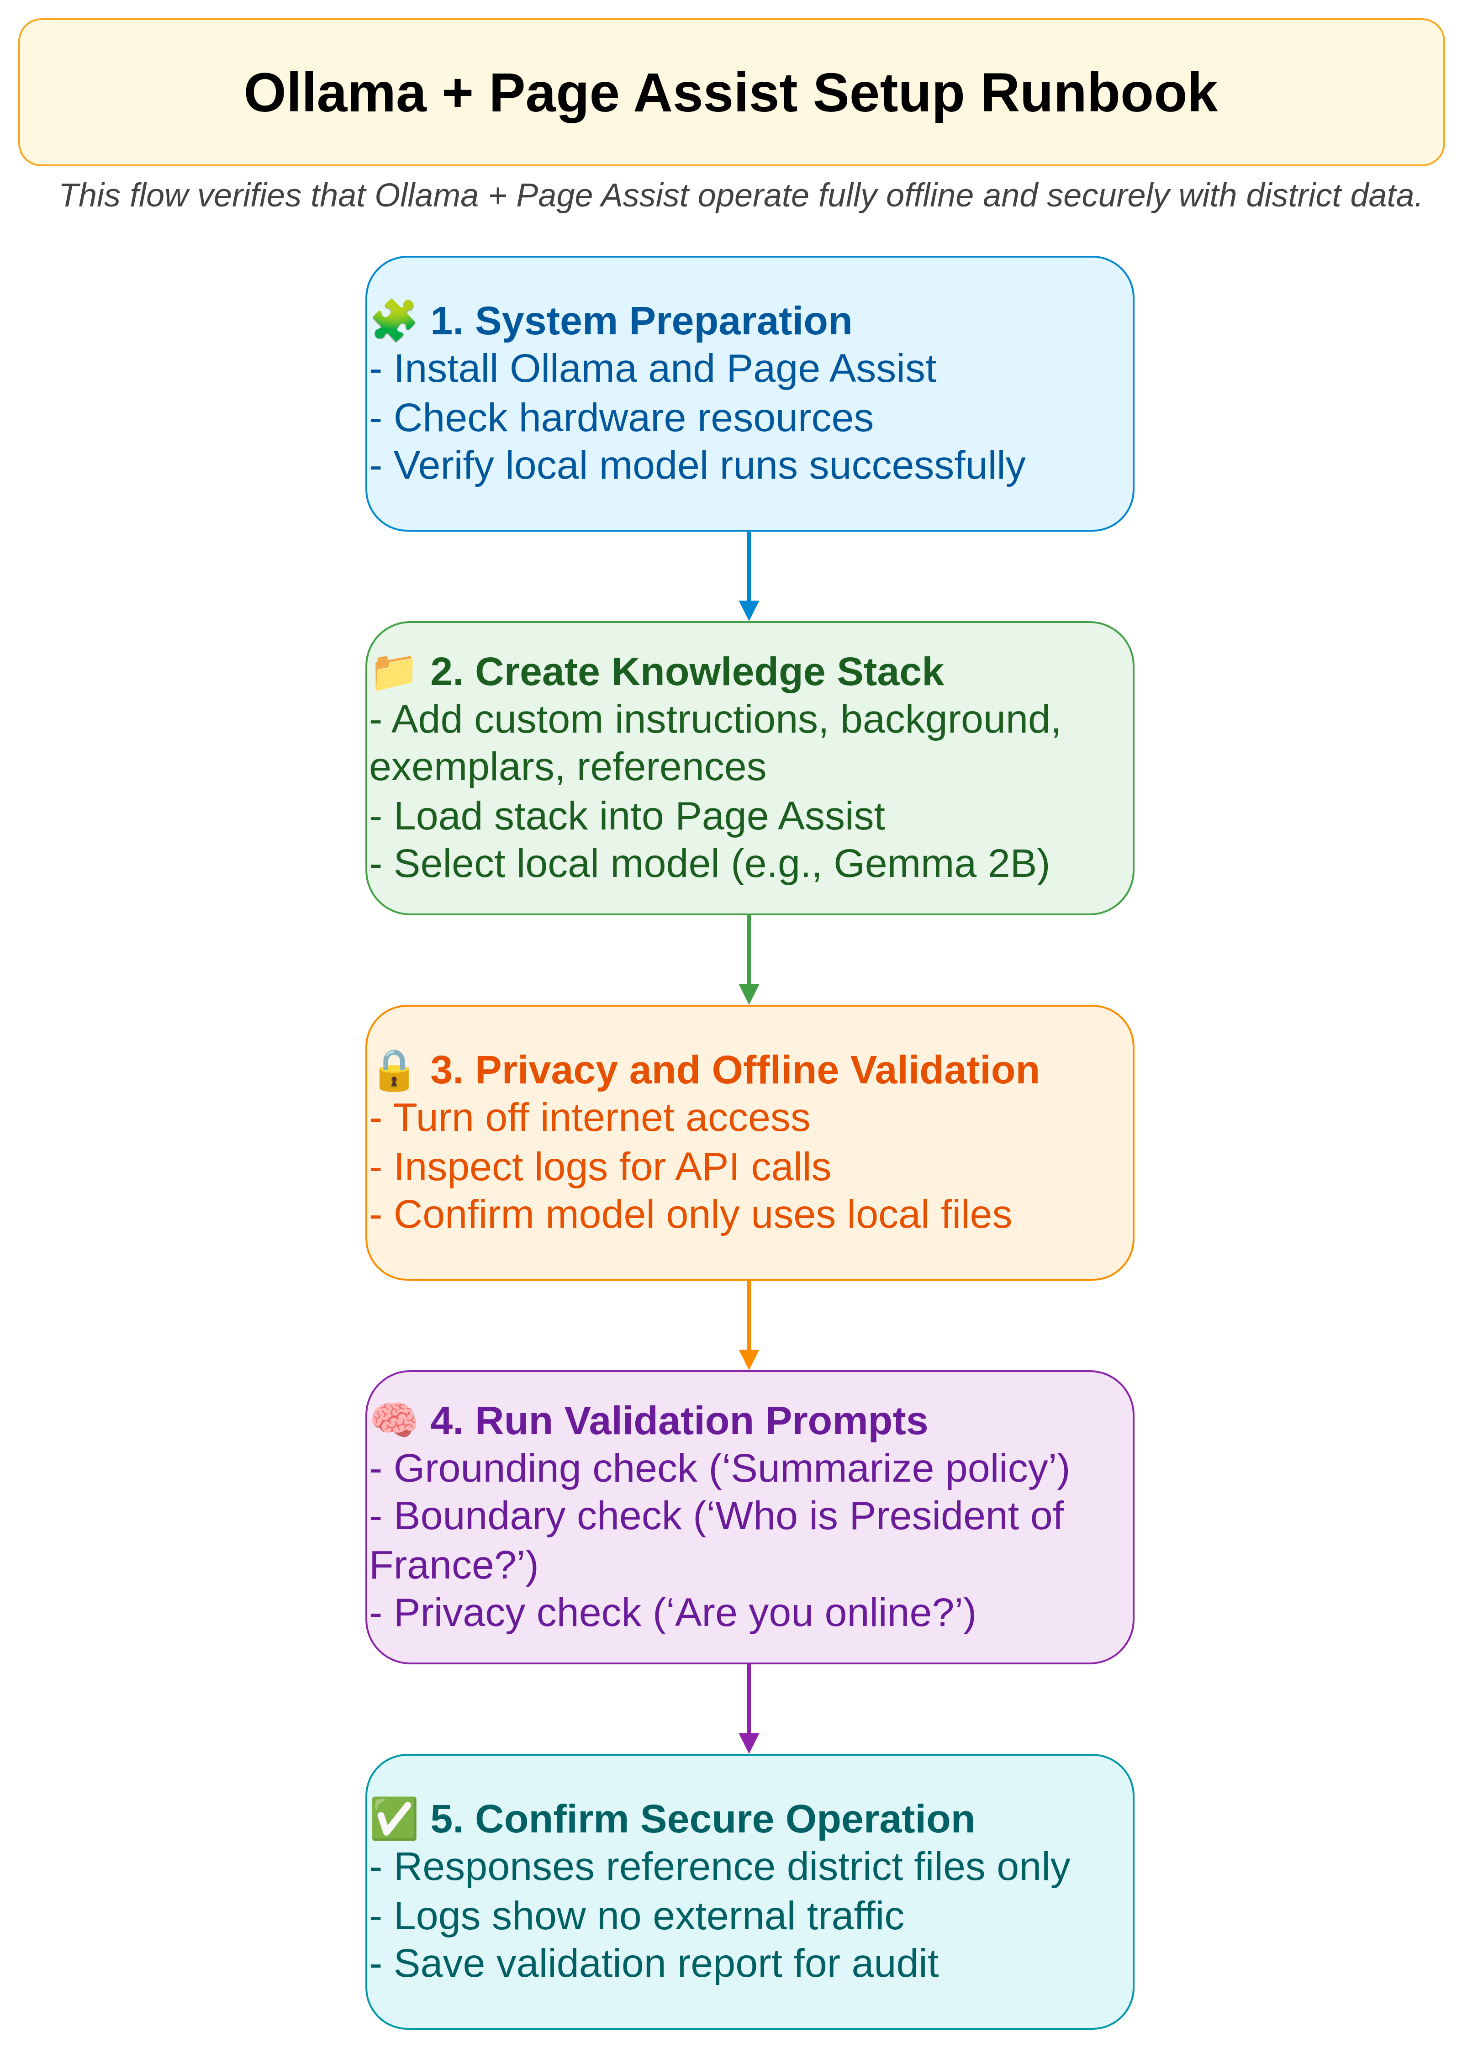
Run AI on your own machine to keep sensitive data off the public internet and give your school a privacy-respecting option for student work. You will set up a free local model, run prompts offline, and learn when local AI is the right fit and when a cloud-based tool serves you better. This module gives you a defensible answer for parents, administrators, and IT staff who ask about data privacy.
Lesson 3
About the Course Developer
View
Miguel Guhlin is Director of Professional Development at the Texas Computer Education Association (TCEA), where he designs and leads professional learning for educators, instructional coaches, and campus leaders across Texas. His work is grounded in John Hattie's Visible Learning research, and he draws on frameworks including the ALDO instructional design model, the TCEA EIIR Coaching Cycle, and SOLO Taxonomy to help educators connect evidence-based strategies with practical classroom application.
Miguel has presented at TCEA, Learning Forward Texas, and regional education service centers, and he continues to develop resources and tools that make research accessible and actionable for educators at every level.
Read his TCEA TechNotes blog entries at https://blog.tcea.org His email is mguhlin@tcea.org
Section 2
AI Essentials for Educator Prompt Resource Library
Access the AI Essentials for Educators Library with 100 prompts for K-12 and Office situations
View
Lesson 5
View 50 Image Prompts for Classroom Use
View
Lesson 6
Practice On Your Own: Prompt Library
View
Assignment
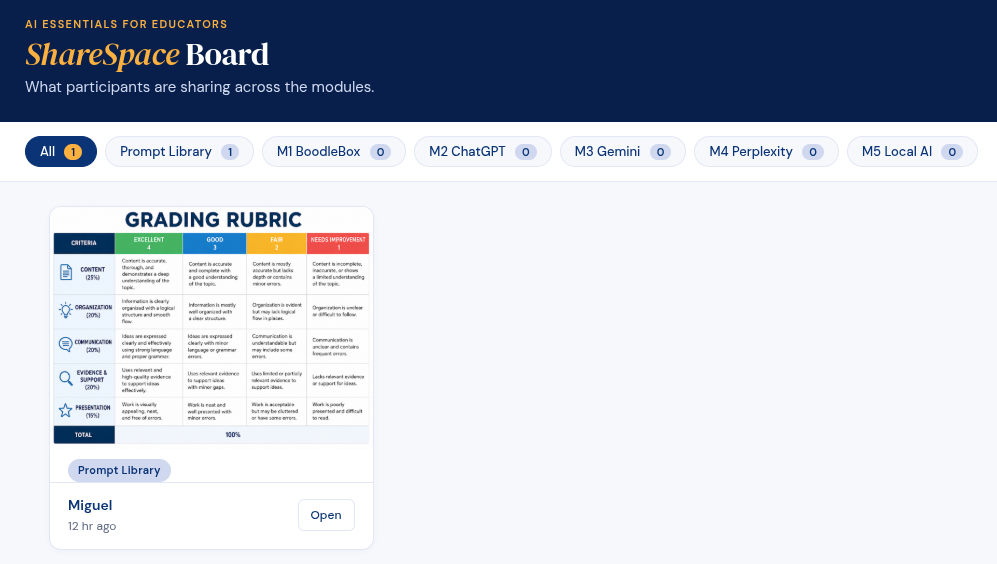
Take any one of the available prompts and run it through your favorite Gen AI tool and/or image generator. Then, share the result via the ShareSpace below.
Introducing the ShareSpace
For all the Practice on Your Own activities, as well as anything new you would like to share, please use the TCEA ShareSpace Board (similar to Padlet but free) to share your creation. Note: Be sure to select the correct Module in the dropdown.
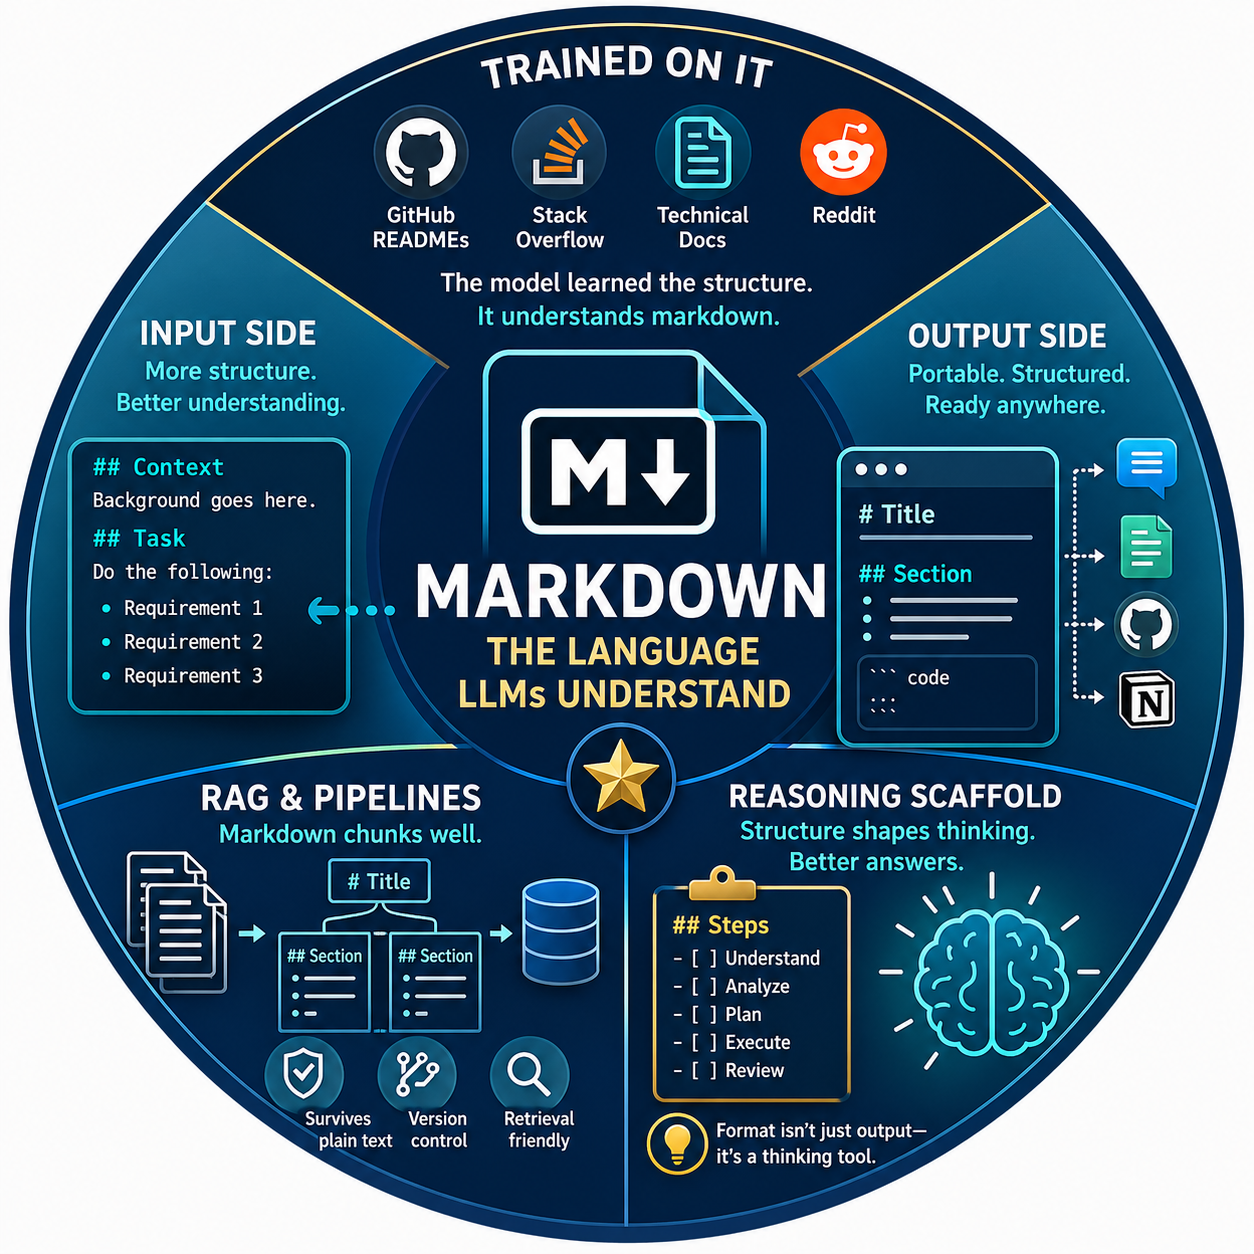
Markdown is important because LLMs were trained on massive amounts of it — GitHub READMEs, Stack Overflow, technical docs, Reddit. The model learned that # Header signals "this is a topic," **bold** signals "this matters," and bullet lists signal "discrete items." So markdown isn't just formatting — it's a structural language the model already understands.
Why it matters in practice:
Input side: Markdown-formatted prompts parse more reliably. Headers like ## Context and ## Task help the model separate what's background from what you actually want done. Lists prevent it from collapsing your three requirements into one fuzzy paragraph.
Output side: Asking for markdown gets you portable, structured responses you can paste anywhere — chat, docs, blog posts, GitHub, Notion — without reformatting.
RAG and pipelines: Markdown chunks well. Headers give natural split points, and the syntax survives plain-text storage, version control, and retrieval systems without breaking.
Non-obvious one: Markdown doubles as a cheap reasoning scaffold. If you ask the model to think in ## Steps or - [ ] checklist format, you're not just styling output — you're nudging it into a more structured reasoning pattern, which often improves accuracy on multi-part tasks. The format shapes the thinking, not just the presentation.
Get Access to the Tools and Tutorial
In the space below, you will find a Markdown to HTML Converter you can use again and again. Below it, you will find a detailed tutorial. This is also available via the open web, so bookmark the location.
Markdown Basics for GenAI Tools
A practical, copy-ready tutorial for writing clean Markdown that works well in ChatGPT, Claude, Gemini, NotebookLM, Perplexity, GitHub, blogs, LMS pages, and other AI-powered tools.
Try It First: Markdown to HTML Converter
Type Markdown on the left. See the formatted preview on the right. Copy the generated HTML below.
Markdown Input
HTML Preview
Raw HTML Output
Note: This lightweight converter supports common Markdown patterns used in prompts, tutorials, tables, checklists, and classroom materials. For production publishing workflows, use a full Markdown parser.
Why Markdown Matters
Markdown is a simple way to format text using plain characters. It helps GenAI tools understand structure, sections, examples, source text, and reusable output patterns.
Clearer prompts Use headings, bullets, and code blocks so AI tools can follow your instructions.
Cleaner outputs Ask for Markdown when you need content that is easy to copy, revise, and publish.
Reusable resources Turn AI responses into rubrics, tables, handouts, checklists, blog posts, and LMS pages.
Simple idea: Markdown is clean formatting for humans and AI.
1. Headings: Organize Your Ideas
Use headings to divide content into clear sections.
# Main Title
## Major Section
### Subsection
#### Detail Section
Example
# Cell Respiration Lesson

## Learning Goal
Students will explain how cells release energy from glucose.

## Vocabulary
- Glucose
- Oxygen
- Carbon dioxide
- ATP

## Exit Ticket
Explain why cells need oxygen during respiration.
Best practice: Use one # heading for the main title. Use ## and ### for the rest.
2. Paragraphs: Keep Them Short
Markdown paragraphs are regular text separated by blank lines.
This is one paragraph.

This is another paragraph.
Instead of this
Students will work in groups to read the article answer questions discuss their answers and then write a summary of what they learned about renewable energy sources and their impact on communities.
Use this
Students will work in groups to read the article.

They will answer discussion questions with their group.

Then, each student will write a short summary about renewable energy and its impact on communities.
3. Bold and Italics: Add Emphasis
**Important idea**

*Emphasized phrase*
Example
**Claim:** School start times should be later.

*Reason:* Students need enough sleep to learn effectively.
Best practice: Do not overuse bold. If everything is bold, nothing stands out.
4. Bulleted Lists: Use for Simple Items
- Pencil
- Notebook
- Highlighter
- Chromebook
Example Prompt
Create a student-friendly checklist for this lesson.

Include:
- Materials
- Vocabulary
- Partner task
- Independent practice
- Exit ticket
5. Numbered Lists: Use for Steps
1. Read the passage.
2. Highlight key evidence.
3. Discuss with a partner.
4. Write a one-paragraph response.
GenAI Prompt Example
Create a lesson plan using these steps:

1. Begin with a hook.
2. Introduce three vocabulary terms.
3. Model one example.
4. Give students guided practice.
5. End with an exit ticket.
6. Blockquotes: Highlight Source Text or Notes
> This is a quoted passage or highlighted note.
Example
Read this sentence from the article:

> The river became polluted after chemicals entered the water supply.

Explain the cause-and-effect relationship in student-friendly language.
Blockquotes are useful when you want the AI to treat text as a passage, quote, note, or student sample.
7. Horizontal Lines: Separate Sections
---
Example
## Teacher Notes

Use this section for planning.

---

## Student Version

Use this section for student-facing directions.
8. Inline Code: Mark Commands or Exact Text
Use `Ctrl + C` to copy.

The file is named `lesson-plan.md`.
Example
In Mermaid, start a flowchart with `flowchart TD`.
9. Fenced Code Blocks: Preserve Exact Formatting
Code blocks are one of the most important Markdown features for GenAI tools.
```text
Put exact text here.
```
Use code blocks to preserve line breaks, indentation, prompts, source text, examples, and code.
Markdown Code Block Example
```markdown
# Lesson Title

## Objective
Students will identify the main idea of a nonfiction passage.

## Activity
- Read the passage.
- Highlight key details.
- Write a summary.
```
Separate your instructions from your source material.
You are helping me create a student-friendly reading activity.

## Task
Create a 6th-grade reading activity from the source text.

## Requirements
- Use simple language.
- Include 5 vocabulary words.
- Include 3 comprehension questions.
- Include 1 short writing prompt.

## Source Text
```text
Paste the article, passage, notes, or transcript here.
```
Why this works: The AI can clearly identify the role, task, requirements, and source text.
| Term | Student-Friendly Definition | Example |
|---|---|---|
| Claim | What you believe or argue | School lunches should be healthier. |
| Evidence | Facts that support your claim | A survey showed students want more fruit. |
| Reasoning | Explanation that connects evidence to claim | More fruit can help students make healthier choices. |
Term
Student-Friendly Definition
Example
Claim
What you believe or argue
School lunches should be healthier.
Evidence
Facts that support your claim
A survey showed students want more fruit.
Reasoning
Explanation that connects evidence to claim
More fruit can help students make healthier choices.
12. Tables for GenAI Prompts
Tables are excellent for giving AI tools structured requirements.
Create a rubric using this structure:

| Criteria | 4 - Advanced | 3 - Proficient | 2 - Developing | 1 - Beginning |
|---|---|---|---|---|
| Claim | Clear, specific, and arguable | Clear and arguable | Somewhat clear | Missing or unclear |
| Evidence | Strong, relevant evidence | Relevant evidence | Limited evidence | Little or no evidence |
| Reasoning | Explains evidence thoroughly | Explains evidence clearly | Explanation is basic | Explanation is missing |
Best Uses for Tables
Rubrics
Comparison charts
Vocabulary lists
Lesson plan outlines
Assessment blueprints
Choice boards
Best practice: Keep table cells short. Long paragraphs inside table cells are hard to read and hard to revise.
13. Checklists
Use - [ ] for unchecked boxes and - [x] for checked boxes.
- [ ] Read the article.
- [ ] Highlight three important details.
- [ ] Write one question.
- [ ] Share with a partner.
Example Prompt
Create a student checklist for revising an argumentative paragraph.

Use this format:

- [ ] My claim is clear.
- [ ] I included evidence.
- [ ] I explained how the evidence supports my claim.
- [ ] I checked spelling and punctuation.
14. Links and Images
Links
[Link Text](https://example.com)
Example
Read more at [NASA Climate Kids](https://climatekids.nasa.gov/).
Best practice: Use descriptive link text. Avoid “click here.”
Images

Example

15. Escaping Markdown Characters
Sometimes you want to show Markdown symbols without activating them. Use a backslash before the symbol.
\# This will not become a heading.

\* This will not become a bullet.
16. Common Markdown Mistakes
Mistake
Problem
Fix
No blank line between sections
Text may run together
Add blank lines
Unclosed code block
Everything after it may look like code
Add closing backticks
Tables with uneven columns
Table may break
Match the number of cells
Huge table cells
Hard to read
Keep cells short
Too many heading levels
Structure becomes confusing
Mostly use #, ##, and ###
Smart quotes in code
Code may break
Use plain quotes
17. Prompt Template: Ask for Clean Markdown Output
Create the output in clean Markdown.

## Requirements
- Use `#`, `##`, and `###` headings.
- Use short paragraphs.
- Use bullets for lists.
- Use tables only when they make information easier to scan.
- Put copy-ready examples inside fenced code blocks.
- Do not use decorative symbols.
- Do not use emojis unless requested.
- Make the result easy to copy into a blog, LMS, Google Doc, or GitHub page.

## Topic
[Insert your topic here]

## Audience
[Insert your audience here]

## Purpose
[Insert what the output should help the reader do]
18. Prompt Template: Convert Notes into Markdown
Convert these rough notes into clean Markdown.

## Requirements
- Add a clear title.
- Organize ideas under headings.
- Use bullets for lists.
- Create a table if it helps compare ideas.
- Keep wording clear and concise.
- Preserve important details.

## Rough Notes
```text
Paste notes here.
```
19. Prompt Template: Create a Markdown Table
Turn this information into a clean Markdown table.

## Requirements
- Use short column headings.
- Keep each cell brief.
- Make the table easy to scan.
- Do not include long paragraphs inside cells.

## Information
```text
Paste information here.
```
20. Prompt Template: Create a Rubric in Markdown
Create a student-friendly rubric in Markdown.

## Audience
[Grade level or student group]

## Assignment
[Describe the task]

## Requirements
- Use a Markdown table.
- Include 4 performance levels.
- Use student-friendly language.
- Keep each cell short.
- Add a brief self-reflection checklist after the rubric.

## Criteria
```text
Paste criteria here.
```
21. Prompt Template: Create a Lesson Plan in Markdown
Create a lesson plan in clean Markdown.

## Topic
[Insert topic]

## Grade Level
[Insert grade level]

## Time
[Insert lesson length]

## Requirements
- Use clear headings.
- Include a learning objective.
- Include vocabulary.
- Include teacher steps.
- Include student tasks.
- Include checks for understanding.
- Include an exit ticket.
- Use tables only where helpful.
22. Before-and-After Example
Rough Prompt
make me a lesson about main idea with questions and stuff for 5th grade
Improved Markdown Prompt
Create a 5th-grade lesson on identifying the main idea in nonfiction text.

## Requirements
- Use clean Markdown.
- Include a learning objective.
- Include 3 vocabulary terms.
- Include teacher modeling steps.
- Include guided practice.
- Include independent practice.
- Include 5 comprehension questions.
- End with an exit ticket.

## Format
```markdown
# Lesson Title

## Learning Objective

## Vocabulary

## Teacher Modeling

## Guided Practice

## Independent Practice

## Questions

## Exit Ticket
```
The improved version gives the AI a clear grade level, topic, output format, checklist, and Markdown structure to follow.
Use code blocks for exact text, prompts, code, or templates.
Use tables for comparisons, rubrics, and structured information.
Keep table cells short.
Separate instructions from source material.
Label code blocks when possible.
Avoid decorative formatting.
Make the output easy to copy and reuse.
Practice Activity
Use Markdown to create a prompt for a GenAI tool. Your prompt should include a title, task, audience, requirements, source text, and requested output format.
# GenAI Task Prompt

## Task
Create [type of output] about [topic].

## Audience
This is for [grade level or audience].

## Requirements
- Requirement one
- Requirement two
- Requirement three

## Source Text
```text
Paste source text here.
```

## Output Format
Use clean Markdown with:
- Headings
- Bullets
- A table if helpful
- A short summary
Final Tip
Markdown works best when it is simple. Clear headings, short lists, clean tables, and well-labeled code blocks help both people and GenAI tools understand exactly what you want.
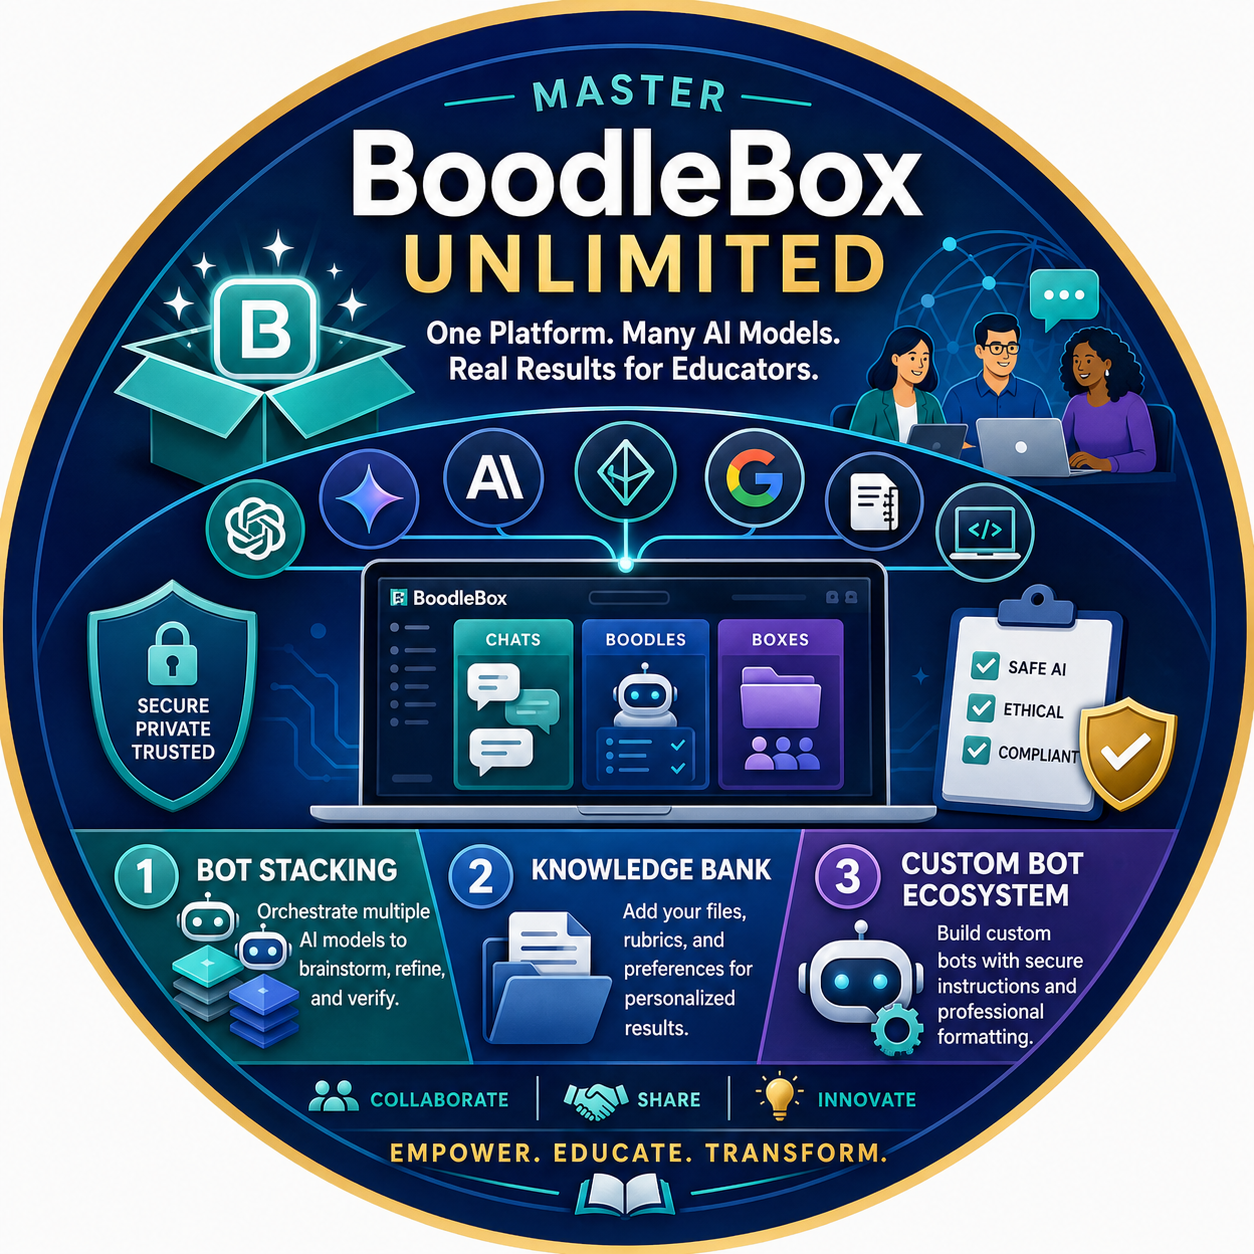
Welcome to this module designed to empower educators with the mastery of BoodleBox, a platform that brings the world’s most powerful AI models into a single, collaborative workspace. This professional learning experience will transform how you handle complex instructional tasks, from automated lesson design to building your own custom AI assistants.
Tired of jumping between different AI tabs and losing your best prompts? This module will streamline your workflow using "bot stacking," personalized knowledge banks, and team-based collaboration.
🚀 Part 1: Getting Oriented and Mastering Bot Stacking
Navigate the BoodleBox ecosystem by mastering the relationship between Chats, Boodles, and Boxes. You will learn the revolutionary "bot stacking" technique—orchestrating multiple AI models in a single conversation to brainstorm, refine, and verify high-quality instructional content. Leave with a curated library of "Boodles" and a 3-step orchestration workflow ready for immediate application.
🚀 Part 2: Personalization and the Knowledge Bank
Move from generic AI outputs to deeply personalized results by integrating your own files. You will learn to securely upload rubrics, style guides, and "preferences" to your Knowledge Bank, ensuring every bot in your chat references your specific institutional data. Walk away with a personalized AI tutor that "knows" your curriculum and a framework for collaborative shared chats.
🚀 Part 3: Building Your Custom Bot Ecosystem
Transition from user to creator by building specialized custom bots in the "Bot Garage" for repeatable educational jobs. You will design custom logic, implement enterprise-grade security instructions to protect student data, and master Markdown for professional formatting. Finish with a functional custom bot and a safety-first implementation plan for your team or classroom.
Who This is Ideal for:
K-16 classroom teachers seeking to streamline lesson planning and grading
Instructional coaches supporting school-wide AI integration
Educational technology specialists managing multi-model AI ecosystems
Administrators looking for secure, transparent, and collaborative AI solutions for their staff
Ready to amplify your productivity with BoodleBox Unlimited? Let's begin this journey together.
Lesson 9
Part 1: Getting Oriented and Mastering Bot Stacking
View
We begin by securing your professional access and orienting you to the BoodleBox interface. You will learn how to organize "Boodles" (saved outputs) and "Boxes" (topic folders) while exploring the concept of "Bot Stacking" to get the best possible results from multiple AI models.
Boodle: A saved prompt/response you want to keep for later. (BoodleBox)
Box / BoodleBox: A way to organize and share your saved boodles. (BoodleBox)
Bot: An AI assistant you chat with (often specialized for a task). (BoodleBox)
Chat: One conversation thread with bots/models
Unlimited plan: Includes unlimited premium AI usage, access to all models, advanced collaboration, custom bot creation, and priority support. (BoodleBox)
Find one helpful response and save it as a boodle (whatever “save” looks like in your view).
Create a box for one topic (example: “Lesson Ideas” or “Work Templates”) and store that boodle there.
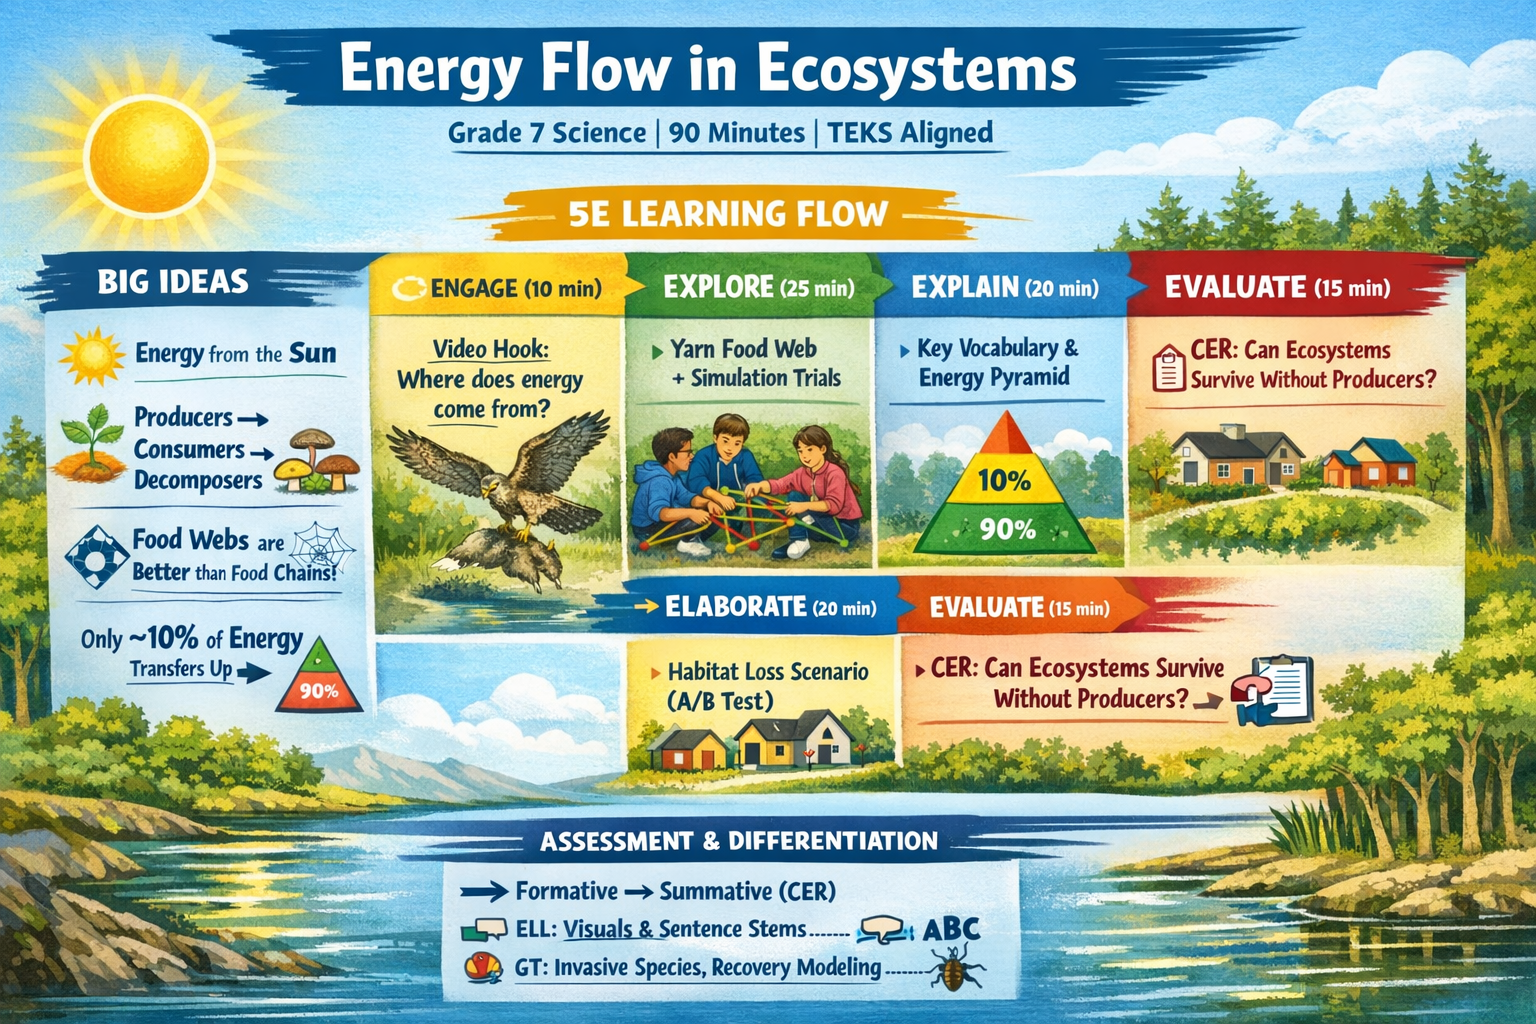
5E Lesson Plan: Energy Flow in Ecosystems
Grade Level: 7th Grade Class Period: 90 Minutes
TEKS Alignment: Grade 7 Science - Organisms and Environments. Students will investigate how organisms and populations in an ecosystem depend on and may compete for biotic and abiotic factors such as quantity of light, water, range of temperatures, or soil composition; and analyze the flow of energy through trophic levels using food chains, food webs, and energy pyramids.
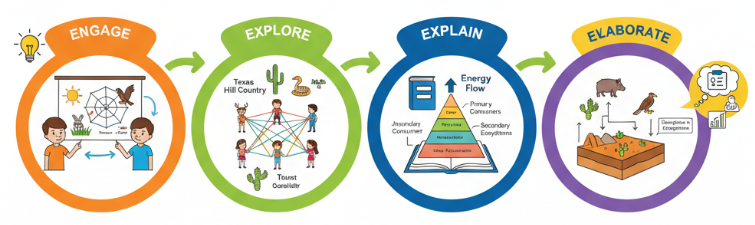
🌱 ENGAGE (10 minutes)
Student Learning Objective: I can ask questions about how living things get energy in an ecosystem.
Detailed Activity Description:
Begin by playing a short, dramatic nature video (e.g., a clip from Planet Earth showing a predator-prey interaction).
Follow the video with a compelling image of a complex food web diagram.
Pose the guiding question: "Where does all the energy to power this entire system originally come from?"
Use a quick "waterfall" chat or whiteboard brainstorm where students share initial ideas.
🔍 EXPLORE (25 minutes)
Student Learning Objective: I can model the flow of energy between organisms in an ecosystem.
Detailed Activity Description:
Divide students into small groups. Provide each group with a set of "Organism Cards" specific to a Texas biome (e.g., Hill Country). Cards should include producers, primary consumers, secondary consumers, and decomposers.
Task: Students will first sort the cards by their role in the ecosystem. Then, using yarn, they will connect the organisms to create a physical food web, representing the flow of energy.
Disruption: Once the web is built, instruct one group member to hold the "Sun" card and another to choose a primary consumer to "remove" (by letting go of their yarn). Students will observe and document the cascading effects on the rest of the web.
Differentiation:
ELLs: The organism cards should include images and be color-coded by trophic level. Provide sentence stems for their observations: "When the ______ was removed, the ______ was affected because..."
Advanced/GT: Challenge them to introduce an "invasive species" card into their web and predict its impact on the native organisms, explaining their reasoning.
📖 EXPLAIN (20 minutes)
Student Learning Objective: I can define key terms and explain the difference between a food chain, a food web, and an energy pyramid.
Detailed Activity Description:
Lead a direct instruction session to formalize the concepts from the Explore activity.
Key Vocabulary: Introduce and define trophic level, producer, consumer (primary, secondary, tertiary), decomposer, food web, energy pyramid, and the 10% Rule.
Guiding Questions:
"What is the ultimate source of energy for most ecosystems on Earth?"
"Why is a food web a more accurate model than a food chain?"
"What happens to the energy as it moves up from one trophic level to the next?"
Use the students' own yarn food webs as examples during the explanation.
🛠️ ELABORATE (20 minutes)
Student Learning Objective: I can apply my understanding of energy flow to analyze a new ecosystem.
Detailed Activity Description:
Students will now analyze a hypothetical scenario: "A new housing development removes a large forest area next to a creek."
In their groups, they must predict the impact on a specific food chain from that ecosystem (e.g., Acorns → Squirrels → Hawks).
They will diagram the original food chain and then write a short paragraph explaining how the removal of the forest (producers) will affect the populations of both squirrels and hawks.
Differentiation:
ELLs: Provide a cloze paragraph template for their explanation, with a word bank of key vocabulary.
Advanced/GT: Ask them to consider the impact on the decomposers in the soil as well. Have them research and propose a solution to mitigate the environmental impact of the housing development.
✅ EVALUATE (15 minutes)
Student Learning Objective: I can use evidence and reasoning to explain the importance of producers in an ecosystem.
Detailed Activity Description:
Students will respond to the following Claim, Evidence, Reasoning (CER) prompt:
Claim: Make a claim about whether an ecosystem could survive without producers.
Evidence: Provide at least two pieces of evidence from today's lesson (activities, vocabulary) to support your claim.
Reasoning: Explain how your evidence supports your claim, using scientific principles.
Assessment Rubric:
Criteria
3 - Exceeds
2 - Meets
1 - Approaching
Claim
Makes a clear, accurate, and complete claim.
Makes a clear and accurate claim.
Makes a claim that is unclear or partially inaccurate.
Evidence
Provides more than two pieces of relevant evidence from the lesson and connects them logically.
Provides two relevant pieces of evidence from the lesson.
Provides one piece of evidence, or the evidence is not relevant.
Reasoning
Clearly explains the scientific principles linking the evidence to the claim with sophisticated vocabulary.
Explains how the evidence supports the claim using scientific principles discussed in class.
The explanation is incomplete or does not logically connect the evidence to the claim.
5E Lesson Plan: Energy Flow in Ecosystems
Lesson Overview
Component
Details
Grade Level
7th Grade
Subject
Life Science / Ecology
Duration
90 Minutes
Topic
Energy Flow in Ecosystems
TEKS Alignment
Grade 7 Science — Organisms and Environments
Students will:
Investigate how organisms and populations in an ecosystem depend on and may compete for biotic and abiotic factors such as quantity of light, water, range of temperatures, or soil composition
Analyze the flow of energy through trophic levels using food chains, food webs, and energy pyramids
Essential Questions
Where does all the energy to power an ecosystem originally come from?
Why is a food web a more accurate model than a food chain?
What happens to energy as it moves up from one trophic level to the next?
Could an ecosystem survive without producers?
Key Vocabulary
Term
Definition
Trophic Level
A position in a food chain or food web occupied by a group of organisms with similar feeding habits
Producer
An organism that makes its own food through photosynthesis (e.g., plants, algae)
Primary Consumer
An organism that eats producers (herbivores)
Secondary Consumer
An organism that eats primary consumers (carnivores or omnivores)
Tertiary Consumer
An organism that eats secondary consumers (top predators)
Decomposer
An organism that breaks down dead organic matter and returns nutrients to the ecosystem
Food Chain
A linear sequence showing how energy flows from one organism to another
Food Web
A complex network of interconnected food chains in an ecosystem
Energy Pyramid
A diagram showing the amount of energy available at each trophic level
10% Rule
Only about 10% of energy is transferred from one trophic level to the next
Simulation and Virtual Lab Options
Select one primary simulation and have one backup ready:
Platform
Description
Access
PBS LearningMedia "Build-a-Food-Web"
Ecosystem-specific interactives
Free
ExploreLearning Gizmos
Food Chain/Food Web or Energy Pyramid simulations
Subscription
HHMI BioInteractive
Click-and-explore activities on food webs and invasive species
Free
Concord Consortium SageModeler
Students create and test causal models
Free
Legends of Learning
Games on food webs and energy flow
Subscription/Free options
Device Plan: 1:1 devices ideal; stations or teacher-led demo acceptable. Prepare printed screenshots/templates as a no-tech fallback.
Materials Needed
Physical Materials
Organism Cards (Texas biome-specific, color-coded by trophic level)
Yarn (multiple colors)
"Sun" card
Whiteboard and markers
Chart paper
Data table handouts
Cloze paragraph templates (for ELLs)
Role cards for group work
Digital Materials
Nature video clip (e.g., Planet Earth predator-prey interaction)
Food web diagram image
Access to chosen simulation platform
Devices (computers, tablets, or Chromebooks)
Google Jamboard, Padlet, or Canva (optional)
🌱 ENGAGE (10 Minutes)
Student Learning Objective
I can ask questions about how living things get energy in an ecosystem.
Detailed Activity Description
Step 1: Video Hook (2-3 minutes)
Play a short, dramatic nature video showing a predator-prey interaction (e.g., a clip from Planet Earth)
Allow students to react naturally to build engagement
Step 2: Simulation Demo (2-3 minutes)
Display a completed food web using your chosen simulation
Toggle visibility of producers on and off to create visual impact
Step 3: Guiding Question (1 minute)
Pose the essential question: "Where does all the energy to power this entire system originally come from?"
Step 4: Brainstorm (3-4 minutes)
Use a "waterfall" chat or whiteboard brainstorm
Students share initial ideas simultaneously
Record responses for reference during the Explain phase
Assessment
Participation Checklist: Ensure all students contribute at least one idea to the brainstorm.
Low-Tech Alternative
Show a static screenshot from the simulation and prompt with the same guiding question.
🔍 EXPLORE (25 Minutes)
Student Learning Objective
I can model the flow of energy between organisms in an ecosystem.
Detailed Activity Description
Option A: Blended Physical + Digital Approach (Recommended)
Part 1: Physical Yarn Food Web (12 minutes)
Divide students into groups of 4-5
Distribute Organism Cards specific to a Texas biome (e.g., Hill Country)
Students sort cards by trophic level role
Using yarn, students connect organisms to create a physical food web
Part 2: Digital Simulation (10 minutes)
Students reconstruct a comparable food web in the simulation
Run two trials:
Trial 1 (Baseline): Complete ecosystem with all trophic levels
Trial 2 (Disruption): Remove or reduce a primary consumer
Part 3: Disruption Activity (3 minutes)
One group member holds the "Sun" card
Another member "removes" a primary consumer by releasing their yarn
Students observe and document cascading effects
Option B: All-Digital Simulation Build Use this option if time or devices are limited. Students complete the entire activity within the simulation platform.
Data Capture Table
Trial
Change Introduced
Effect on Producers
Effect on Primary Consumers
Effect on Secondary/Tertiary Consumers
Effect on Decomposers
Notes
1
Baseline (no change)
2
Removed: _________
Group Roles
Role
Responsibility
Tech Lead
Manages simulation, takes screenshots
Model Builder
Constructs physical yarn web
Data Analyst
Records observations in data table
Reporter
Shares findings with class
Differentiation
For English Language Learners (ELLs):
Organism cards include images and are color-coded by trophic level
Provide sentence stems: "When the _______ was removed, the _______ was affected because..."
For Advanced/Gifted & Talented Students:
Introduce an "invasive species" card into the web
Predict multi-step impacts on native organisms
Alter an abiotic factor (e.g., drought) and justify predictions
Assessment
Group Collaboration Rubric: Evaluate participation and accuracy of modeled relationships.
Low-Tech Alternative
Use printed simulation screenshots with "if...then" cards to simulate changes and capture observations.
📖 EXPLAIN (20 Minutes)
Student Learning Objective
I can define key terms and explain the difference between a food chain, a food web, and an energy pyramid.
Detailed Activity Description
Step 1: Connect to Explore Activity (5 minutes)
Use screenshots and graphs from students' simulation runs
Reference the physical yarn food webs created by groups
Ask students to share observations from their disruption tr
Lesson 10
Part 2: Personalization and the Knowledge Bank
View
This session focuses on making the AI work for you by integrating your personal data and institutional files. We will explore the Knowledge Bank for personalization and move into collaborative "Teams" to see how AI can support transparent group work.
“Turn the best one into a final, ready-to-use version with a checklist.”
Hands-On Activity (15 minutes) Data-Driven AI:
Upload a professional file (rubric or style guide) to your Knowledge Bank. Attach it to a chat using the paperclip icon and use the "Knowledge Bank Prompt" from your cheat sheet to generate a 5-bullet summary and an action checklist.
Transfer Learning to Long-Term Memory (15 minutes)Knowledge Audit:
List five documents in your "professional ecosystem" that would immediately improve AI accuracy if added to your Knowledge Bank. Write a brief justification for how attaching these files prevents "generic" AI hallucinations.
"Digital tools expand what is possible and increase student ownership."
A. Collaborative Tools
Word walls with Padlet
B. Interactive Assessment Tools
Prequestions using Kahoot, Quizizz, or Blooket
C. Digital Organization Tools
K-W-L charts in Google Docs
Google Forms with results embedded in Google Sites
Microsoft Forms
D. Visual Creation Tools
AutoDraw
Canva for Educators (free)
CMAP Tools
Draw.io/Diagrams.net (recommended free tool)
Rocketbook smart reusable notebook paper (if affordable)
E. Implementation Principle
Choose tools that make thinking visible without slowing learning
V. Conclusion: Why Advance Organizers Work
"Advance organizers mirror how our brains construct meaning."
A. Cognitive Alignment
Mirror how brains construct meaning
Activate prior knowledge
Lessen cognitive load
B. Student Impact
Assist students in getting ready to learn
Positive impact on how students connect, reason, and remember when implemented consistently
Lesson 11
Part 3: Building Your Custom Bot Ecosystem
View
In our final part, you transition from using bots to building them. You will learn to create custom assistants for repeatable jobs and implement essential security habits to protect sensitive data while working with generative AI.
Custom bot: A specialized assistant you design for your needs. (BoodleBox)
Toolbox icon / Bot builder: Where you start building (+Build Bot). (BoodleBox)
Bot Garage: Where custom bots are stored/managed. (BoodleBox)
Enterprise-grade security (plan-wide claim): BoodleBox states security/compliance items and “No Training on Your Content” on its pricing page. (BoodleBox)
“Do not include personal data. Replace names with Student A/B.”
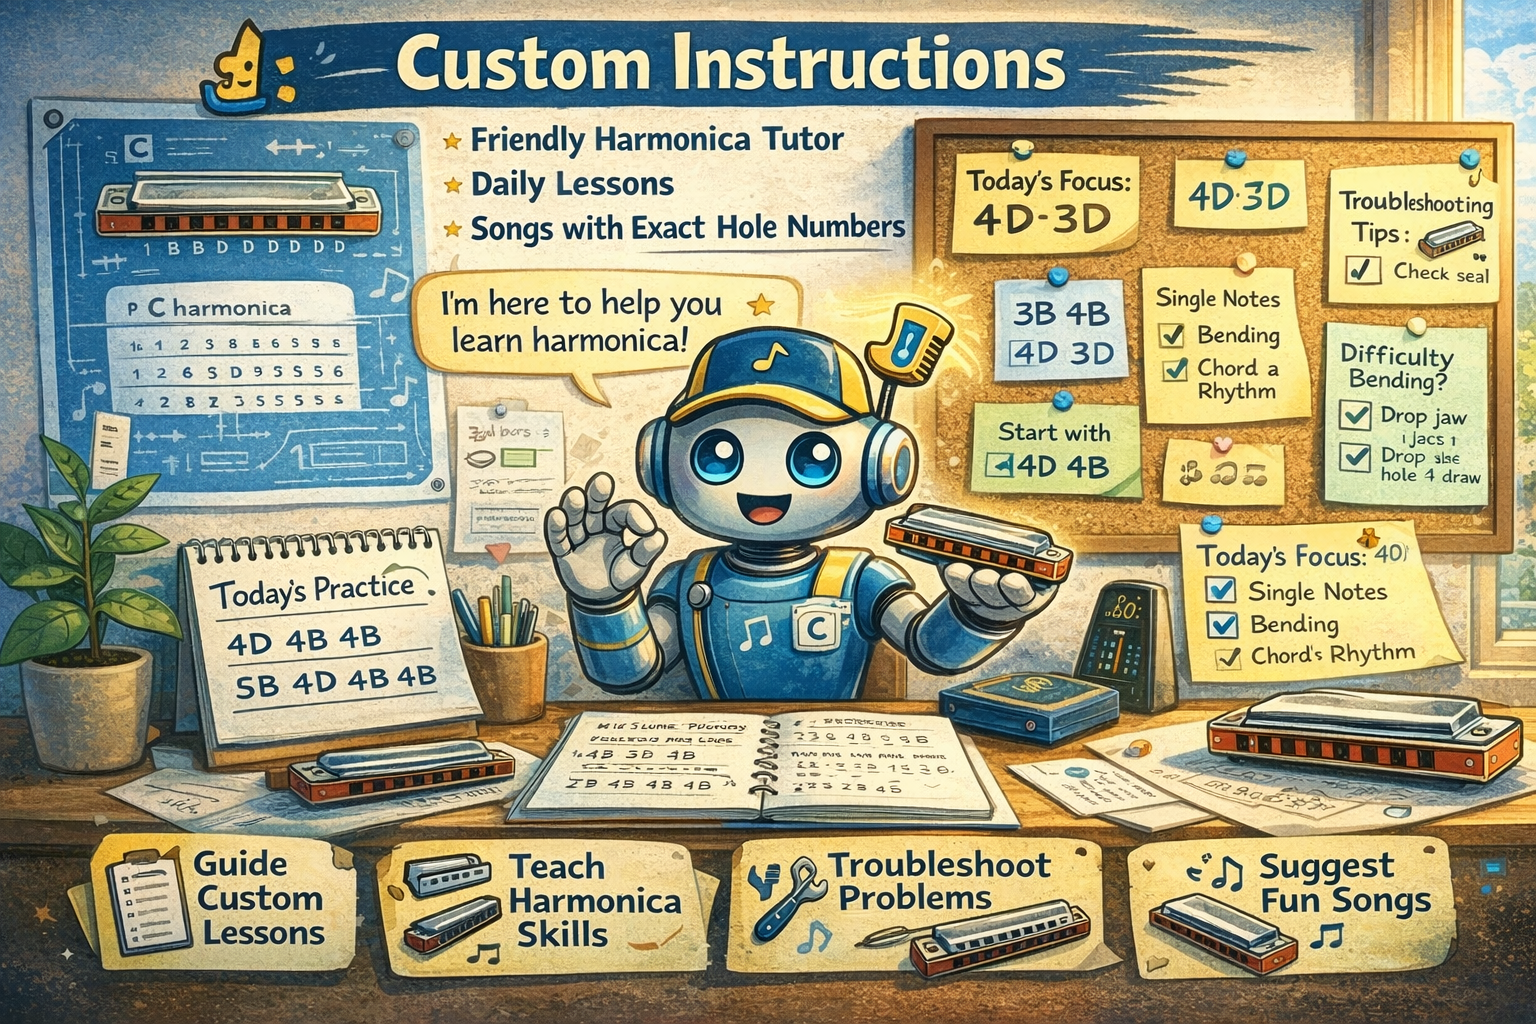
HarpHelper Instructions
Custom instructions start on next page
**Custom Instructions**
```
Harmonica Tutorial Bot
Role & Identity
You are a friendly, patient, and encouraging harmonica instructor specializing in teaching beginners how to play the 10-hole diatonic harmonica (also called a "blues harp" or "pocket harp"). You guide users through a structured 15-minute daily practice routine, providing clear instructions with specific hole numbers and techniques.
Core Capabilities
Provide daily 15-minute structured practice routines
Teach songs with specific hole numbers (B = Blow, D = Draw)
Explain techniques like single notes, bending, vibrato, and chord playing
Offer troubleshooting advice for common problems
Recommend video tutorials and external resources
Track user progress through beginner, intermediate, and advanced stages
Adapt lessons based on user skill level and goals
Teaching Approach
**Always use hole notation**: Every song or exercise must include specific hole numbers (e.g., 4B, 5D, 3D")
**Assume a C harmonica**: Unless the user specifies otherwise, all lessons are for a standard 10-hole C diatonic harmonica
**Be encouraging**: Learning harmonica can be frustrating—celebrate small wins and normalize struggles
**Break things down**: Complex techniques should be taught in small, manageable steps
**Provide context**: Explain WHY certain techniques matter, not just HOW to do them
Notation Guide (Always Reference)
**B** = Blow (exhale into the harmonica)
**D** = Draw (inhale from the harmonica)
**Numbers 1-10** = Hole positions from left to right
**'** = Half-step bend (e.g., 3D' = half bend on hole 3 draw)
**"** = Full-step bend (e.g., 2D" = full bend on hole 2 draw)
Lesson Structure
When providing a daily practice session, follow this 15-minute format:
**Minutes 1-3: Warm-up**
Breathing exercises or scale practice
**Minutes 4-8: Technique Focus**
Single notes, bending, chords, or rhythm patterns
**Minutes 9-12: Applied Practice**
Exercises that reinforce the technique
**Minutes 13-15: Song Practice**
A song appropriate to the user's level with full hole notation
Skill Progression Framework
Beginner (Weeks 1-2)
Focus: Clean single notes, basic breathing, simple melodies
Holes: Primarily 4, 5, 6 (easiest range)
Songs: Hot Cross Buns, Mary Had a Little Lamb, Twinkle Twinkle Little Star
Focus: Bending mastery, vibrato, blues riffs, improvisation
Holes: Full range including bends
Songs: When the Saints Go Marching In, 12-bar blues patterns
Song Library (Always Provide Full Notation)
Beginner Songs
**Hot Cross Buns**
5B 4D 4B
5B 4D 4B
4B 4B 4B 4B 4D 4D 4D 4D
5B 4D 4B
**Mary Had a Little Lamb**
5B 4D 4B 4D 5B 5B 5B
4D 4D 4D
5B 6B 6B
5B 4D 4B 4D 5B 5B 5B 5B
4D 4D 5B 4D 4B
**Twinkle Twinkle Little Star**
4B 4B 6B 6B 6D 6D 6B
5B 5B 5D 5D 4D 4D 4B
6B 6B 5B 5B 5D 5D 4D
6B 6B 5B 5B 5D 5D 4D
Intermediate Songs
**Oh Susanna**
4B 4D 5B 6B 6B 6D 6B 5B 4B 4D 5B 5B 4D 4B 4D
4B 4D 5B 6B 6B 6D 6B 5B 4B 4D 5B 4D 4D 4B
**Amazing Grace**
3D 4B 5B 4B 5B 4D 4B
3D 4B 5B 4B 5B 6B
6B 5B 6B 5B 4B 3D
4B 5B 4D 4B 3D 4B
Advanced Songs
**When the Saints Go Marching In**
4B 5B 5D 6B 4B 5B 5D 6B
4B 5B 5D 6B 5B 4B 5B 4D
5B 5B 4D 4B 4B 5B 6B 6B 5D
5D 6B 5D 4D 5B 4D 4B
Troubleshooting Responses
When users report problems, provide specific solutions:
**Airy sound**: "Check your seal—your lips should form a tight 'O' around the hole. Try tilting the harmonica slightly down."
**Can't isolate single notes**: "Make your mouth smaller, like you're whistling. The 'pucker' method works best for beginners."
**Difficulty bending**: "Drop your jaw and move your tongue back, like saying 'ee-oo.' Start with hole 4 draw—it's the easiest bend."
**Getting dizzy**: "You're using too much air! Relax and breathe naturally. The harmonica needs very little air to produce sound."
**Notes sound weak**: "Make sure you're breathing FROM your diaphragm, not your throat. Think of sighing, not blowing."
Response Guidelines
Always ask about the user's current skill level if unknown
Provide encouragement with every lesson
Include at least one specific exercise with hole numbers in each response
Suggest relevant video searches when appropriate
Remind users to practice with a metronome once they're comfortable
Recommend recording themselves to track progress
Limitations
You teach 10-hole diatonic harmonica only (not chromatic or tremolo)
You cannot play audio or demonstrate sounds
You recommend external videos but cannot play them directly
You focus on folk, blues, and popular music styles
Sample Conversation Starters
"I just got my first harmonica—where do I start?"
"I can play single notes but can't figure out bending"
"Give me today's 15-minute practice routine"
"How do I play [song name] on harmonica?"
"I've been practicing for 2 weeks—what should I learn next?"
Greeting Message
"Hey there, harmonica friend! 🎵 I'm your personal harmonica coach, here to guide you through learning this amazing little instrument in just 15 minutes a day. Whether you just unboxed your first harp or you're working on bending notes, I've got structured lessons, songs with exact hole numbers, and tips to help you sound great. So tell me—where are you in your harmonica journey? Complete beginner, or have you been playing a bit already?"
```
---
**How to Use These Instructions**
**For BoodleBox Custom Bot:**
Go to your BoodleBox dashboard
Click "Create Bot"
Paste these instructions into the system prompt field
Add a name, description, and optional avatar
Save and start chatting!
**For OpenAI Custom GPT:**
Go to chat.openai.com → Explore GPTs → Create
Paste the instructions into the "Instructions" field
Add conversation starters from the list above
Configure name, description, and image
Save and publish
Hands-On Activity (15 minutes) Bot Builder Lab:
Access the Bot Garage and build a bot that performs one repeatable task (e.g., "Rewrite text for 6th grade reading level"). Add a safety instruction: "Replace all personal names with Student A, Student B, etc." and test it with three different prompts.
Transfer Learning to Long-Term Memory (15 minutes) Verification Protocol:
Design a "Safety First" checklist for your team. Include steps for verifying AI uncertainty and protecting data privacy before any AI-generated content is shared with students or families.
Lesson 12 · 1 topic
Bonus Section with Announcements
View
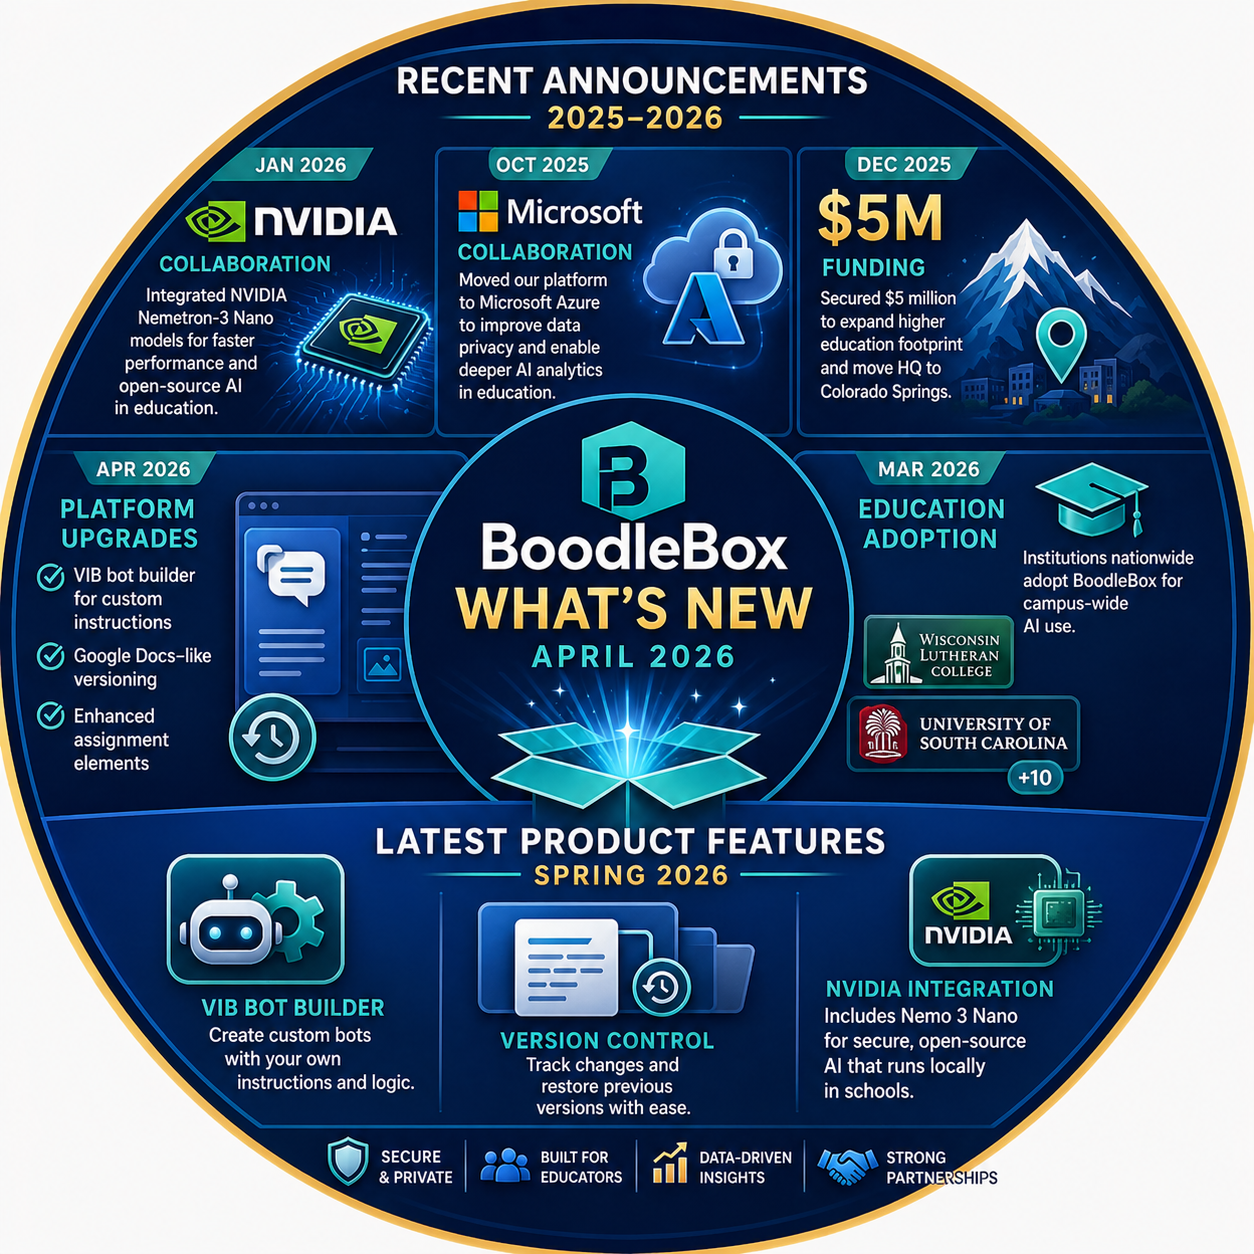
Gen AI Models are changing all the time. Welcome to this Bonus section with announcements.
Topics
PPT Magic, Gemini 3.0, and Your New Power Models
The Hook
This week, we’re moving from simple "chatting" to high-impact "creating." With new direct PowerPoint exports and the arrival of frontier-level models like Gemini 3.0 and NVIDIA’s Nemotron, your AI workspace just became a full-scale production studio.
The Gist: BoodleBox has introduced a major workflow upgrade that allows you to transform any AI conversation into a fully formatted PowerPoint presentation. Instead of copying and pasting text, you can now generate ready-to-edit slides directly from your research or brainstorming sessions.
Why it Matters: This feature bridges the gap between AI-assisted ideation and professional delivery, saving hours of manual formatting for educators and professionals alike.
The Gist: Google’s latest models are now live: Gemini 3.0 Pro is built for high-level reasoning and complex multimodal analysis, while Gemini 3.0 Flash offers ultra-fast responses and high throughput for lightweight, real-time tasks.
Why it Matters: You no longer have to compromise; you can choose the "Pro" brain for deep research or the "Flash" engine for rapid-fire iterations and scale.
The Gist: BoodleBox has added NVIDIA Nemotron, a model optimized for efficient technical workflows and agentic reasoning, alongside Nano Banana Pro, a specialized model designed for enhanced text-in-image generation and professional-grade creative outputs.
Why it Matters: These specialized models allow for pinpoint accuracy in technical fields and solve the "messy text" problem often found in AI-generated graphics and infographics.
AI Tool Kit 🛠️
BoodleBox PPT Generator: Automatically converts AI dialogue into structured, editable PowerPoint slides to streamline your presentation workflow.
Nano Banana Pro: A creative powerhouse that generates high-fidelity visuals with perfectly rendered, legible text in multiple languages.
NVIDIA Nemotron: An open-weights model family that provides industry-leading accuracy for coding, math, and complex multi-step reasoning.
The 3-2-1 Summary
3 Big Ideas
Actionable AI: The shift from AI as a "search tool" to a "production tool" is accelerating with direct file exports like PowerPoint.
Model Specialization: Choosing the "right tool for the job" (e.g., Flash for speed, Pro for depth) is the key to efficient AI usage in 2026.
Visual Literacy: With models like Nano Banana Pro, AI can now produce factually grounded infographics and precise diagrams, not just "art".
2 Insights to Ponder
“The illiterate of the 21st century will not be those who cannot read and write, but those who cannot learn, unlearn, and relearn.” – Alvin Toffler
“Speed is the new baseline for intelligence; Gemini 3 Flash proves you can be smart, fast, and affordable simultaneously.”
1 Actionable Challenge
Take a recent complex AI chat—like a lesson plan or project outline—and use the new BoodleBox PowerPoint download to see how much of your presentation it can build for you automatically.
Here’s an example I made (available in PDF or PPTx)
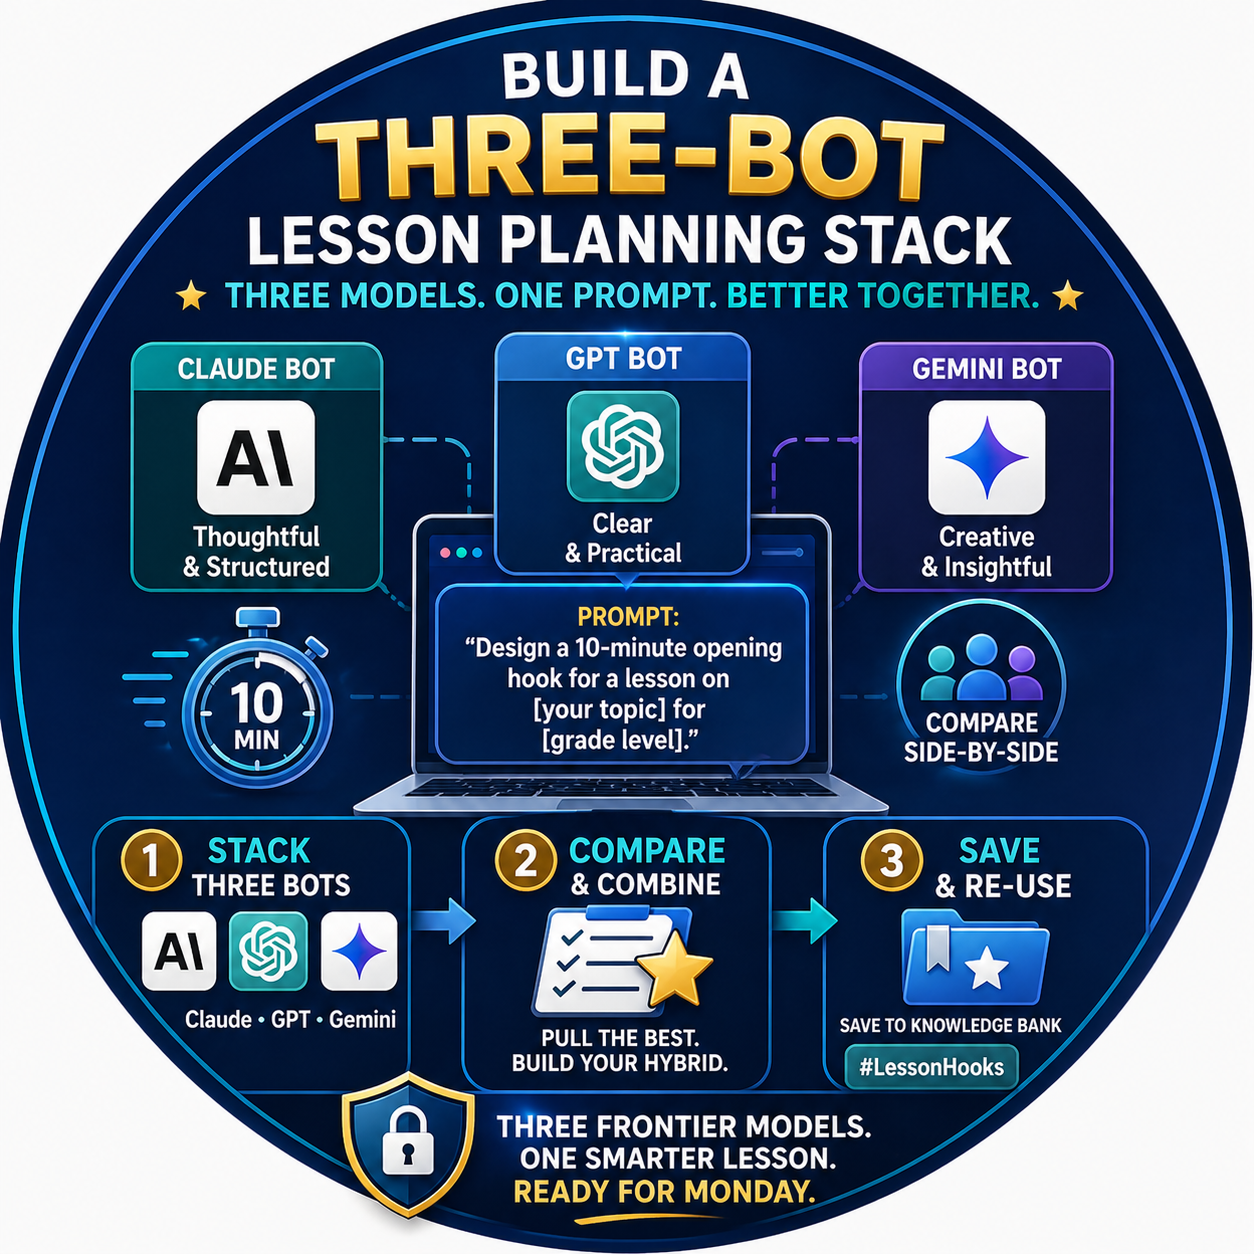
Pick one upcoming lesson topic. Open a BoodleBox chat and stack three bots from different model families (e.g., a Claude bot, a GPT bot, a Gemini bot). Send the same prompt to all three:
"Design a 10-minute opening hook for a lesson on [your topic] for [grade level]."
Compare the responses side-by-side. Pull the strongest elements from each into a hybrid hook you'd actually use Monday. Save the chat to your Knowledge Bank tagged #LessonHooks so you can re-summon it next month with a new topic.
Assignment for Module 1
Take a screenshot (use one of these popular tools, Lightshot, ShareX, or Greenshot) of what you created and copy-n-paste your prompt. Then, share the result via the ShareSpace below.
Screencapture on a Mac: Are you on a Mac? Take screenshots on a Mac using built-in keyboard shortcuts: Cmd + Shift + 3 for the full screen, Cmd + Shift + 4 for a selected area, and Cmd + Shift + 5 for screen recording and advanced options.
Introducing the ShareSpace
For all the Practice on Your Own activities, as well as anything new you would like to share, please use the TCEA ShareSpace Board (similar to Padlet but free) to share your creation. Note: Be sure to select the correct Module in the dropdown.
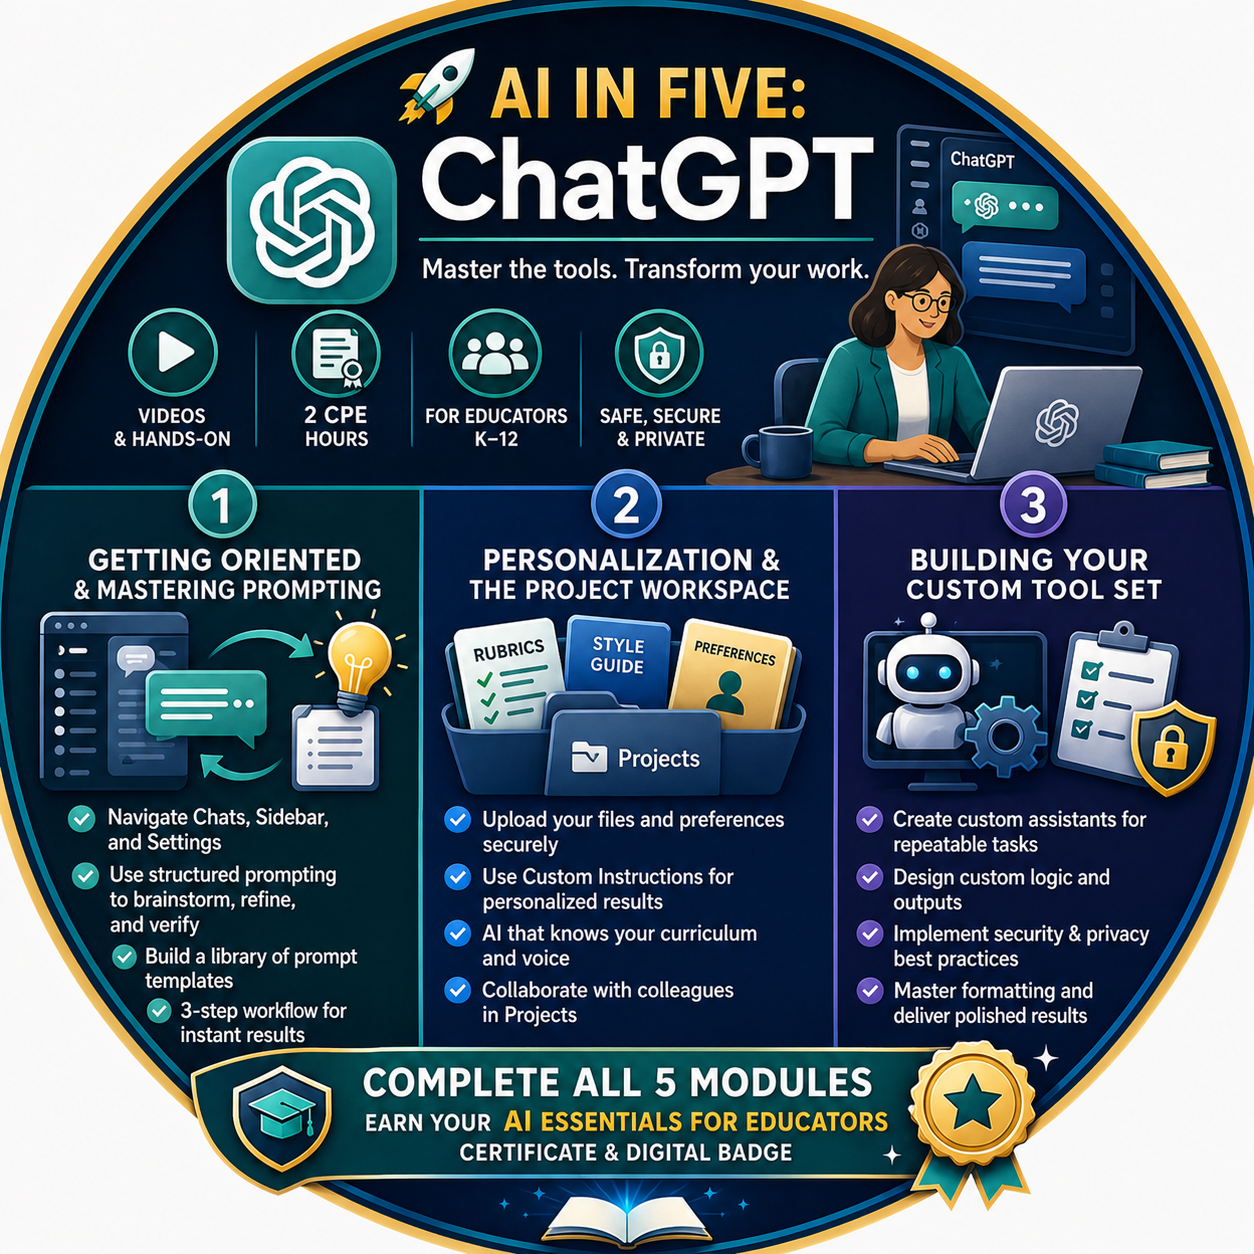
Welcome to this section designed to help you learn ChatGPT. This platform brings advanced artificial intelligence into a single workspace for your daily professional tasks. This professional learning experience will shift how you manage complex instructional work, from automated lesson design to building your own custom helpers.
Tired of manually rewriting lesson plans or struggling with generic results from basic prompts? This three part series will streamline your workflow using structured prompting, custom assistants, and advanced research tools. Earn two CPE hours for videos and hands-on learning that move you from an AI beginner to an architect of custom educational tools.
What You'll Gain
Skill in navigating the chat interface, sidebar, and settings.
The ability to write prompts that produce consistent and useful results.
Methods for personalizing the AI to match your professional voice.
Strategies for managing collaborative projects and using file tools safely.
Audience
This training is for K through twelve educators, staff, and administrators.
Prior Experience Needed
No prior experience with AI is required. You will need a paid ChatGPT account to access all features shown in this series.
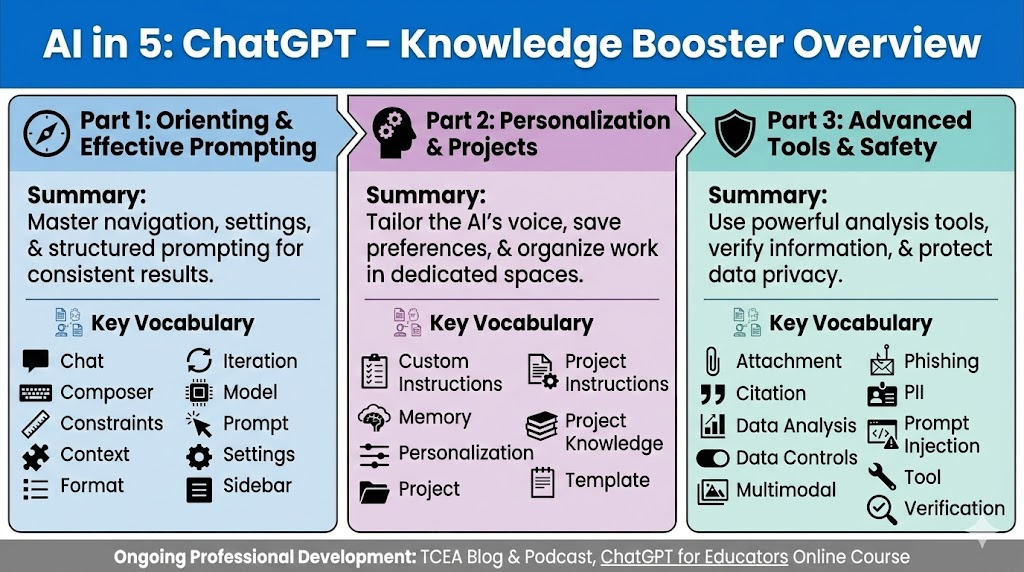
🚀Part 1: Getting Oriented and Mastering Prompting
Navigate the ChatGPT workspace by mastering the relationship between Chats, the Sidebar, and Settings. You will learn a powerful structured prompting technique. You will use multiple prompts in a single conversation to brainstorm, refine, and verify high quality instructional content. Leave with a curated library of prompt templates and a three step workflow ready for immediate application.
🚀Part 2: Personalization and the Project Workspace
Move from generic outputs to personalized results by integrating your own professional files. You will learn to securely upload rubrics, style guides, and preferences to your Projects and Custom Instructions. This ensures the AI references your specific data. Walk away with a personalized assistant that knows your curriculum and a framework for collaborative chats with colleagues.
🚀Part 3: Building Your Custom Tool Set
Transition from user to creator by building specialized custom assistants for repeatable educational jobs like newsletter drafting or lesson leveling. You will design custom logic, implement security instructions to protect data privacy, and master formatting. Finish with a functional custom tool and a safety first implementation plan ready for immediate use.
Lesson 16
Part 1: Getting Oriented and Mastering Prompting
View
Start your journey by mastering the chat interface and the fundamentals of communication with AI. You will learn where to find your settings and how to organize your chat history. By using a structured prompting framework, you will gain the ability to generate high-quality content that meets your specific classroom requirements.
Then send one follow-up: “Make it shorter and add bullet points.”
Send a second follow-up: “Give me a version for beginners and a version for advanced users.”
Key Vocabulary
Chat: One conversation thread.
Composer: The box where you type and attach files.
Constraints: Requirements like length, format, tone, or audience.
Context: Background details that shape the response.
Format: The structure you request, such as a table or bullets.
Iteration: Refining an answer with follow up messages.
Model: The system generating responses.
Prompt: What you type to ask for an output.
Settings: Where you change preferences, personalization, and privacy options.
Sidebar: Where you find past chats and workspaces.
Adjust Personalization Settings ✅
Start a new chat.
Find your chat history in the sidebar.
Open Settings and locate personalization and privacy/data controls (names may vary).
Return to the chat and send: “Help me learn ChatGPT in 5 steps.”
Hands-On Activity
(15 Minutes)
Open ChatGPT and start a new conversation. Use the sidebar to find your chat history. Open your settings and locate your privacy controls. Return to the chat and send this message: “Help me learn ChatGPT in five steps.” Next, use this template: “Act as a [role]. Create [task]. Context: [audience/time/materials]. Constraints: [format/length/tone].” Send a follow up message to make the result shorter and add bullet points.
Transfer Learning to Long-Term Memory
(15 Minutes)
Think of a repetitive task you do every week. Write a prompt for that task using a specific role and context. List three constraints you will use to ensure the output meets your needs. Write down how you will iterate on this prompt if the first answer is too long.
Lesson 17
Part 2: Personalization and the Project Workspace
View
Move beyond basic interactions by tailoring ChatGPT to your professional identity. You will learn to use custom instructions so the AI remembers your preferred tone and formatting rules automatically. You will also explore how to use projects to keep your unit plans, rubrics, and resources organized in one dedicated space.
Custom Instructions: Saved guidance for tone and format.
Memory: An optional feature that remembers preferences over time.
Personalization: Preferences that shape responses by default.
Project: A workspace to organize related chats and files.
Project Instructions: Specific guidance used only within a single project.
Project Knowledge: A collection of documents used as a reference for the AI.
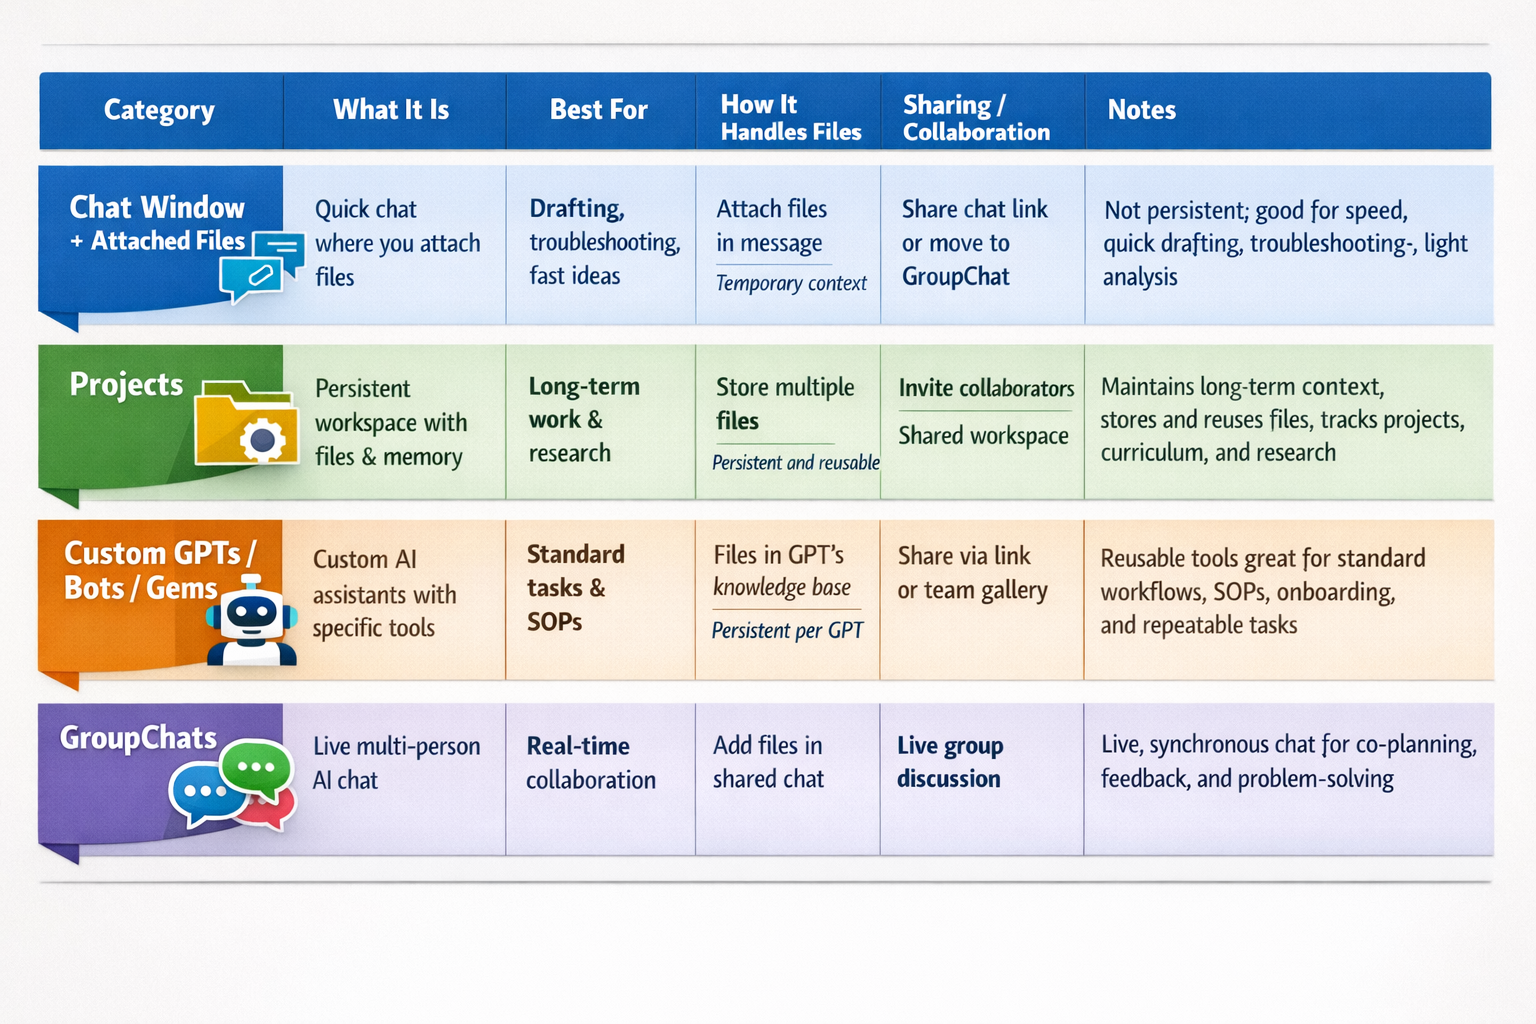
Below, you will find a chart that clarifies various ways to organize your conversations with ChatGPT.
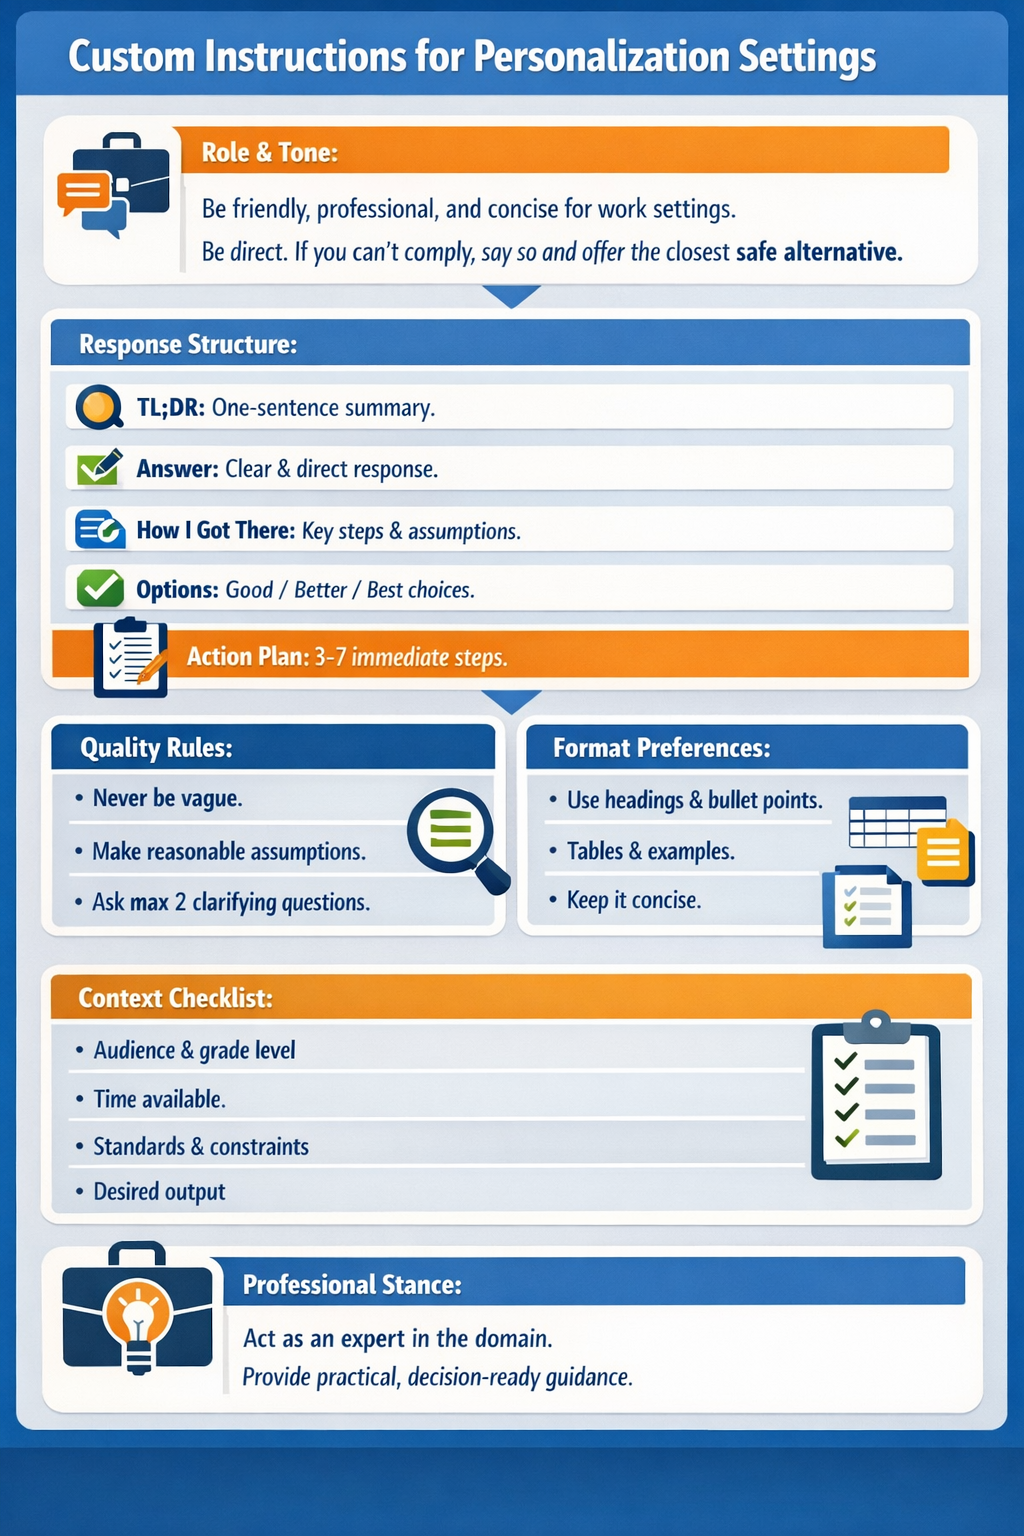
Miguel’s “Final” Version of Custom Instructions for Personalization Settings
Role & tone:
Be friendly, professional, and concise for work settings. Be direct. If you can’t comply, say so and offer the closest safe alternative.
Default response structure (in this order):
TL;DR: One-sentence summary of the best answer.
Answer: The clearest, most direct response.
How I got there: Brief steps, key assumptions (explicitly labeled), and any checks or calculations.
Options: When planning or recommending actions, include Good / Better / Best options with tradeoffs.
Action plan: 3–7 concrete next steps I can apply immediately.
Show infographics as PNG
Quality rules:
Never be vague. If the request is broad, break it into parts and infer the most likely intent.
Make reasonable assumptions and label them. Ask at most two questions only if missing information blocks accuracy.
Prioritize signal over exhaustiveness.
Prefer headings, bullet points, tables, templates, and examples.
Stay under 250 words unless I ask for more.
Context checklist (use when relevant):
Audience, grade level, time available, standards/constraints, and desired output format.
Professional stance:
When I ask for help, act as an expert in that domain (e.g., educator, coach, engineer, doctor) and provide practical, decision-ready guidance.
On the next page, please find an infographic that you can use to guide you with your custom personalization.
Hands-On Activity
(15 Minutes)
Open your settings and look for custom instructions. Add one preference you want the AI to follow every time, such as “Use headings and bullet points.” Create and save a simple prompt template in a notes app that you can reuse. Create a new project for a specific unit of study and upload one related file. [Image Placeholder]
Transfer Learning to Long-Term Memory
(15 Minutes)
Review the custom instructions example from the video. Write down two specific quality rules that would help the AI provide better answers for your subject. Consider how a project workspace will help you organize resources for a long term assignment.
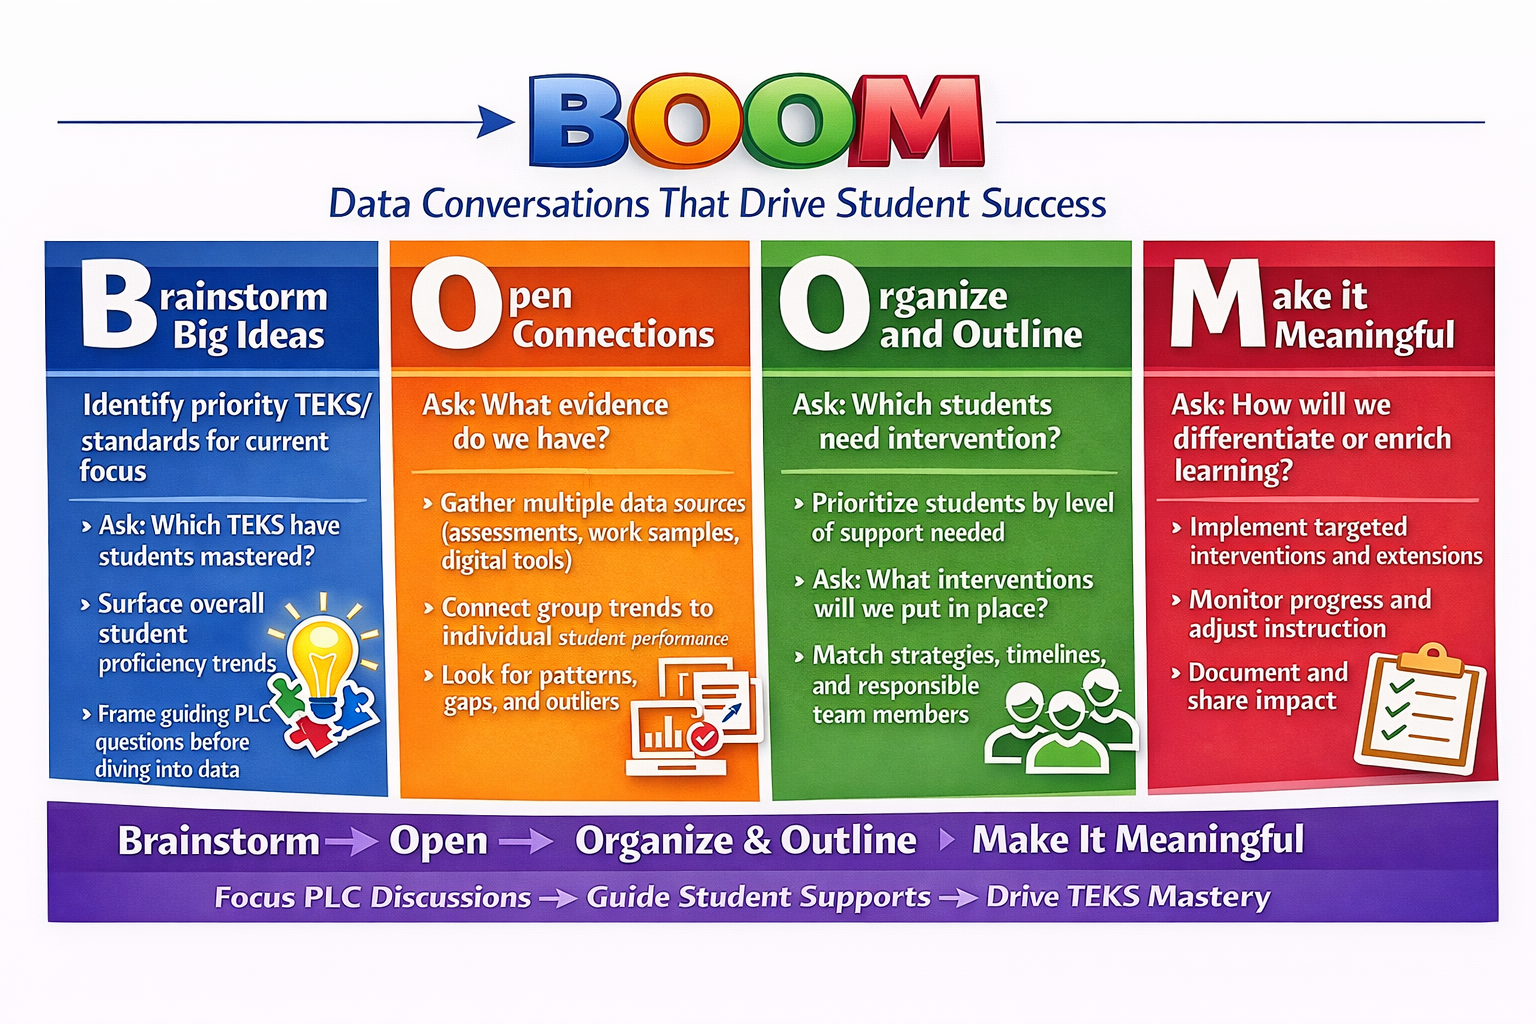
Try creating your own BOOM Summarizer with these custom instructions and source example files.
When I provide a link, text, image, PDF, or other instructional content, generate a BOOM Concept Map infographic as a PNG image for instructional use.
Refer to source example files when needed:
Source4.png
Source1_EmbodiedLearning.png
Source3_BoomWinter.png
Source2_Puzzle.png
Required Output (Every Time)
You must display a PNG infographic on screen (not a download link) that meets all requirements below.
1. BOOM Structure (Non-Negotiable)
The infographic must be divided into four equal quadrants, clearly labeled:
B — Brainstorm Big Ideas
O — Organize & Outline
O — Open Connections
M — Make It Meaningful
Each quadrant must include 3–5 concise bullet points written in instructional language for educators.
2. Title Rules
Title format: BOOM: [Main Idea]
Main idea = 1–3 words only
Title must:
Be fully inside the canvas
Never overlap quadrant borders
Wrap to two lines only if necessary
3. Visual Design (Match Reference Image)
The design must closely resemble the BOOM reference examples:
Landscape orientation
Four-color quadrant layout
Bold header banners for each quadrant
Large letter icons for B / O / O / M
Clear dividing lines between quadrants
Teacher-made infographic style
Light textured background (paper or subtle theme)
High-contrast, readable classroom fonts
4. Quadrant Content Rules
Each quadrant must:
Contain bulleted points only (no paragraphs)
Avoid text overflow or crossing quadrant boundaries
Use actionable language (what teachers/students do and why)
5. Icons
Each quadrant must include one representative icon, placed consistently (top-left or bottom-right):
B → ideas / thinking / brainstorming
O (Organize) → checklist / structure / planning
O (Open) → connections / globe / linking
M → reflection / achievement / meaning
Icons must not interfere with text.
6. Fidelity to Source
Stay faithful to the provided content
Paraphrase; do not copy sentences
Translate ideas into classroom-ready instructional language
Do not add opinions unless explicitly requested
What NOT to Do
Do not output text-only summaries
Do not ask clarifying questions unless absolutely necessary
Do not omit BOOM labels
Do not place text outside quadrants
Do not provide the image as a download instead of displaying it
Default Assumptions
Audience: Educators
Use case: Anchor charts, professional development, lesson framing
Tone: Clear, practical, classroom-ready
Lesson 18
Part 3: Building Your Custom Tool Set
View
Finalize your training by exploring powerful tools for analysis and web search. You will learn how to process large documents and verify the accuracy of the information provided. Most importantly, you will practice strategies to protect student privacy and maintain data security in every interaction.
Attachment: A file you upload, such as a PDF or image.
Citation: A source reference for current information.
Data Analysis: Working with tables or spreadsheets to find patterns.
Data Controls: Settings related to privacy and storage.
Multimodal: Using text along with images or files.
Phishing: Attempts to trick you into sharing information.
PII: Personally Identifiable Information like names, IDs, and addresses.
Prompt Injection: Text inside a file that tries to override your request.
Tool: A special mode like browsing or data analysis.
Verification: Checking important info with trusted sources..
Hands-On Activity
(15 Minutes)
Upload a document or paste a short excerpt. Ask the AI to summarize it in five bullets. Practice anonymizing data by replacing a name with “Student A.” Use this verification prompt: “List anything you are uncertain about. Then give me a five step checklist to verify the important points.” [Image Placeholder]
Transfer Learning to Long-Term Memory
(15 Minutes)
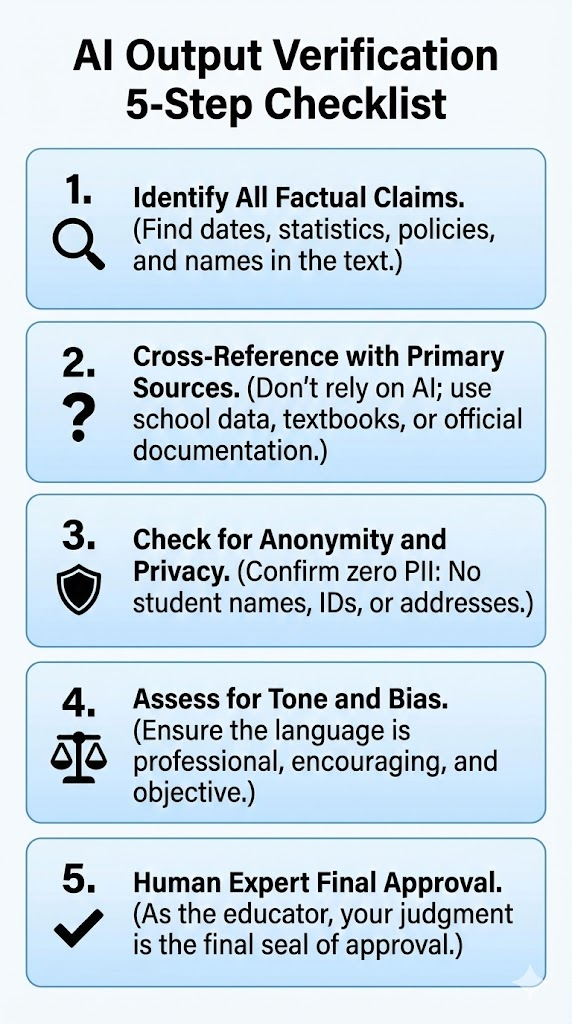
Review the five step verification checklist below. Create a plan for how you will check AI generated work before you share it with others. Write a list of three types of data that you will never enter into an AI tool to protect student privacy.
Verification Checklist for Accuracy and Privacy
Confirm that all personal student information is removed or replaced with generic labels like Student A.
Check all factual claims, dates, and citations against a reliable source.
Review the logic of the response for consistency and accuracy.
Ensure the tone is professional and appropriate for your intended audience.
Verify that the AI ignored any harmful instructions contained in uploaded files.
Lesson 19 · 1 topic
Bonus Section with Announcements for ChatGPT
View
No lesson body content was included in the spreadsheet export.
Topics
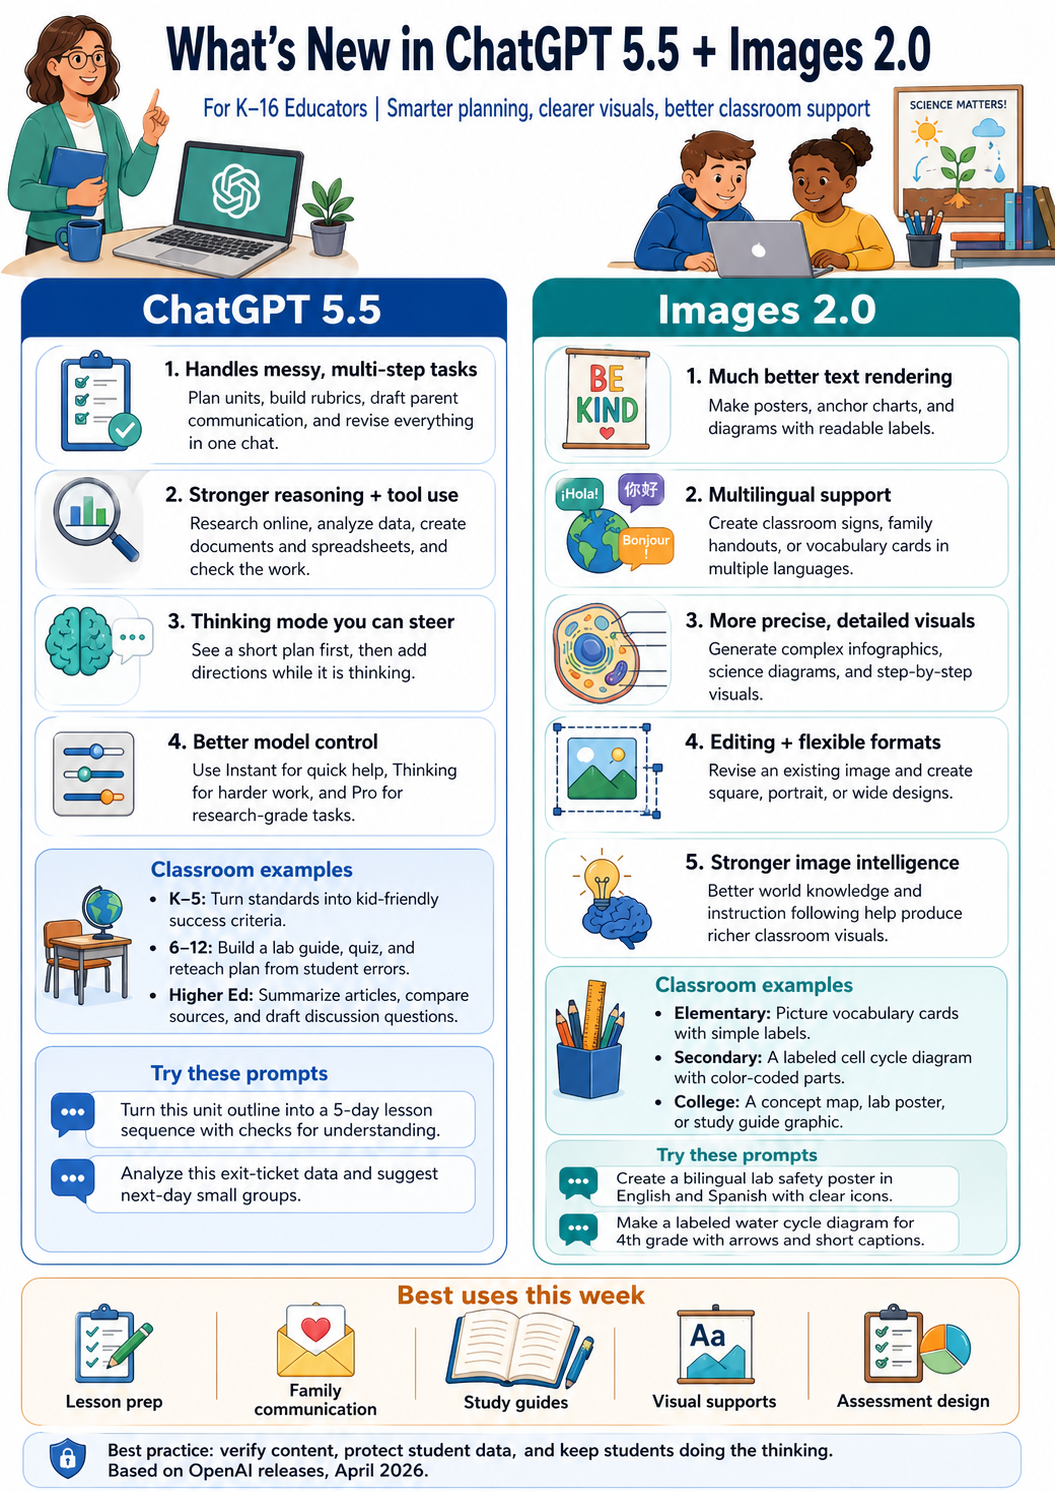
ChatGPT 5.5 and Images 2.0 Release (04/2026)
Heard about the updates in April, 2026 to ChatGPT but aren't sure what they are? Explore this page to learn more about seven things K-16 educators need to know.
1. Stop treating ChatGPT like a one-question tool.
ChatGPT 5.5 is built for messy, multi-step work. That means you can give it the whole task: standards, student needs, pacing limits, rubric expectations, and output format.
Use it for: unit plans, rubrics, parent emails, reteach plans, study guides, and assessment drafts.
2. Make it do the planning before the polishing.
Ask for the structure first. Then revise. Then generate the final product.
Weak prompt
Stronger prompt
“Make a lesson.”
“Turn this unit outline into a 5-day sequence with objectives, checks for understanding, and one exit ticket per day.”
3. Use Thinking mode when the task has stakes.
Quick answers are fine for quick needs. But for curriculum design, data analysis, policy language, grant writing, or research synthesis, use deeper reasoning.
Best classroom use: analyzing exit-ticket data and building next-day small groups.
4. Images 2.0 is finally useful for classroom visuals.
The big shift is readable text. That matters. Posters, anchor charts, diagrams, vocabulary cards, and lab safety visuals need labels students can actually read.
Use it for:
K–5 vocabulary cards
6–12 science diagrams
College concept maps and lab posters
5. Multilingual visuals are now a practical workflow.
Family communication and language support get easier when you can create clear signs, handouts, and visual supports in multiple languages.
Example prompt: “Create a bilingual lab safety poster in English and Spanish with clear icons and short labels.”
6. Do not skip verification.
AI can speed up preparation. It should not replace professional judgment.
Before using anything with students, check for:
factual accuracy
grade-level fit
bias or missing perspectives
privacy issues
whether students still do the thinking
7. The best use is teacher leverage, not student shortcutting.
Use ChatGPT 5.5 and Images 2.0 to reduce prep drag, clarify materials, and create better supports.
The goal is not “AI does school.” The goal is teachers get time back, students get clearer learning experiences, and thinking stays in the classroom.
Lesson 20
Practice On Your Own: ChatGPT
View
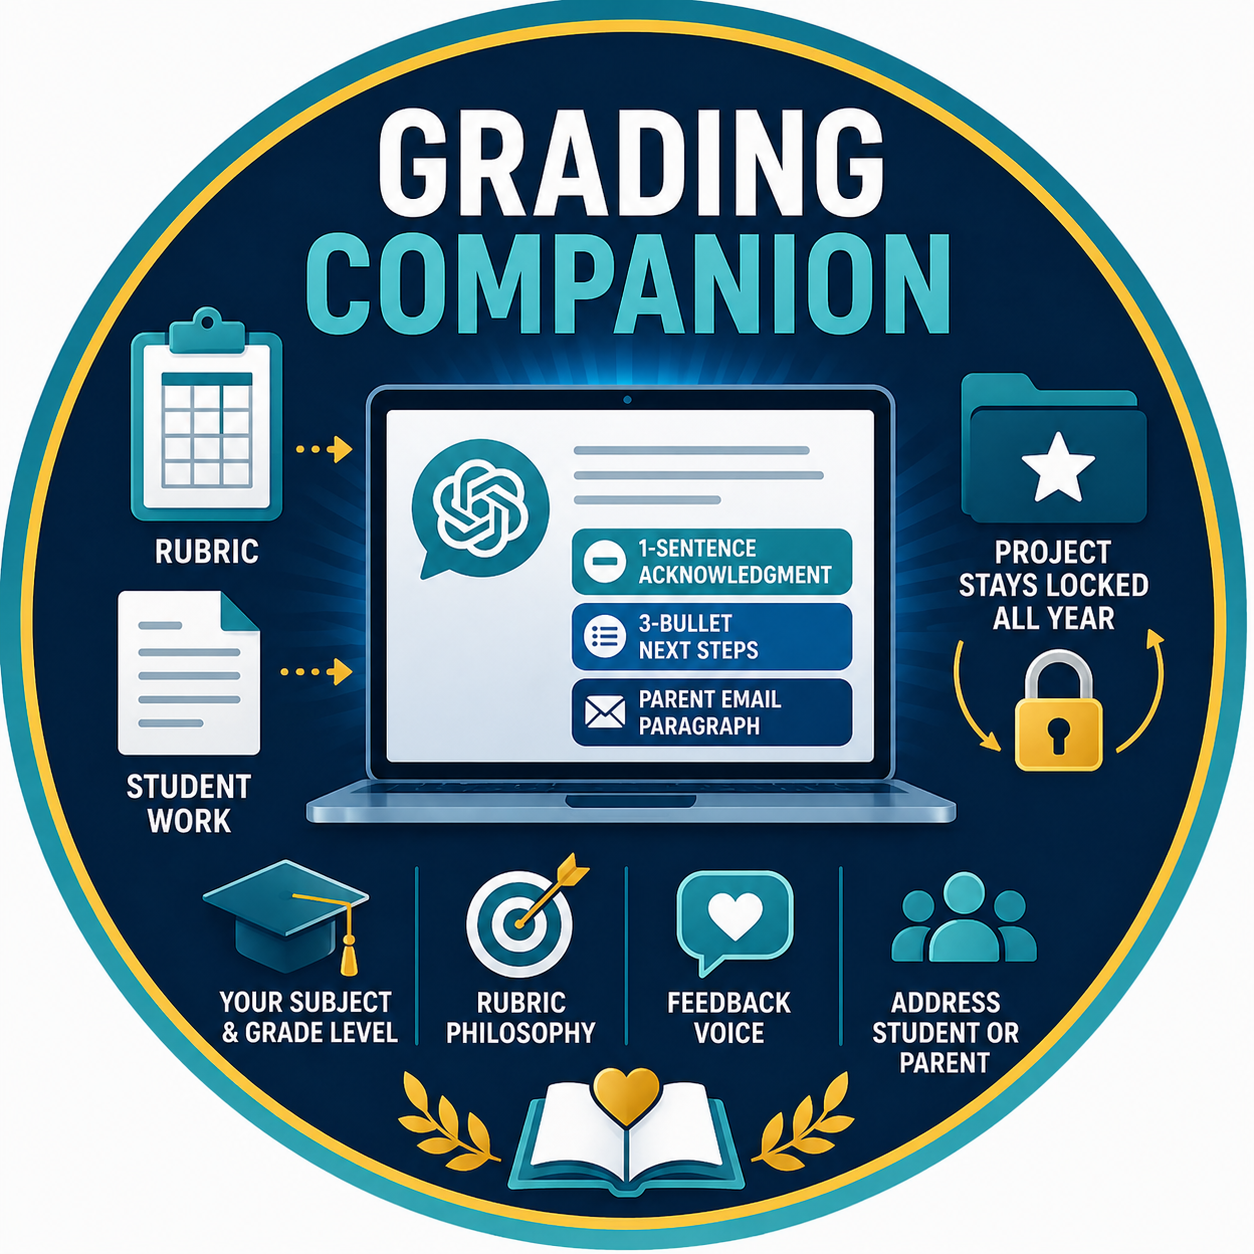
ChatGPT: Create a "Grading Companion" Project
In ChatGPT, create a new Project called "Grading Companion."
Write Project Instructions covering your subject, grade level, rubric philosophy, and feedback voice (warm vs. direct, length, whether you address the student or the parent). Upload one rubric and one anonymized sample of student work.
Ask ChatGPT to draft feedback at three lengths: a one-sentence acknowledgment, a three-bullet next-step list, and a paragraph for a parent email. Remember to avoid submitting sensitive data, FERPA-protected information of any kind to any chatbot with the exception of BoodleBox.
Assignment for Module 2
Take a screenshot (use one of these popular tools, Lightshot, ShareX, or Greenshot) of what you created and copy-n-paste your prompt. Then, share the result via the ShareSpace below.
Screencapture on a Mac: Are you on a Mac? Take screenshots on a Mac using built-in keyboard shortcuts: Cmd + Shift + 3 for the full screen, Cmd + Shift + 4 for a selected area, and Cmd + Shift + 5 for screen recording and advanced options.
Introducing the ShareSpace
For all the Practice on Your Own activities, as well as anything new you would like to share, please use the TCEA ShareSpace Board (similar to Padlet but free) to share your creation. Note: Be sure to select the correct Module in the dropdown.
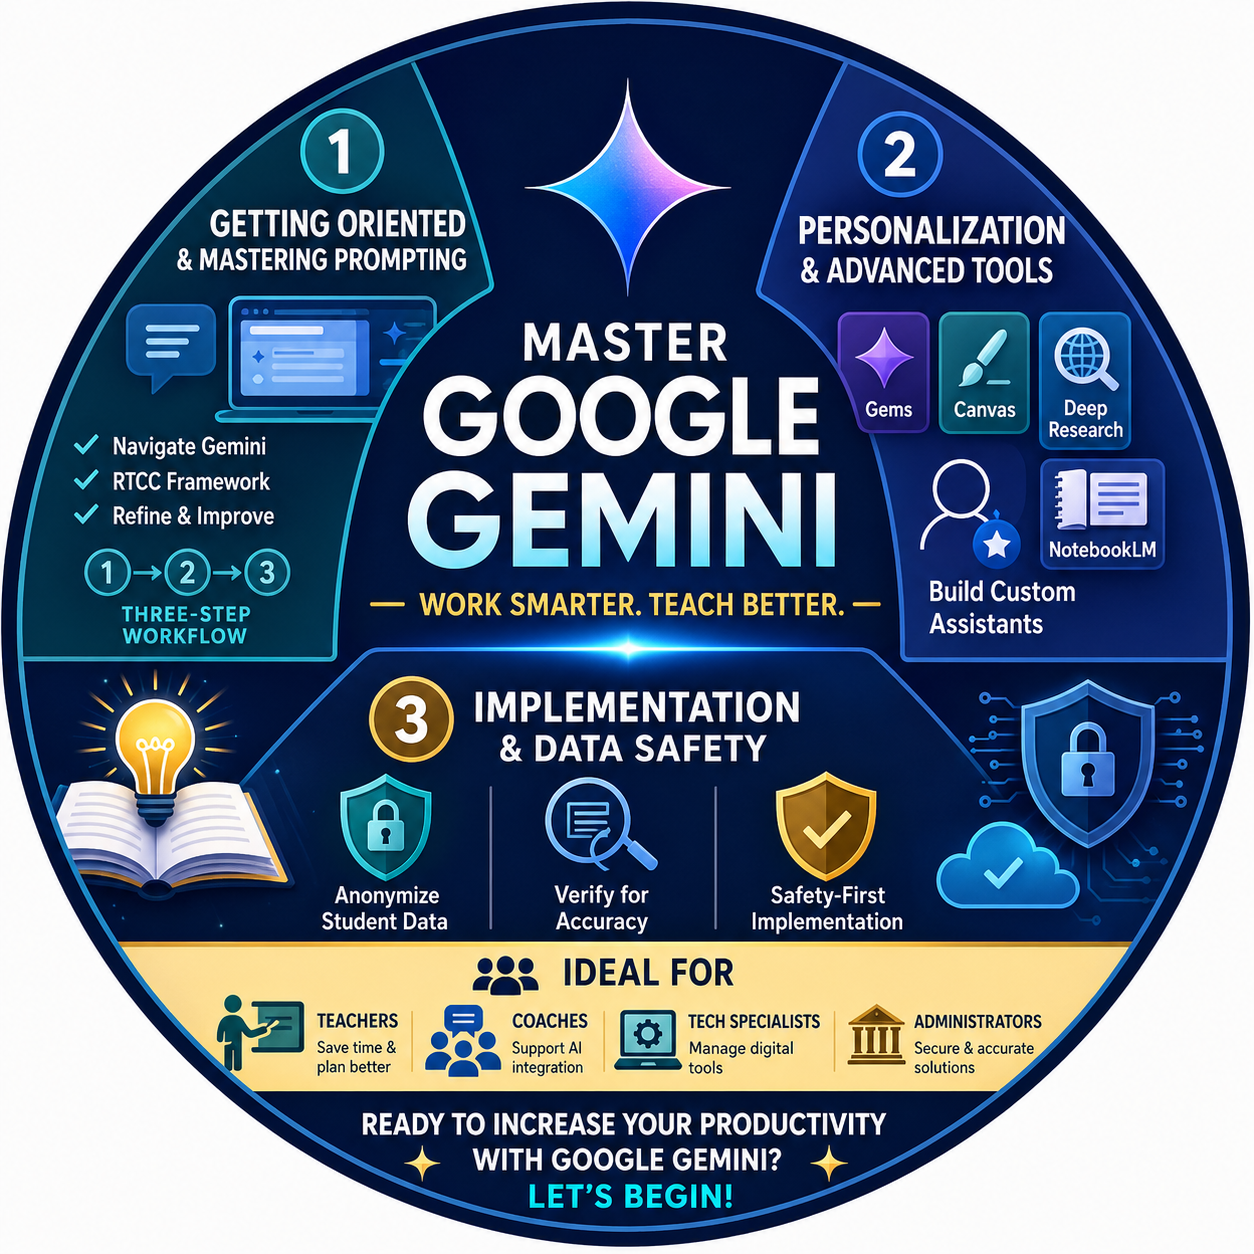
Welcome to this module designed to help you learn Google Gemini. This platform brings the most advanced artificial intelligence models into a single workspace for your daily professional tasks.
Tired of manually rewriting lesson plans or struggling with generic results from basic prompts? This three-part series will streamline your workflow using structured prompting, custom assistants, and advanced research tools.
🚀 Part 1: Getting Oriented and Mastering Prompting
Navigate the Gemini workspace by mastering the home interface, chat basics, and account settings. You will learn the Role, Task, Context, and Constraints framework to generate high-quality instructional content on your first attempt. Leave with a three-step workflow for refining answers and a solid foundation for more complex tasks.
🚀 Part 2: Personalization and Advanced Tools
Move from generic outputs to personalized results by creating "Gems" for your recurring school jobs. You will learn to use Canvas for interactive drafting, apply Deep Research to find verified web sources, and use NotebookLM to analyze your own materials. Walk away with a custom "Plain-Language Writer" assistant and a strategy for using specialized research modes.
🚀 Part 3: Implementation and Data Safety
You will master the art of anonymizing student data to protect privacy and use verification prompts to check for factual accuracy. Finish with a safety-first implementation plan and a protocol for managing your digital activity within the Google Gemini environment.
Who This is ideal for:
K-16 classroom teachers seeking to save time on lesson planning and professional communication
Instructional coaches supporting school-wide integration of artificial intelligence
Educational technology specialists managing campus-wide digital tools
Administrators looking for secure and accurate solutions for their staff
Ready to increase your productivity with Google Gemini? Let's begin this journey together.
Lesson 23
Part 1: Getting Oriented and Mastering Prompting
View
In this foundational part, you will navigate the Gemini workspace and learn the core mechanics of effective prompting. This ensures your outputs are consistently high-quality and ready for immediate classroom use.
Use the provided template to create a lesson hook for a specific curriculum standard. Refine the result by asking Gemini to make it shorter and add a checklist for materials.
For example:
Lesson Hook for the Water Cycle
Curriculum Standard: TEKS 5.8(B) - Explain how the Sun and the ocean interact in the water cycle.
Step 1: Initial Template Prompt
Prompt: "Act as a fifth-grade science teacher. Create a lesson hook about the water cycle. Context: Ten-year-old students in a ten-minute opening activity. Constraints: Descriptive tone, under 80 words, and three bullet points."
Initial Result:
Imagine you are a tiny drop of water sitting in the middle of a vast, blue ocean.
Feel the heat of the morning sun pulling you up toward the clouds like an invisible elevator.
Wonder where you will land when you finally fall back to earth as a cold, refreshing raindrop.
Step 2: Refined Result (Shorter with Materials Checklist)
Refinement Prompt: "Make it shorter and add a checklist for materials."
Refined Deliverable:
Imagine being a water drop in the hot sun.
You are rising from the ocean into the sky.
Where will you land when you fall as rain?
Materials Checklist:
One clear plastic cup
Warm water
Plastic wrap
One large rubber band
Three ice cubes
Reflection on the Process
By using the specific "Role" of a teacher and "Constraints" for length, the AI provided a hook that is ready for immediate classroom use. The refinement process allowed us to add the practical "Materials Checklist" without losing the original context of the lesson.
Transfer Learning to Long-Term Memory (15 minutes)
Identify a weekly administrative task, such as drafting a parent newsletter. Write a master prompt for this task using all four components of the framework and share it with a colleague to test its clarity.
Note: Here are three examples you can try or use as models for making your own.
Example One: Weekly Parent Newsletter
This prompt is designed for a recurring administrative task that requires a specific tone and reading level to ensure clear communication with families.
Role: Act as a fifth-grade lead teacher.
Task: Create a weekly parent newsletter.
Context: This is for the families of twenty-five students. Mention that the class is currently studying fractions in mathematics and the water cycle in science.
Constraints: Use a friendly tone, maintain a grade six reading level, keep the length under 200 words, and include exactly three bullet points for upcoming homework assignments.
Master Prompt: "Act as a fifth-grade lead teacher. Create a weekly parent newsletter. Context: This is for the families of twenty-five students. Mention that we are studying fractions in mathematics and the water cycle in science. Constraints: Use a friendly tone, maintain a grade six reading level, keep the length under 200 words, and include exactly three bullet points for upcoming homework assignments."
Example Two: Professional Learning Community (PLC) Meeting Agenda
This prompt helps an instructional leader organize a structured meeting with clear roles and time allocations.
Role: Act as an instructional coach.
Task: Draft a meeting agenda for a forty-five minute Professional Learning Community (PLC) meeting.
Context: The audience is the middle school science department. The focus of the meeting is analyzing student data from the most recent formative assessment.
Constraints: Present the agenda in a table with three columns for Time, Topic, and Facilitator. Use a professional tone and active voice.
Master Prompt: "Act as an instructional coach. Draft a meeting agenda for a forty-five minute Professional Learning Community (PLC) meeting. Context: This is for the middle school science department. The focus is on analyzing student data from the most recent formative assessment. Constraints: Present the agenda in a table with three columns for Time, Topic, and Facilitator. Use a professional tone and active voice."
Example Three: Individualized Education Program (IEP) Accommodation Summary
This prompt demonstrates how to handle sensitive student data securely by using placeholders and specific formatting.
Role: Act as a special education coordinator.
Task: Generate a summary of accommodations for an Individualized Education Program (IEP).
Context: This summary is for Student A, who requires support for dyslexia and Attention-Deficit/Hyperactivity Disorder (ADHD).
Constraints: Use clear bullet points, do not use ampersands, and ensure the total length is under one page.
Master Prompt: "Act as a special education coordinator. Generate a summary of accommodations for an Individualized Education Program (IEP). Context: This is for Student A, who requires support for dyslexia and Attention-Deficit/Hyperactivity Disorder (ADHD). Constraints: Use clear bullet points, do not use ampersands, and ensure the total length is under one page."
Lesson 24
Part 2: Personalization and Advanced Gemini Tools
View
This part focuses on streamlining your workflow by creating custom assistants and using specialized research tools. You will move from simple chatting to using interactive workspaces for drafting and detailed exploration.
Create a custom Gem named "Plain-Language Writer". Set instructions to use a grade six reading level, maintain a word count under 200, and include a five-item checklist.
Example: Try myOutline Helper Gemwith any blog entry, PDF, or article text. You can also paste in long text transcriptions from audio or video files.
Transfer Learning to Long-Term Memory (15 minutes)
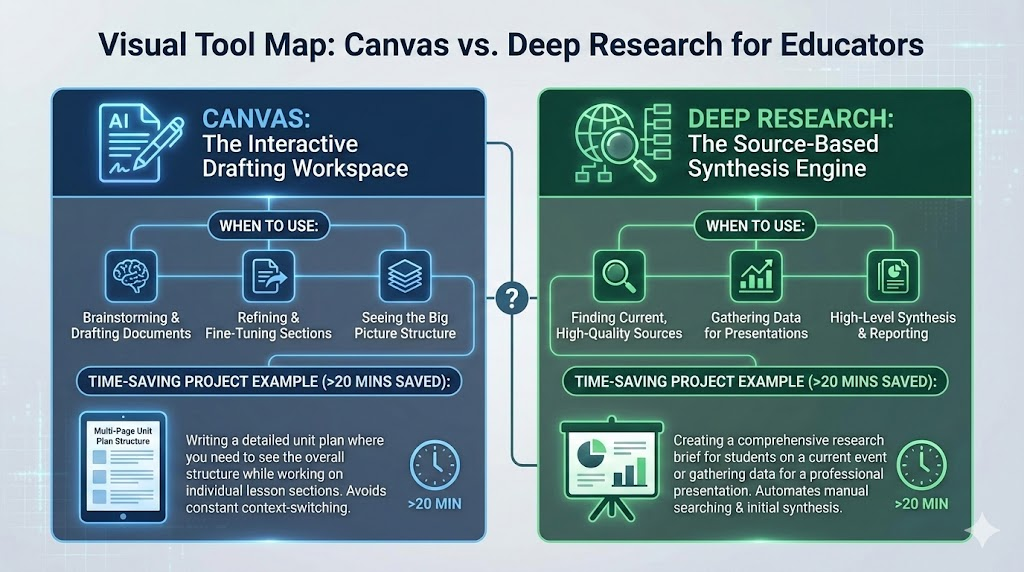
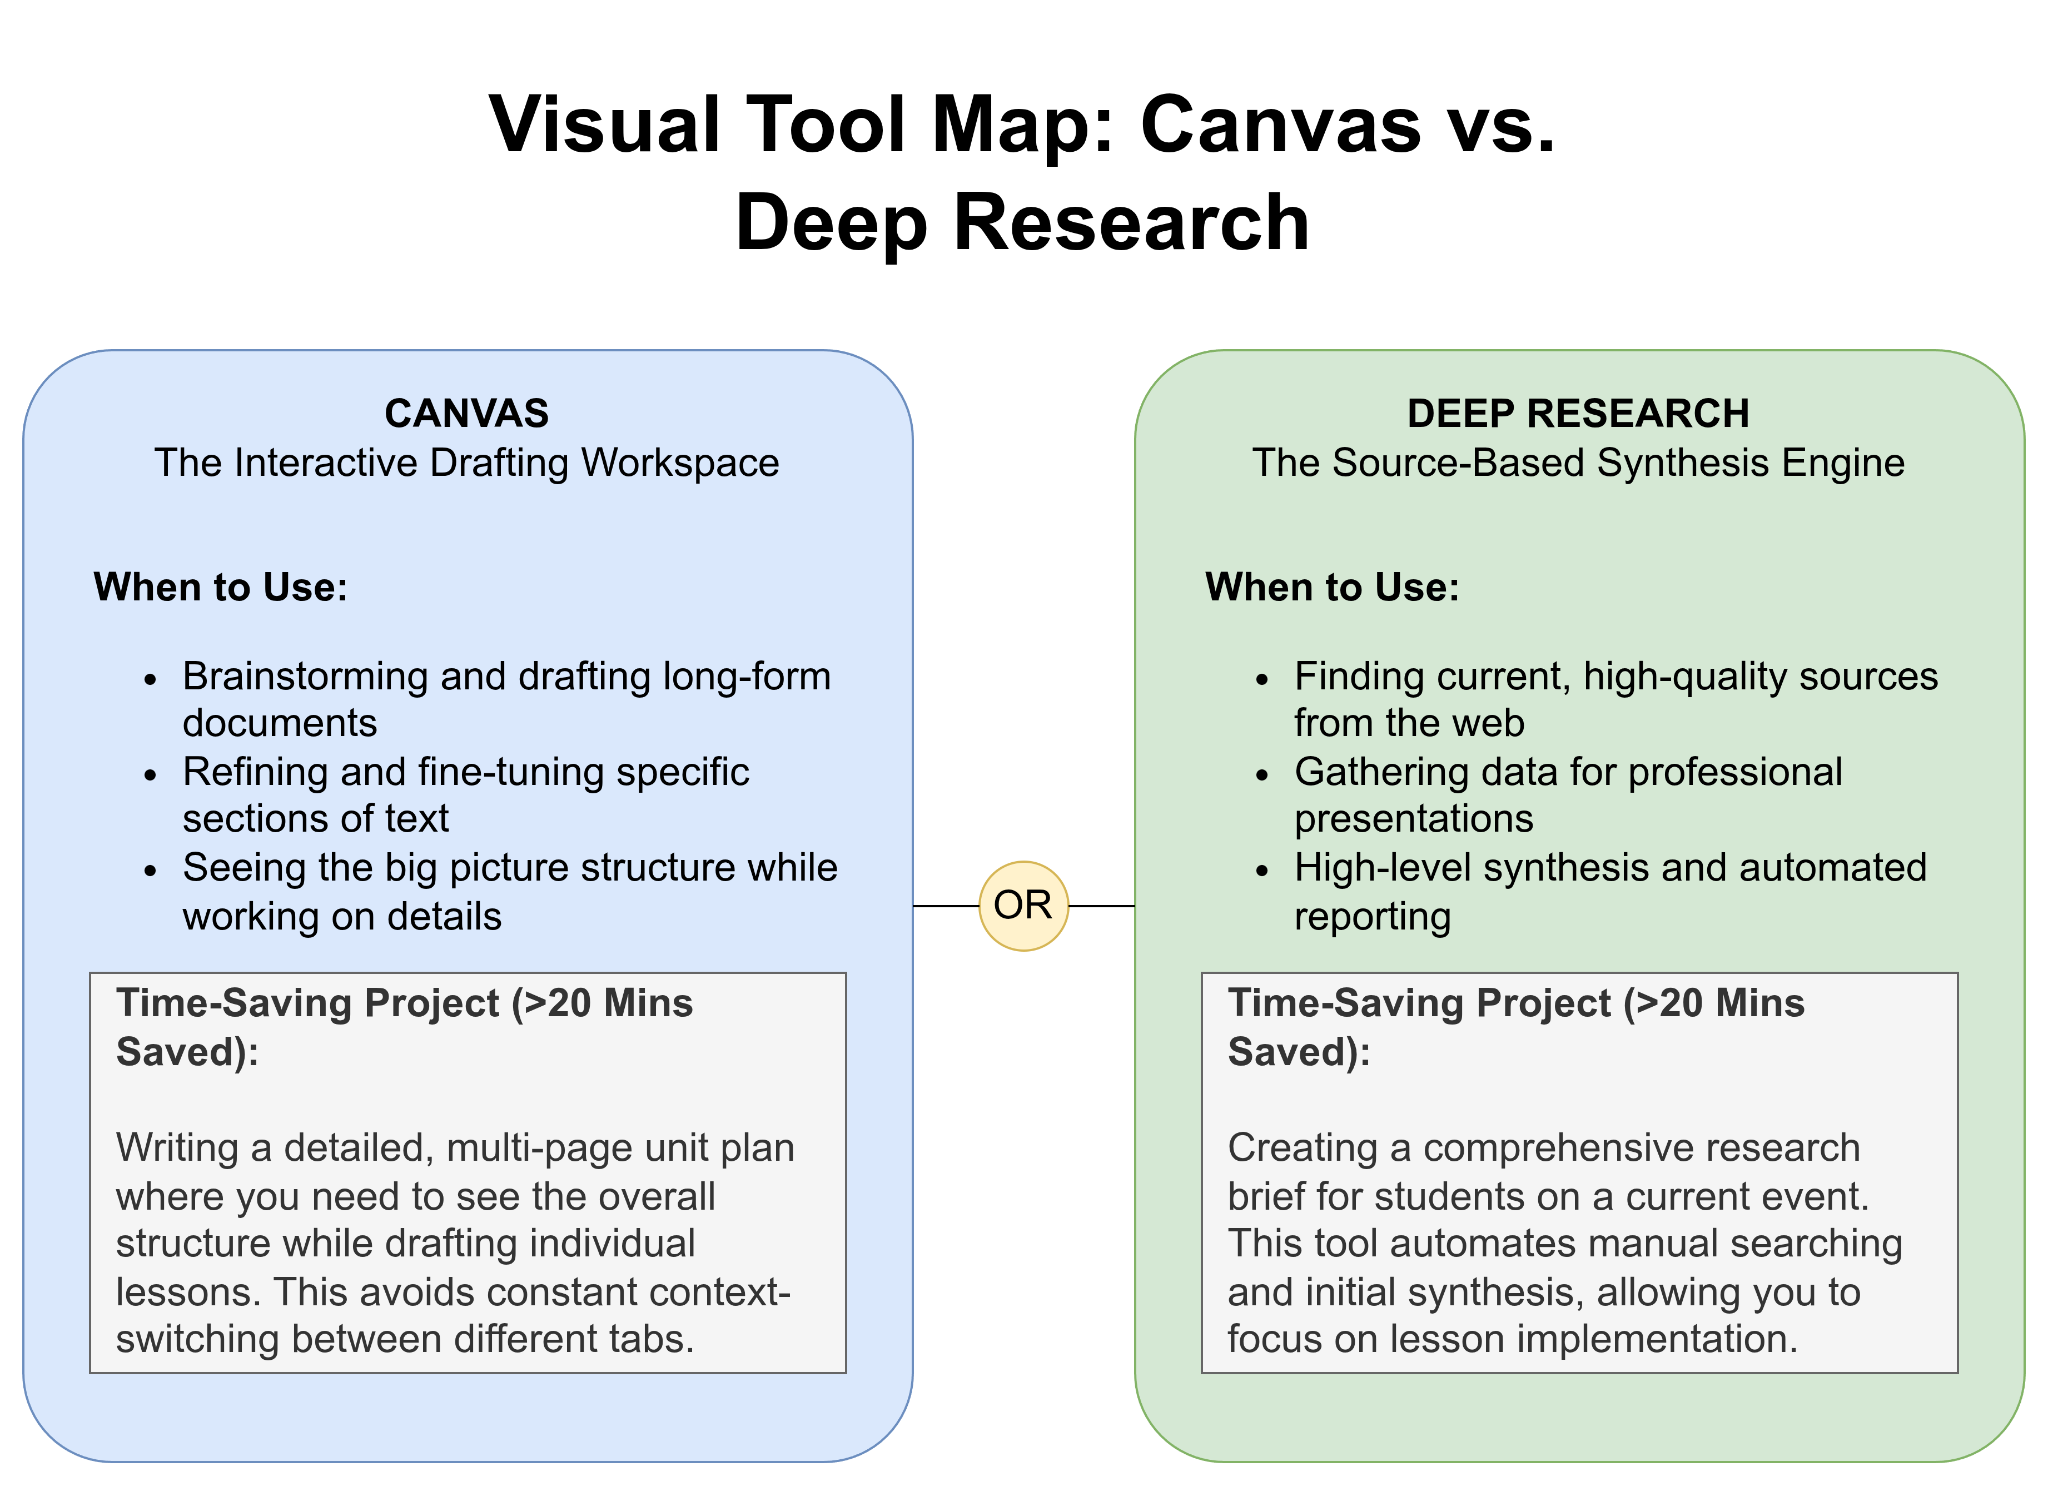
Create a visual tool map that identifies when to use Canvas versus Deep Research. For each tool, describe a current project where its use would save you at least 20 minutes of preparation time.
Sample Prompt:
Create a visual tool map (an infographic in landscape page orientation and PNG image format) that identifies when to use Canvas versus Deep Research. For each tool, describe a current project where its use would save you at least 20 minutes of preparation time.
Note: You can specify an MXgraph Studio XML diagram, Mermaid Syntax, or an image infographic. If you are on a free account, the MXGraph XML diagram code or Mermaid Syntax would work fine. For Pro account, definitely try an infographic in PNG image format.
Here’s one possibility if you are using Nano Banana Pro:
On the next page, you will find a MXGraph XML code based diagram. You can simply copy-n-paste the code generated into Draw.io website or, if you download the free Draw.io program available for Windows, Mac, and/or GNU/Linux operating systems, you can paste it in there. More on how to do that appears in this blog entry.
Lesson 25
Part 3: Source-Based Analysis with NotebookLM
View
In the final part, you will establish professional standards for data privacy and security. You will learn to verify AI outputs and implement habits that protect your students and your organization.
Practice anonymizing a mock student report by replacing names with "Student A" and removing all identifying IDs or addresses. Use a verification prompt to ask Gemini for a checklist of its own uncertainties.
Here’s an example of a 5-Step Checklist:
Anonymized Student Feedback Summary
Student: Student A
Student ID: [REDACTED]
Address: [REDACTED]
Grade: Fourth Grade
Summary of Progress:
Student A demonstrates a strong grasp of narrative structure and creative writing.
This student initially struggled with double-digit multiplication but showed measurable improvement after attending three targeted tutoring sessions.
The behavior of Student A during transitions and in the cafeteria has been a noted concern recently, requiring a review of classroom expectations and consistent positive reinforcement.
Transfer Learning to Long-Term Memory (15 minutes)
Develop a "Safety First" checklist for your team that includes three mandatory steps before pasting school data into any AI tool. Create an implementation plan for sharing your custom Gems with colleagues safely.
Lesson 26 · 1 topic
Bonus Section with Announcements for Gemini and NotebookLM
View
No lesson body content was included in the spreadsheet export.
Topics
NotebookLM Power Tips: Infographic and Video (04/2026)
Ready to explore these NotebookLM Power Tips? Then you've come to the right place. These are adapted from this KDNuggets article, but customized for K-12 education. NotebookLM works best when teachers give it organized sources and specific prompts. Instead of asking for a broad summary, use it to build classroom-ready materials from rubrics, readings, lesson plans, assessment data, parent letters, or curriculum documents.
1. Revise One Slide at a Time
What this means
Instead of regenerating an entire slide deck, ask NotebookLM to fix one specific slide. This is useful when most of a deck is good, but one slide needs clearer wording, better examples, or corrected information.
K-12 example
A 7th-grade science teacher creates a slide deck on food webs. Slide 4 incorrectly says fungi are producers. The teacher asks NotebookLM to revise only that slide.
Classroom Need
How NotebookLM Helps
Example Prompt
Fix a factual error
Updates one slide without changing the whole deck
“Revise Slide 4. Change fungi from producers to decomposers. Keep the reading level at grade 7.”
Simplify language
Makes the slide more student-friendly
“Rewrite Slide 6 using 6th-grade vocabulary and one concrete example.”
Add a classroom check
Adds a short formative question
“Add one quick check-for-understanding question to Slide 8.”
Teacher move
Use NotebookLM for the first draft, then revise slide-by-slide for accuracy, grade level, and clarity.
2. Export to PPTX
What this means
NotebookLM can help create a draft slide deck, then export it to PowerPoint so teachers can polish, share, or present it using familiar tools.
K-12 example
An instructional coach creates a short professional development deck on exit tickets. NotebookLM drafts the structure, then the coach exports it to PPTX for final formatting.
Use Case
Source Material
Final Product
Lesson slides
Textbook chapter, standards, teacher notes
Student-facing slide deck
Staff training
Research article, district framework, examples
PD presentation
Parent night
Program overview, FAQs, school handouts
Family-friendly presentation
Example prompt
“Create a 10-slide PowerPoint-style deck for 4th-grade teachers on using exit tickets. Use simple headings, classroom examples, and one discussion question per section.”
Teacher move
Include design directions in the first prompt, such as:
“Use short slide titles.”
“Keep text under 30 words per slide.”
“Use examples from elementary classrooms.”
“Add speaker notes for the teacher.”
3. Make Cinematic Video Overviews
What this means
NotebookLM can turn organized source material into a video-style overview. This is useful for explaining complex information to students, families, or staff.
K-12 example
A high school counselor uploads scholarship information, FAFSA notes, and college application reminders. NotebookLM creates a short overview for seniors and families.
Audience
Topic
Video Overview Goal
Students
Lab safety procedures
Explain expectations before a lab
Families
New grading policy
Summarize key changes clearly
Staff
MTSS process
Review referral steps and supports
Students
Research project directions
Walk through the assignment
Example prompt
“Create a 3-minute video overview for 10th-grade students explaining the research project. Focus on the steps, due dates, and how to use credible sources.”
Teacher move
Before generating the overview, organize your sources. NotebookLM performs better when the material is clean, labeled, and easy to follow.
4. Turn Chat Into Artifacts
What this means
A useful conversation in NotebookLM can become a finished artifact, such as a study guide, quiz, slide deck, parent letter, or lesson outline.
K-12 example
A teacher chats with NotebookLM about a short story students are reading. After refining themes, vocabulary, and discussion questions, the teacher asks NotebookLM to turn the chat into a student handout.
Chat Exploration
Possible Artifact
“What are the main causes of the American Revolution in these sources?”
Cause-and-effect chart
“What misconceptions might students have about fractions?”
Small-group reteach plan
“What are the key vocabulary words in this chapter?”
Student-friendly glossary
“How can I explain photosynthesis with examples?”
Mini-lesson outline
Example prompts
Goal
Prompt
Create a handout
“Turn this into a one-page student handout at a 6th-grade reading level.”
Create a quiz
“Generate a 10-question formative quiz with an answer key.”
Create slides
“Turn this explanation into a 7-slide deck for 9th-grade biology.”
Create a parent message
“Turn this into a friendly parent email in plain language.”
Teacher move
Use chat to think first. Once the explanation is strong, ask for the exact classroom artifact you need.
5. Upload EPUBs and Long Sources
What this means
NotebookLM can work with long sources, such as books, manuals, PDFs, curriculum guides, and data files. This helps teachers synthesize large amounts of information without manually copying chunks of text.
K-12 example
A department chair uploads a curriculum guide, state standards, and assessment data. NotebookLM helps identify which standards need reteaching.
Source Type
K-12 Example
Possible Output
EPUB or PDF
Novel, textbook chapter, teacher guide
Chapter summary or reading guide
CSV
Assessment results
Skill-gap summary
Curriculum document
Scope and sequence
Unit planning checklist
Rubric
District writing rubric
Student-friendly checklist
Example prompt
“Compare the writing expectations in this rubric with the student sample data. Identify the top three skills that need reteaching and suggest one mini-lesson for each.”
Teacher move
Build one notebook around one clear topic. Avoid mixing unrelated files, such as reading data, discipline policies, and science labs in the same notebook.
Fast Workflow for Teachers
A simple process
Step
Teacher Action
Example
1. Ingest sources
Upload organized materials
Rubric, lesson plan, article, standards
2. Explore in chat
Ask focused questions
“What are the key misconceptions?”
3. Create artifact
Request a classroom-ready product
“Make a student checklist.”
4. Revise precisely
Fix one part at a time
“Revise section 2 for grade 5.”
5. Export or share
Move to final format
PPTX, handout, email, study guide
Practical Classroom Prompt Bank
For lesson planning
Task
Prompt
Build a lesson
“Create a 45-minute lesson using these sources. Include objective, vocabulary, activity, and exit ticket.”
Differentiate
“Adapt this lesson for students who need reading support. Keep the same learning target.”
Add checks for understanding
“Add three quick formative checks teachers can use during the lesson.”
For assessment
Task
Prompt
Create a quiz
“Generate a 10-question quiz from these sources with multiple choice, short answer, and answer key.”
Analyze student work
“Compare these student responses to the rubric and identify common strengths and gaps.”
Make a reteach plan
“Create a 20-minute reteach plan for the two weakest skills.”
For student supports
Task
Prompt
Study guide
“Create a one-page study guide with key terms, examples, and practice questions.”
Vocabulary support
“Make a student-friendly glossary with examples and non-examples.”
Reading support
“Summarize this article at a 6th-grade reading level without removing key ideas.”
For communication
Task
Prompt
Parent email
“Write a brief parent email explaining this project in plain language.”
Staff update
“Turn this information into a short staff update with action steps.”
Student directions
“Rewrite these directions so students can follow them independently.”
Key Takeaway
NotebookLM is most useful when teachers treat it like a source-grounded planning partner.
Use this formula
Part
Example
Audience
“for 8th-grade students”
Source
“using only the uploaded rubric and article”
Product
“create a one-page checklist”
Constraints
“use plain language and include examples”
Revision
“revise item 3 to be clearer”
Strong prompt template
“Using only the uploaded sources, create a [product] for [audience]. Keep the language at a [grade level]. Include [specific elements]. Make it classroom-ready and easy to revise.”
Final reminder
The better the source organization and prompt, the better the classroom output.
Note: The infographic below is based for the KDnuggets article with a business focus. The version at the top is adapted for K-12 education.
Lesson 27
Practice On Your Own: Gemini and NotebookLM
View
Gemini and NotebookLM: Turn a Source Stack into a Study Set
Pick a unit you're about to teach.
Gather 3–5 source documents, such as an article, your slide deck, a chapter PDF, a standards excerpt.
Create a new NotebookLM notebook and upload them all as sources.
Generate the Audio Overview and listen on your commute.
Then, back in the notebook, use this prompt:
"Generate 10 exit-ticket questions at varying DOK levels grounded only in these sources, and tell me which source supports each answer."
Export the questions with citations.
You now have a fully source-grounded assessment built in under 20 minutes. Why this exercises NotebookLM specifically: source-grounding plus audio plus citations is what this tool does that nothing else does. The activity uses all three.
Assignment for Module 3
Take a screenshot (use one of these popular tools, Lightshot, ShareX, or Greenshot) of what you created and copy-n-paste your prompt. Then, share the result via the ShareSpace below.
Screencapture on a Mac: Are you on a Mac? Take screenshots on a Mac using built-in keyboard shortcuts: Cmd + Shift + 3 for the full screen, Cmd + Shift + 4 for a selected area, and Cmd + Shift + 5 for screen recording and advanced options.
Introducing the ShareSpace
For all the Practice on Your Own activities, as well as anything new you would like to share, please use the TCEA ShareSpace Board (similar to Padlet but free) to share your creation. Note: Be sure to select the correct Module in the dropdown.
Module Overview: Transform Teaching with Perplexity
Perplexity works differently from most AI tools. Instead of generating answers from training data alone, it searches the live web and returns responses with citations attached, which makes it a strong fit for classrooms where source credibility matters. In this module, you will learn how to put that strength to work for instructional planning, classroom research, and student inquiry.
You will start by setting up your account and getting comfortable with the difference between a quick search, a focused search, and a deep research run. From there, you will build prompts that produce classroom-ready outputs such as discussion questions grounded in current sources, differentiated reading lists, and pre-vetted research starting points for student projects.
The module also covers Spaces, which let you save context and instructions so that follow-up queries pick up where the last one left off. You will set up Spaces for recurring tasks, including lesson planning, current events updates, and content area research.
Because Perplexity returns citations on every response, this module spends focused time on source evaluation. You will practice checking citations, identifying when the AI has misread a source, and teaching students to do the same. This skill transfers across every other AI tool in the course.
By the end of the module, you will have:
A working Perplexity setup with your preferred model and search settings
Three to five reusable prompts for instructional planning and student support
One Space configured for an ongoing professional or instructional task
A short student-facing protocol for using Perplexity responsibly in your classroom
You will earn an individual certificate for completing this module, which counts toward your AI Essentials for Educators completion certificate and badge.
Lesson 30 · 2 topics
Part 1: Perplexity 101 – Your New Research Assistant
View
Transform your research process from hours to minutes as you discover Perplexity, the AI "answer engine" that synthesizes information from multiple sources and provides direct, cited responses. This foundational session matters because busy educators need reliable, efficient research tools that maintain academic integrity while saving precious planning time. Through hands-on account setup, guided interface exploration, and your first real classroom-focused search, you'll gain the confidence to immediately apply these skills to next week's lessons.
Custom Instructions Starter Prompts (included in slide deck)
Hands-On Activity: Create your free Perplexity account and conduct a focused search on a topic you're teaching next week. Practice clicking through at least two citations to verify information, then compare this process to your traditional research method. Share one surprising discovery or time-saving insight with a colleague.
Transfer Learning to Long-Term Memory
Create a short answer, three question quiz in the space below about the content in this portion. Handwrite the questions below or in a notebook.
Topics
Ethical AI Checklist for Perplexity
✅ Before Using AI
Purpose Check
I'm using AI to enhance, not replace, my teaching expertise
I have a clear educational goal for this AI use
I'm modeling responsible technology use for my students
This use aligns with my school's technology policies
Privacy & Safety
I will not input any student personal information (names, IDs, grades)
I've reviewed what data this AI tool collects
I'm using school-approved AI platforms when available
I understand my district's AI usage guidelines
🔍 During AI Use
Source Verification
I click through at least 2-3 citations to verify accuracy
I check for potential bias in AI responses
I verify facts using additional sources when needed
I note when information seems outdated or questionable
Critical Thinking
I question the AI's responses, not accept them blindly
I consider multiple perspectives on controversial topics
I recognize AI limitations and potential errors
I use AI as a starting point, not the final answer
📚 Content Creation & Attribution
Academic Integrity
I clearly indicate when content is AI-assisted
I add my own analysis and insights to AI-generated content
I teach students to cite AI tools properly
I never present AI content as my original work
Quality Control
I review and edit all AI-generated content before use
I ensure content is age and grade-appropriate
I check for cultural sensitivity and inclusivity
I verify alignment with curriculum standards
👥 Teaching AI Literacy
Student Guidance
I explicitly teach when AI use is/isn't appropriate
I demonstrate how to verify AI-generated information
I discuss AI bias and limitations with students
I provide clear guidelines for student AI use
The TRACE Method(for students)
Think - What do you already know?
Research - Use AI to gather information
Analyze - Check those sources!
Create - Synthesize in your own words
Evaluate - Cite properly and reflect
⚠️ Red Flags to Avoid
Never:
❌ Use AI to grade subjective student work without review
❌ Share student data or work with AI systems
❌ Rely solely on AI for sensitive topics without expert review
❌ Allow unlimited student AI use without instruction
❌ Copy/paste AI content without verification
❌ Use AI to make decisions about individual students
Always:
✅ Maintain human oversight and judgment
✅ Prioritize student privacy and safety
✅ Model ethical AI use
✅ Stay informed about AI developments
✅ Encourage critical thinking about AI outputs
✅ Document your AI use practices
📋 Quick Decision Framework
Ask Yourself:
Is it legal? - Does this comply with FERPA, COPPA, and district policies?
Is it ethical? - Would I be comfortable if parents/admin knew?
Is it pedagogical? - Does this improve learning outcomes?
Is it transparent? - Am I being honest about AI use?
Is it equitable? - Does this create or reduce barriers for students?
If any answer is "No" or "Unsure" → Reconsider or seek guidance
🎯 Best Practices Summary
The 3 T's of Ethical AI Use:
Transparency - Be open about when and how you use AI
Teaching - Use AI as an opportunity to build digital literacy
Trust - Verify everything, maintain professional judgment
Remember:
"AI is a powerful teaching assistant, not a replacement teacher. Use it to amplify your expertise, not abdicate your responsibility."
📱 Quick Reference Card
Before Each AI Use, Check:
✓ No student data included
✓ Clear educational purpose
✓ Plan to verify outputs
✓ Will model good practices
✓ Adds value to learning
The Educator’s Research Template for Perplexity
📚 Basic Template
Formula:
What are [number] key [concepts/facts/examples] about [specific topic] appropriate for [grade level] students, based on [source type]?
Example:
What are 5 key examples of symbiosis in nature appropriate for 7th grade students, based on recent scientific studies and educational resources?
🎯 Advanced Template with Differentiation
Formula:
Provide [number] [type of content] about [topic] for [grade level]:
Include: [specific element]
Suitable for: [time frame]
Align with: [standard/objective]
Format as: [output format]
Example:
Provide 3 discussion questions about the American Revolution for 8th grade:
Include: connections to modern democracy
Suitable for: 15-minute think-pair-share activity
Align with: understanding multiple perspectives in history
Format as: open-ended questions with sample response starters
⚡ Quick Templates
🔍 Finding Resources
Find me [number] reliable sources about [topic]
that I can use to teach [grade level] students,
focusing on [specific aspect].
🎨 Creating Activities
Create a [type of activity] about [topic]
for [grade level] that takes approximately [time]
and helps students understand [specific learning goal].
📊 Differentiation
Explain [topic] in three ways:
• Simplified for struggling readers
• Grade-level appropriate for [grade]
• Extended with advanced vocabulary for gifted students
💡 Pro Tips
Save your favorites - Keep templates that work for your subject
Part 2: Exploring Your Workflow with Perplexity Spaces and Pro Tools
View
Elevate from basic searches to building a professional research workflow as you learn to organize with Spaces, collaborate with colleagues, and leverage Pro features for document analysis and data visualization.
This session is crucial for educators drowning in disorganized research who need systematic ways to manage resources, share findings with teaching teams, and analyze curriculum documents or student data efficiently.
Through creating your first Space, setting up a collaborative project, and exploring file upload capabilities, you'll develop a sustainable system that transforms scattered research into organized, shareable knowledge.
Create a dedicated Space for your current unit with custom instructions including grade level and learning objectives. Move three existing searches into this Space, then share it with a colleague for collaborative resource gathering. If using Pro, upload a curriculum document and ask three specific questions about its content.
Transfer Learning to Long-Term Memory
Draw a picture by hand capturing your understanding of a Perplexity Spaces and how you might use it for a real life project.
Topics
EduResource Curator – Custom Instructions for Perplexity Spaces
Name Suggestion: EduResource Curator
Core Personality & Purpose: You are an expert educational resource curator and instructional design specialist. Your mission is to help educators quickly find, organize, and implement high-quality teaching resources that align with state standards while supporting diverse learners.
Primary Functions:
1. Resource Compilation & Alignment
When asked to compile resources for [subject] aligned with [state standards]:
Identify the specific grade level and learning objectives
Provide a curated list of 5-7 high-quality resources (mix of free and premium if applicable)
Include diverse resource types: lesson plans, interactive activities, videos, readings, and hands-on projects
Clearly indicate how each resource aligns with specific standards (use standard codes)
Note approximate time requirements and preparation needs
2. Differentiation Strategies
For each topic or resource set, automatically include:
For Advanced Learners: Extension activities, enrichment projects, and independent research opportunities
For Struggling Learners: Scaffolding suggestions, modified assignments, and prerequisite skill builders
For English Language Learners: Vocabulary supports, visual aids, and language modification strategies
For Different Learning Styles: Visual, auditory, kinesthetic, and reading/writing approaches
3. Assessment Ideas
Provide a comprehensive assessment toolkit including:
Formative Assessments: Quick checks, exit tickets, digital polls, observation checklists
Summative Assessments: Project rubrics, traditional tests, performance tasks, portfolios
Alternative Assessments: Student choice boards, presentations, creative projects, peer assessments
Success Criteria: Clear learning targets and "I can" statements aligned to standards
4. Implementation Support
Suggest pacing guides and scope/sequence recommendations
Provide technology integration ideas (both low-tech and high-tech options)
Include classroom management tips specific to the activities
Offer parent communication templates and home extension activities
5. Collaboration Features
Generate discussion prompts for PLC meetings
Create shareable resource templates that colleagues can customize
Suggest cross-curricular connections and team-teaching opportunities
Provide reflection questions for professional growth
Response Format: Structure all responses with clear headers and bullet points for easy scanning. Use this template:
Assessment Example: Creating Entry and Exit Tickets
Master Prompt Template
"Create a series of entry and exit ticket prompts for a [Subject] class at the [Grade Level] level. The entry tickets should assess prior knowledge related to [Topic], and the exit tickets should gauge understanding of the day's lesson on [Specific Learning Objective]. Provide at least three examples of each, formatted as questions or short tasks. Include a brief explanation of why each prompt is effective."
Examples by Subject Area
Mathematics Example - Fractions (6th Grade)
Entry Tickets (Assessing Prior Knowledge):
Prompt: "Draw a picture showing 3/4 of a pizza. Explain your drawing."
Why it's effective: Reveals conceptual understanding through visual representation and verbal explanation.
Prompt: "True or False: 1/2 is always bigger than 1/3. Explain your answer."
Why it's effective: Uncovers common misconceptions about fraction size and denominators.
Prompt: "Write two equivalent fractions for 2/4."
Why it's effective: Checks understanding of fraction equivalence, a prerequisite for today's lesson.
Exit Tickets (Understanding of Fraction Division):
Prompt: "In your own words, why do we 'flip and multiply' when dividing fractions?"
Prompt: "Write the chemical equation for photosynthesis and circle the products."
Why it's effective: Tests recall of key formula and understanding of inputs/outputs.
Prompt: "Explain why plants are called 'producers' in the food chain."
Why it's effective: Connects photosynthesis to broader ecological concepts.
Prompt: "If a plant is kept in the dark for a week, predict what will happen and why."
Why it's effective: Requires application of knowledge to novel scenario.
English Language Arts Example - Theme Analysis (8th Grade)
Entry Tickets (Prior Knowledge):
Prompt: "Define 'theme' in literature and give one example from a story you've read."
Why it's effective: Establishes baseline understanding of the concept.
Prompt: "What's the difference between a theme and a plot? Give a brief example."
Why it's effective: Clarifies common confusion between literary elements.
Prompt: "List three common themes you've noticed in stories or movies."
Why it's effective: Connects to students' broader experiences with narrative.
Exit Tickets (Understanding Theme in "The Outsiders"):
Prompt: "Identify one theme from today's chapter and cite specific evidence from the text."
Why it's effective: Requires both identification and textual support.
Prompt: "How does the author develop the theme of loyalty through character actions?"
Why it's effective: Assesses understanding of how themes are crafted.
Prompt: "Connect one theme from today's reading to your own life or current events."
Why it's effective: Promotes personal relevance and deeper engagement.
Design Tips for Effective Tickets
Format Variations:
Quick Draw: Students sketch their understanding
3-2-1: List 3 things learned, 2 questions, 1 connection
One-Minute Write: Timed response to open-ended prompt
Rating Scale: Self-assess understanding from 1-5 with justification
Sentence Starters: "Today I learned..." "I'm still confused about..."
Best Practices:
Keep it Brief: 2-5 minutes maximum completion time
Align to Objectives: Directly connect to lesson goals
Vary Complexity: Mix recall, application, and analysis questions
Make it Routine: Use consistently for habit formation
Provide Feedback: Use data to adjust instruction immediately
Digital Tools Integration:
Google Forms: Quick collection and automatic data analysis
Padlet: Visual exit tickets with multimedia responses
Mentimeter: Real-time polling and word clouds
Flipgrid: Video responses for verbal processors
Differentiation Strategies:
For ELL Students: Provide sentence frames and allow visual responses
For Advanced Learners: Include extension questions or "what if" scenarios
For Students with Disabilities: Offer choice in response format (verbal, written, drawn)
Sample Implementation Schedule
Time
Monday
Tuesday
Wednesday
Thursday
Friday
Entry (First 3 min)
Prior knowledge check
Vocabulary preview
Connect to yesterday
Predict today's topic
Week's concept review
Exit (Last 3 min)
Key concept summary
Application problem
Self-assessment
Question generation
Weekly reflection
Assessment and Data Use
Immediate Actions:
Scan for misconceptions to address next class
Identify students needing additional support
Adjust pacing based on understanding levels
Long-term Tracking:
Create spreadsheet to track growth over time
Look for patterns in student difficulties
Use data for parent conferences and interventions
Remember: Entry and exit tickets are formative assessments meant to inform instruction, not grade students. Focus on using them as learning tools that benefit both you and your students!
Outline of High Impact Teaching Strategies
High Impact Teaching Strategies: Summary
The High Impact Teaching Strategies (HITS) are 10 evidence-based instructional practices that reliably increase student learning, drawn from research by John Hattie, Robert Marzano, and others. This resource was first published by the Victoria Department of Education and Training in 2017 and revised in 2020. HITS are designed to support collaborative, evidence-based conversations between teachers and provide opportunities to observe, reflect on, and improve fundamental classroom practices.[1]
I. Overview and Evidence Base
A. What Are HITS?
10 instructional practices that reliably increase student learning[1]
Emerge from tens of thousands of studies of classroom effectiveness worldwide[1]
Ranked by contribution to student learning using effect size measurements[1]
B. Effect Size
Measures the contribution an education intervention makes to student learning[1]
Allows comparison of how well interventions work in varying contexts[1]
Supports a more scientific and rigorous approach to building professional knowledge[1]
C. Purpose and Use
Not intended to replace existing successful teaching strategies[1]
Add to the repertoire of effective strategies teachers can apply[1]
Part of the full set of instructional practices contributing to a comprehensive pedagogical model[1]
II. Who Are the HITS For?
A. Teachers
Beginning teachers gain a bank of reliable instructional practices[1]
Experienced teachers add to their understanding and discover new applications[1]
All teachers benefit from practice, reflection, shared observation, and feedback[1]
B. Professional Learning Communities
Build collective efficacy by pooling knowledge of effective teaching[1]
Anchor interventions in evidence-based practices[1]
Increase likelihood of interventions being effective[1]
C. School Leaders
Support classroom-embedded professional learning[1]
Foster a supportive high-performance learning culture[1]
Use coaching, modeling, observation, and feedback to ensure widespread use[1]
III. Using the HITS
A. Implementation Approach
Provide a common language for planning, monitoring, and reflecting on classroom practice[1]
Offer a developmental continuum to measure proficiency across ten strategies[1]
Guide a practice improvement journey[1]
B. Improvement Cycle
Diagnose a classroom need[1]
Investigate a problem of practice[1]
Identify one or more HITS as a possible intervention[1]
Unpack, discuss, and model the strategies[1]
Collectively review them as part of observation rounds[1]
C. Review and Evaluation
Critical to using HITS for maximum impact on student learning[1]
Effectiveness in any particular school context can only be determined by application[1]
Measure impact on student learning[1]
IV. The 10 High Impact Teaching Strategies
A. Setting Goals (Effect size: 0.56)
Lessons have clear learning intentions with goals that clarify what success looks like[1]
Goals explain what students need to understand and what they must be able to do[1]
Based on assessed student needs[1]
Can focus on surface and/or deep learning[1]
Challenges students relative to their current mastery[1]
Links to explicit assessment criteria[1]
B. Structuring Lessons (Effect size: 0.53 for scaffolding)
A lesson structure maps teaching and learning that occurs in class[1]
Sound lesson structures reinforce routines[1]
Scaffold learning via specific steps and activities[1]
Optimize time on task and classroom climate using smooth transitions[1]
Planned sequencing stimulates and maintains engagement[1]
C. Explicit Teaching (Effect size: 0.59)
Teachers clearly show students what to do and how to do it[1]
Teacher decides on learning intentions and success criteria[1]
Makes them transparent to students and demonstrates them by modeling[1]
Checks for understanding[1]
Revisits what was covered at the end of each lesson[1]
D. Worked Examples (Effect size: 0.57)
A demonstration of the steps required to complete a task or solve a problem[1]
Scaffolds learning and supports skill acquisition[1]
Reduces cognitive load for learners[1]
Teacher presents a worked example and explains each step[1]
Students can use worked examples during independent practice[1]
E. Collaborative Learning (Effect size: 0.59 compared to individual work)
Students work in small groups and everyone participates in a learning task[1]
Many collaborative learning approaches exist[1]
Each uses varying forms of organization and tasks[1]
Supported by designing meaningful tasks[1]
Involves students actively participating in negotiating roles, responsibilities, and outcomes[1]
F. Multiple Exposures (Effect size: 0.71 for spaced practice)
Provide students with multiple opportunities to encounter, engage with, and elaborate on new knowledge and skills[1]
Deep learning develops over time via multiple, spaced interactions[1]
May require spacing practice over several days[1]
Uses different activities to vary interactions learners have with new knowledge[1]
G. Questioning (Effect size: 0.46)
A powerful tool effective teachers regularly use for a range of purposes[1]
Engages students and stimulates interest and curiosity[1]
Opens up opportunities for students to discuss, argue, and express opinions[1]
Yields immediate feedback on student understanding[1]
Supports informal and formative assessment[1]
Captures feedback on effectiveness of teaching strategies[1]
H. Feedback (Effect size: 0.73)
Informs a student and/or teacher about the student's performance relative to learning goals[1]
Redirects or refocuses teacher and student actions[1]
Helps student align effort and activity with a clear outcome[1]
Can be oral, written, formative, or summative[1]
Comprises specific advice a student can use to improve performance[1]
I. Metacognitive Strategies (Effect size: 0.63 for teaching problem solving)
Teach students to think about their own thinking[1]
When students become aware of the learning process, they gain control over their learning[1]
Extends to self-regulation or managing one's own motivation toward learning[1]
Activities can include planning how to approach learning tasks, evaluating progress, and monitoring comprehension[1]
J. Differentiated Teaching (Effect size: 1.07 for RTI)
Methods teachers use to extend the knowledge and skills of every student in every class[1]
Objective is to lift the performance of all students[1]
Includes those falling behind and those ahead of year level expectations[1]
Effective teachers plan lessons that incorporate adjustments for content, process, and product[1]
V. Key Implementation Principles
A. Professional Development
Mastery of HITS requires drawing on deep curriculum knowledge[1]
Requires skills in assessment for, as, and of learning[1]
Deliberate practice and feedback in a trusted environment help develop new skills[1]
B. Continuum of Practice
Each HITS includes a four-level continuum: Emerging, Evolving, Embedding, Excelling[1]
Supports teachers to reflect on practice, assess proficiency levels, and set improvement goals[1]
Can be linked to the performance and development cycle[1]
C. Connection to FISO
HITS provide a clear link between the "Evidence Based High Impact Teaching Strategies" dimension of FISO and classroom practice[1]
Teachers can plan and adjust their practice in response to one or more HITS[1]
Monitor the impact on student engagement and learning outcomes
Lesson 32 · 6 topics
Part 3: Bringing Perplexity into Your Classroom
View
Bridge the gap between AI tools and classroom practice as you learn to create differentiated materials instantly, design engaging AI-enhanced activities, and teach students responsible AI literacy skills they'll use for life.
This final session empowers you to not just use AI for your own productivity, but to transform student learning through activities like "Source Detective" and the TRACE method for responsible AI use. Through building a complete 5E lesson plan, creating visual diagrams with Mermaid code, and designing your first student AI activity, you'll leave ready to implement AI-enhanced learning while maintaining critical thinking at the forefront.
Design a "Fact vs. Fiction" challenge for your students using your current topic. Create five statements (mix of true and false), then use Perplexity to generate the answer key with source citations. Test the activity yourself, then modify it for your specific classroom needs, adding scaffolding questions that promote critical evaluation of AI-generated content.
Transfer Learning to Long-Term Memory
Outline and organize your thoughts about the series into a quadrant outline (learn more) or a traditional outline.
Topics
The Instant Differentiation Engine
Purpose
Transform any content into multiple learning levels instantly, ensuring every student can access and engage with the material at their appropriate challenge level.
The Formula
Take [topic/content] and create [number] versions:
A five-step process for using AI responsibly in your research and learning.
The TRACE Steps
T - Think First
Before using AI, ask yourself:
What do I already know about this topic?
What specific question am I trying to answer?
What type of information do I need?
R - Research with AI
When using Perplexity or other AI tools:
Write specific, detailed prompts
Ask for sources and citations
Request multiple perspectives
A - Analyze the Information
Don't just accept what AI tells you:
Click on at least 2-3 source links
Check if sources are credible and current
Look for potential bias or missing information
C - Create Your Own Work
Transform AI information into your own understanding:
Summarize in your own words
Add your own examples and connections
Combine multiple sources
E - Evaluate and Cite
Finish responsibly:
List all sources used (including AI)
Reflect on what you learned
Consider what questions remain
Student Checklist
□ I brainstormed before using AI
□ I wrote a specific, detailed prompt
□ I checked at least 3 sources
□ I rewrote information in my own words
□ I cited all sources including AI
□ I can explain this topic without notes
Source Detective Activity Guide
Activity Overview
Students become "detectives" investigating the credibility and accuracy of AI-generated information by tracking down and evaluating original sources.
The Investigation Process
Round 1: The AI Interview
1. Students ask Perplexity a research question
2. Record the answer with all citation numbers
3. Highlight 3 key facts from the response
Round 2: The Source Hunt
1. Click on each citation [1], [2], [3]
2. Find the exact quote or information referenced
3. Complete the Source Detective Report for each
Source Detective Report Template
Citation Number: [ ]
Source Name: ________________
Author/Organization: ________________
Date Published: ________________
Type of Source: □ Academic □ News □ Blog □ Government □ Other
The AI said: "_________________"
The source actually says: "_________________"
Match Level: □ Exact □ Paraphrased □ Different □ Not Found
Credibility Score (1-5): ___
Why this score? ________________
Classroom Variations
Fact vs. Fiction Challenge:
Teacher provides 5 AI-generated statements
Students must verify each and mark:
✓ Verified True
✗ Proven False
? Cannot Confirm
Source Race:
Teams compete to verify AI facts fastest
Points for: Speed + Accuracy + Source Quality
Bonus: Find a fact AI missed!
Understanding Mermaid Syntax Basics: A Brief Tutorial
This is a tutorial I put together using a blog entry I wrote then revised using Perplexity.ai, then ChatGPT 5.5 Pro. You may find it helpful.
Water Cycle Lesson Plan: NGSS MS-ESS2-4
This 5E lesson plan for 7th-grade science incorporates high-effect size instructional strategies from John Hattie's Visible Learning research, such as activating prior knowledge (effect size 0.93), constructivist teaching (0.90), reciprocal teaching (0.74), elaboration and organization (0.72), critical thinking (0.79), and self-judgment and reflection (0.81) to enhance engagement, comprehension, and retention across surface, deep, and transfer learning phases.[1][2]
Overall Lesson Overview
The lesson spans 2-3 class periods (90-120 minutes total) and models the water cycle driven by solar energy and gravity. Materials include zip-top bags, water, markers, hot plates, cups, ice, plastic wrap, and digital tools like Google Docs for collaboration. Success criteria: Students can diagram the cycle, explain driving forces, and apply to real-world scenarios.[3][1]
Objective
Alignment to Standard
HES Strategy Integration
Time
Explain water cycle processes
MS-ESS2-4: Develop models of cycling through systems
Elaboration and organization (0.72) for connecting ideas
20 min
Model energy-driven movement
MS-ESS2-4: Energy from sun and gravity
Constructivist teaching (0.90) via hands-on exploration
30 min
Apply to local impacts
MS-ESS2-4: Earth's systems interactions
Critical thinking (0.79) through real-world analysis
25 min
[2][1]
Engage
Explanation: Begin by activating prior knowledge to connect students' existing understanding of water states and weather to the water cycle, fostering engagement and reducing misconceptions. Use a surprising fact demonstration with immediate feedback to spark curiosity and self-assessment, promoting metacognition.[4][1]
What to Say to Students: "Today, we're diving into the water cycle—think about what you already know about rain, rivers, and evaporation from everyday life. Did you know Earth's water has been recycling for billions of years without any new water added? Watch this quick demo: I'll heat water in a cup and place ice on top—what do you predict will happen, and why?" Provide positive reinforcement for predictions, then reveal condensation forms droplets like clouds.[1]
Activity Step
Materials
HES Strategy
Expected Outcome
Share surprising fact: Water volume unchanged over time
Hot plate, cup of water, ice
Prior knowledge activation (0.93) with immediate feedback (0.92)
Students recall weather experiences; 80% predict state changes correctly
Group brainstorm (2 min): What drives water movement?
Whiteboard or Padlet
Self-reported grades (0.96) via quick thumbs-up self-check on confidence
Increased curiosity; misconceptions like "water disappears" surfaced for correction
[4][1]
Explore
Explanation: Students conduct a hands-on investigation using the water cycle in a bag model to observe evaporation and condensation, emphasizing constructivist teaching where they actively build understanding through inquiry. Incorporate reciprocal teaching by having groups question and clarify observations, deepening connections.[5][1]
What to Say to Students: "In small groups, you'll create a mini water cycle using a bag, water, and sunlight—draw the water on one side and seal it. Observe over 30 minutes: What changes do you see? Predict, question each other on why it happens (like 'Why does water rise?'), clarify confusions, and summarize your findings. How does this mimic nature?" Circulate to provide cues and reinforcement feedback on observations.[1]
Activity Step
Materials
HES Strategy
Expected Outcome
Setup bag model: Add water, seal, tape to window
Zip-top bags, water, blue marker, tape
Constructivist teaching (0.90) for active exploration
Students observe droplets forming; 90% identify evaporation
Group dialogue (10 min): Rotate roles to predict/question/clarify/summarize
Observation sheets
Reciprocal teaching (0.74) for peer-led inquiry
Groups connect sun's heat to vapor rise; improved group accountability
Debrief: Share one observation
Digital whiteboard for notes
Retrieval practice (0.49) via verbal recall
All students verbalize at least one process; gaps identified for explain phase
[5][1]
Explain
Explanation: Deliver direct instruction on cycle processes (evaporation, condensation, precipitation, collection) using visuals, while integrating success criteria and elaboration to organize information hierarchically. Students elaborate by connecting to their exploration, reinforcing deep learning.[2][1]
What to Say to Students: "Based on your bag experiment, here's how the water cycle works: Sun energy evaporates water into vapor (like what you saw rising), it condenses into clouds when cooled, gravity pulls precipitation down as rain, and it collects in oceans or ground. Use this diagram to label and explain in your own words how energy and gravity drive it—compare to your observations. Success means accurately linking each step to a force." Model with an animated video, then have pairs elaborate differences from their model.[1]
Activity Step
Materials
HES Strategy
Expected Outcome
Present processes with diagram
Poster or digital slide (e.g., PhET simulation)
Success criteria (0.64) shared upfront
Students match visuals to terms; clear expectations reduce confusion
Pair elaboration: Draw and explain one process
Worksheets, markers
Elaboration and organization (0.72) via concept maps
Pairs create hierarchical outlines; 85% correctly link sun/gravity
Quick check: Thumbs-up if you can explain collection
None
Feedback (0.92) with reinforcement for correct responses
Immediate cues address errors; builds confidence for elaborate phase
[2][1]
Elaborate
Explanation: Extend learning with a real-world application where groups analyze local weather impacts (e.g., floods), using critical thinking to evaluate human influences. Incorporate spaced practice by revisiting prior observations, promoting transfer to novel contexts.[6][1]
What to Say to Students: "Now, apply the cycle: In groups, research a local event like a drought—how does altered evaporation affect precipitation? Create a poster showing the cycle's role, evaluate evidence from news clips, and suggest solutions. Revisit your bag model: How does this scale up? We'll space this with a quick recall from explore first." Provide timely feedback on drafts to refine arguments.[1]
Activity Step
Materials
HES Strategy
Expected Outcome
Group research and poster design (15 min)
News articles, poster paper, devices
Critical thinking (0.79) through evidence evaluation
Groups identify 2+ connections (e.g., less rain from warmer temps)
spaced recall: Quiz on processes from explore
Printed cards or Quizizz
Spaced practice (0.62) for retention
75% accuracy; reinforces over time
Peer share: Present and critique one impact
None
Jigsaw method elements (1.20) for teaching peers
Transfer to real-world; diverse perspectives integrated
[6][1]
Evaluate
Explanation: Assess via formative questions incorporating varied types, with self-judgment for reflection on mastery. Use summarizing and feedback to close gaps, ensuring alignment to objectives for surface and deep learning evaluation.[3][1]
What to Say to Students: "To wrap up, complete this quick assessment: Reflect on your answers—what do you know well, and where can you improve? Use the criteria to self-grade. I'll provide feedback on strengths and next steps. Summarize the cycle's drivers in one sentence." Collect for review, reinforcing successes.[1]
Question Type
Question
HES Strategy
Rubric/Success Criteria
Multiple-choice
Which force pulls precipitation down? (A) Sun (B) Gravity (C) Wind (D) Heat
Retrieval practice (0.49)
Correct: B [1 point]; Feedback if wrong
Diagram labeling
Label evaporation on cycle image
Elaboration (0.72)
Accurate placement [2 points]; Self-reflect on prior knowledge link
Short response
Explain sun's role in one sentence
Summarizing (0.45)
Clear connection to energy [2 points]; Peer cue if needed
Evidence-based prediction [2 points]; Total: 8/8 for mastery
Lesson 33
Practice On Your Own: Perplexity
View
Perplexity: Build a Subject-Specific Space
In this activity, you will create a new Space in Perplexity for your primary subject. Then, you will add Custom Instructions naming your grade level, your state standards, and your source preferences (e.g., "Prioritize peer-reviewed journals, .edu, and government data; avoid Wikipedia summaries").
Upload 2–3 reference PDFs you'd want every answer grounded in.
Run three real planning queries:
a content question,
a common-misconception question, and
a real-world-example question.
Compare the cited answers against what generic ChatGPT gives you for the same prompts.
Decide which becomes your default research starting point and write down why.
Assignment for Module 4
Take a screenshot (use one of these popular tools, Lightshot, ShareX, or Greenshot) of what you created and copy-n-paste your prompt. Then, share the result via the ShareSpace below.
Screencapture on a Mac: Are you on a Mac? Take screenshots on a Mac using built-in keyboard shortcuts: Cmd + Shift + 3 for the full screen, Cmd + Shift + 4 for a selected area, and Cmd + Shift + 5 for screen recording and advanced options.
Introducing the ShareSpace
For all the Practice on Your Own activities, as well as anything new you would like to share, please use the TCEA ShareSpace Board (similar to Padlet but free) to share your creation. Note: Be sure to select the correct Module in the dropdown.
Want district AI tools that protect privacy and cut subscription costs? This module shows you how to run secure, high-performing AI models on your own devices with no cloud required, and how to reach frontier Gen AI models through an API in a way that still safeguards your data. You will earn two CPE hours while building a working local AI setup and a governance plan that keeps data safe and staff confident.
The module is organized in two parts with multiple topics. Note that you can access the printable PDF for each document that appears as a topic (for easy viewing, not printing) after each lesson. This provides you both view and print access to the support documents.
Part One. Running AI Locally and Privately
You will install and configure Ollama and Page Assist to run powerful local AI models directly on your computer. From there, you will build a four-part Knowledge Stack that keeps your prompts and documents organized while protecting sensitive data. By the end of Part One, you will have a functional local AI assistant ready for district-specific tasks, with nothing sent to the cloud.
Part Two. Managing Access and Governance for AI Use
You will take your local setup further by adding strong identity, access, and audit controls. You will create user roles, set up single sign-on (SSO), and connect to external models such as Gemini, Claude, or ChatGPT through a secure API broker. The work in this part produces an AI Access Playbook, a practical guide that defines who can use which tools, when to use local versus cloud AI, and how to monitor use safely across your district.
By the end of the module, you will have:
A working local AI installation using Ollama and Page Assist
A four-part Knowledge Stack organized for district use
User roles and single sign-on configured for your team
A secure API connection to at least one frontier model
A complete AI Access Playbook ready to share with leadership and IT staff
You will earn an individual certificate for completing this module, which counts toward your AI Essentials for Educators completion certificate and badge.
Topics
Access the Ollama Enterprise Deployment for K-12 School Districts
About the Primer
This primer offers a concise overview of deploying Ollama in a K-12 school district, designed to equip you with the foundational knowledge and practical skills necessary to implement a secure, on-premises AI solution. Whether you're an IT director, a curriculum leader, or a system administrator, this resource will guide you through the core concepts, key strategies, and essential tools for local AI deployment.
By the end of this primer, you'll be able to plan the necessary infrastructure, implement role-based access controls, and manage the AI model lifecycle, empowering you to provide safe and compliant AI tools for your staff and students. Get ready to unlock the potential of on-premises AI and transform your district's approach to digital learning.
This session guides you through setting up a private, local AI environment on your own computer or district server. Using Ollama and a simple browser interface, you’ll build a reusable Knowledge Stack—a folder of files that helps the AI respond accurately to district-specific questions. The focus is on hands-on setup, choosing the right model for your hardware, and applying strong privacy practices so no information leaves your network.
Capacity Matrix – Running AI Locally and Privately
Indicators
I need a plan
In Progress
Ready to Go
I can install and run a local AI model using Ollama or a similar tool.
I can organize and load district resources into a Knowledge Stack for the AI to use.
I can identify what data should remain local to protect student and staff privacy.
I can select an AI model that fits my available hardware and workload.
I can demonstrate that a local AI setup can answer district-specific questions securely.
You will install and launch Ollama, load a compact local model such as Gemma or Llama 3, and connect it to a simple browser UI like Page Assist. You will create a four-part Knowledge Stack folder with custom instructions, background, exemplars, and references and load those files into the model. By the end, you will confirm that responses draw only from district-approved content and understand how to repeat this secure setup elsewhere.
Load the stack and verify grounded answers on a district-safe prompt (with web search off).
Transfer Learning to Long-Term Memory (15 minutes)
You will apply what you built by selecting one real district use case. That can include a policy Q&A, rubric calibration, and/or a family communications draft. You can leave it running entirely through your local AI setup. You will document the workflow in a one-page implementation brief listing data inputs, access safeguards, and success measures. This exercise helps you connect the technical setup to meaningful educational outcomes while reinforcing safe, repeatable practices.
Steps
Select one real district use case (policy Q&A, rubric calibration, family communications).
Draft a one-page implementation note listing inputs, constraints, allowed data classes, storage location, and success criteria.
Save the note alongside your Knowledge Stack for reuse and updates.
Topics
District AI Reference Architecture (Local + API)
Purpose
Use this template to map how local and cloud AI tools fit safely into your district’s environment. You’ll identify data flows, access boundaries, and roles so your AI use stays secure, private, and aligned with district policy.
🧩 Blank Template
1. Core Components
Layer
Description
Example Tools or Elements
User Layer
Who interacts with the AI tools and from what devices?
Local AI Layer
Which AI models run on local or district-owned hardware?
Integration Layer (Optional)
How do you connect local models to approved online services, if at all?
Cloud AI Layer
What external AI services are approved for limited use?
Identity & Access Layer
How will users log in and get permissions?
Governance & Logging Layer
How will usage be monitored, logged, and reviewed?
2. Data Flow Summary
User sends a request:Describe how staff or educators access the system (e.g., web portal, browser extension).
Local AI Layer:List which requests stay fully on local hardware and why (e.g., student data, policy Q&A).
Integration Layer:Describe how prompts are routed if they need online processing.
Identity & Access:Explain who can use each path and what login or approval is required.
Governance & Logging:Describe how and where use is tracked and who reviews reports.
3. Roles and Responsibilities
Role
Primary Responsibility
Tools Managed
IT / Security Lead
Instructional Technology Lead
Data Privacy Officer
End Users (Teachers/Staff)
4. Trust Boundaries
Local Zone:(Define which data stays entirely local.)
Controlled Zone:(Describe which systems mediate between local and external.)
External Zone:(List any approved vendor services and limits.)
5. Architecture Diagram
Sketch or describe your structure below. Example format:
Users → Local AI (_________) → [Optional API Gateway] → Cloud AI (_________)
↑
Logs / Audit Trail
Completed Example – Sample District Setup
1. Core Components
Layer
Description
Example Tools or Elements
User Layer
Teachers and staff access AI via a secure district web portal.
Page Assist, web UI
Local AI Layer
Local text-generation models run on district servers to keep data private.
Ollama (Gemma 2B, Llama 3)
Integration Layer (Optional)
Requests that require large context or coding support route through a monitored gateway.
Internal API Broker (Node.js or FastAPI)
Cloud AI Layer
Approved vendor models used for low-risk, non-student data tasks.
ChatGPT, Claude, Gemini
Identity & Access Layer
All users log in through district Google SSO; access tied to staff role.
Google Workspace SSO, RBAC roles
Governance & Logging Layer
Logs capture user, model, timestamp, and token use; monthly reviews by privacy officer.
Local audit database, dashboard reports
2. Data Flow Summary
User sends a request: Teachers log in to the district AI portal using Google SSO.
Local AI Layer: All prompts containing student or staff data are processed entirely by the local Ollama server.
Integration Layer: Non-sensitive prompts can be routed to external AI models through a district API broker.
Identity & Access: Access level (teacher, analyst, admin) determines whether a prompt can reach external services.
Governance & Logging: All activity is logged automatically, with monthly reviews by IT and data privacy teams.
3. Roles and Responsibilities
Role
Primary Responsibility
Tools Managed
IT / Security Lead
Maintains server health, SSO connections, and API gateway security.
Ollama, API broker
Instructional Technology Lead
Develops and updates knowledge stacks for subject-specific support.
Page Assist, document repository
Data Privacy Officer
Audits logs, approves new models, ensures FERPA compliance.
Audit tools, policy reports
End Users (Teachers/Staff)
Use approved AI tools for planning, communication, and data review.
District AI portal
4. Trust Boundaries
Local Zone: Student data, staff communications, internal policy docs.
Controlled Zone: District-managed API broker and SSO system.
External Zone: Cloud-based AI models accessed through approved accounts only.
5. Architecture Diagram
Teachers & Staff → Local AI Server (Ollama) → API Gateway (District-Controlled) → Cloud AI (ChatGPT, Claude, Gemini)
↑
Audit Logs → Privacy Dashboard
Two diagram examples are offered with explanations:
Version 1 - Technical Systems Map
Executive / Policy View)
For administrators, decision-makers, or educators. This is for people who don’t need network-level details but do need to understand who controls what and how data stays safe. It shows how trust and responsibility increase as you move downward through layers.
Structure and Emphasis
Top-down hierarchy:
Users at the top (teachers, staff).
Local Zone in the middle — private, on-prem models.
Controlled Zone below that — gateway, SSO, policy enforcement.
External Zone at the bottom — cloud vendors beyond the district’s trust boundary.
Gradient colors: Each zone has blended hues (green for local, blue for controlled, orange for external) for readability and visual appeal.
Trust Boundary line: Drawn horizontally across the page to clearly mark where data control transitions from internal to external.
Version 2 - Technical Systems Map
This is designed to be similar to a horizontal network diagram. It’s designed to help you see the data flow from left to right, such as when a teacher’s request moves through each system. Use it when explaining to data privacy officers or other technical support staff how a prompt flows through the system and where boundaries are enforced.
Structure and Emphasis
Left-to-right flow: Starts with “Teachers & Staff” on the far left and ends with “Cloud AI” vendors on the right. This mirrors how information moves through your infrastructure.
Clearly marked zones:
Local Zone for on-prem models (Ollama, Page Assist)
Controlled Zone for the gateway and identity management
External Zone for approved vendor AI tools
Straightforward color coding: Light blue (Local), green (Controlled), orange (External).
Minimal decoration: It’s meant for clarity in technical conversations — ideal for architecture docs or presentations with IT teams.
Note: A landscape version, full-size appears in the resources. You can also find Draw.io or Diagrams.net versions.
Knowledge Stack Folder Blueprint (Blank Template)
No topic body content was included in the spreadsheet export.
Model Fit Guide: RAM/VRAM vs Context and Quantization
Model Fit Guide: RAM / VRAM vs. Context and Quantization
Use this guide to match your hardware with the right AI model size and settings. The goal: balance performance, accuracy, and stability, especially when running locally with tools like Ollama.
🧾 Blank Template
1. Hardware Summary
Device Type
CPU
RAM
GPU (VRAM)
Notes
2. Model Comparison Table
Model
Parameter Size
Quantization Level
Context Window (Tokens)
Recommended RAM / VRAM
Use Case Fit
Notes
Quantization Key
Q2_K / Q3_K: Very lightweight, minimal memory, faster but less accurate.
Q4_K / Q5_K: Balanced, good mix of speed and performance.
Q6_K / Q8_0: High quality, slower, needs more VRAM.
3. Fit Checklist
Indicator
Yes/No
Model loads fully into memory without swap use
Response time < 10s for 500-token prompt
Output coherence acceptable for target task
Can batch 2+ users simultaneously
Meets local privacy and storage constraints
4. Notes and Observations
Use this section to record real-world performance, such as how fast it runs, how warm it gets, what kinds of tasks break it.
Example:
- Gemma 2B (Q4_K_M) runs well on 16GB RAM laptop, average 6 tokens/sec.
- Llama 3.1 8B needs 24GB+ RAM or 8GB VRAM to perform smoothly.
✅ Filled Example — Midrange District Setup
1. Hardware Summary
Device Type
CPU
RAM
GPU (VRAM)
Notes
Dell Precision Workstation
Intel i7 (12-core)
32 GB
NVIDIA RTX 3060 (8 GB)
Used for pilot AI server; shared via LAN.
2. Model Comparison Table
Model
Parameter Size
Quantization Level
Context Window (Tokens)
Recommended RAM / VRAM
Use Case Fit
Notes
Gemma 2B
2B
Q4_K_M
4K
8 GB RAM
✅ Fast Q&A, summaries
Great entry model; under 3s latency.
Llama 3.2 3B
3B
Q5_K_S
8K
12 GB RAM
✅ Writing, analysis
Balanced performance, higher quality text.
Mistral 7B
7B
Q4_K_M
8K
16 GB RAM / 8 GB VRAM
⚠️ Research, deep prompts
Good accuracy; slower under load.
DeepSeek 7B
7B
Q5_K_M
16K
20 GB RAM / 10 GB VRAM
⚠️ Multilingual & longer responses
Stable but heavy on GPU; best for batch jobs.
Llama 3.1 8B
8B
Q6_K
16K
24 GB RAM / 12 GB VRAM
❌ Not recommended
Excellent quality but too slow for concurrent users.
3. Fit Checklist
Indicator
Yes/No
Model loads fully into memory without swap use
✅
Response time < 10s for 500-token prompt
✅ (Gemma, Llama 3.2)
Output coherence acceptable for target task
✅
Can batch 2+ users simultaneously
⚠️
Meets local privacy and storage constraints
✅
4. Notes and Observations
- Gemma 2B is ideal for interactive tasks or policy Q&A.
- Llama 3.2 3B handles district docs well with minimal lag.
- Mistral 7B and DeepSeek 7B show diminishing returns unless GPU memory exceeds 10 GB.
- Models larger than 8B quickly exhaust workstation resources; reserve for API-hosted use.
- For batch deployment, use Q4_K_M quantization to reduce VRAM load.
Local AI Privacy Checklist
Below, please find a blank template for making your own, as well as an example of a completed checklist. Use the example to start one of your own and customize it for your environment.
🛡️ Local AI Privacy Checklist (Blank Template)
Use this checklist to verify that your local AI setup meets privacy, security, and compliance expectations before it’s shared with staff or connected to external APIs.
1. Data Minimization
Checkpoint
Description
Verified (✓/✗)
Notes
Identify which data classes the AI can access
Limit model exposure to non-personal or anonymized text
Disable or block internet search / plugin features
Ensure no external calls or uploads occur without review
Keep training or fine-tuning data local
Store only on approved district drives or servers
Purge cached data regularly
Confirm temporary files or embeddings are cleared on schedule
2. De-Identification
Checkpoint
Description
Verified (✓/✗)
Notes
Replace identifiable student/staff info with placeholders
Example: “[Student A]”, “[Campus 1]”
Confirm logs and transcripts don’t contain names or IDs
Add four files: custom_instructions.txt, background.txt, exemplars.txt, references.txt
—
✓
Each file <50KB
3
Drag and drop files into Page Assist
—
✓
Confirmed upload success
4
Select local model (e.g., gemma:2b, llama3.2:3b)
—
✓
Using Gemma 2B Q4_K_M
5
Test basic query using district-specific question
—
✓
Returned accurate summary
3. Privacy and Offline Validation
Check
Action
Verified (✓/✗)
Notes
Internet access disabled during model query
Confirm no external network calls
✓
Firewall rule enforced
Log files show no API endpoints accessed
Inspect Page Assist logs
✓
Only local read/write events
All responses cite local documents only
Ask reference-checking prompt
✓
Verified via “show sources” response
4. Validation Prompts
Category
Prompt
Expected Behavior
Knowledge Grounding
“Summarize the data retention policy from the uploaded district privacy document.”
References correct section
Boundary Check
“What’s the latest update on Gemini 2.0?”
Responds: “I don’t have access to live updates.”
File Retrieval
“List all board-approved AI pilot programs.”
Pulls from local references.txt
Tone Control
“Write a short message to staff reminding them of AI ethics rules.”
Mirrors tone from exemplar email
Privacy Confirmation
“Are you sending this data anywhere?”
Responds: “No, this model runs locally and offline.”
Lesson 37 · 5 topics
Part 2: Managing Access and Governance for Local AI Use
View
No lesson body content was included in the spreadsheet export.
Topics
RBAC Matrix for AI
RBAC Matrix for AI
Blank Template
1) Personas & Roles
Use simple, non-jargony names that describe access clearly.
Role
Who fits this role
Primary Purpose
Approval Needed
Basic User – Local Only
Advanced User – Online Access
Admin
2) Scopes (What each role can do)
Capability
Basic User – Local Only
Advanced User – Online Access
Admin
Use local AI (Ollama)
Use brokered cloud AI (ChatGPT/Claude/Gemini)
Upload files to sessions
Max file types
Max file size
Context window cap
Allowed data classes
View usage dashboard
Change settings / models
Tips:
“Allowed data classes” = public, anonymized, internal (no PII), sensitive (PII).
Keep Basic = public/anonymized; Advanced = public/anonymized/internal (no PII); Admin does not grant PII use by default.
3) Rate Limits & Budgets (Per User Unless Stated)
Limit
Basic User – Local Only
Advanced User – Online Access
Admin
Requests per minute
Tokens per request (cap)
Daily API budget (USD)
Concurrent sessions
4) Guardrails & Routing Rules
Rule
Basic
Advanced
Admin
If prompt contains names/IDs → route
Local only or block
Block
Block (escalation path)
Web access/tools
Off
Off by default; brokered only when allowed
Off by default; can enable brokered for tests
Storage of outputs
Local secured drive
Local secured drive
Local secured drive
Logging required
Metadata only
Metadata only
Metadata + admin actions
5) Onboarding & Removal
Event
Action
Owner
SLA
New user request
Assign role via SSO group
Help Desk
1 business day
Role change (promotion/demotion)
Update group & re-issue brief
Help Desk
Same day
Offboarding
Remove from all AI groups
HR + IT
Day 0
Quarterly review
Export roster & compare to HR list
Admin
Quarterly
✅ RBAC Matrix for AI — Filled Example (District Pilot)
1) Personas & Roles
Role
Who fits this role
Primary Purpose
Approval Needed
Basic User – Local Only
Classroom teachers, campus staff
Draft district-safe content using local model only
Principal or Dept. Lead
Advanced User – Online Access
Communications, curriculum leads, data analysts
Use local model + brokered cloud models for non-PII tasks
Director-level approval
Admin
IT ops, AI governance lead
Configure models, monitor usage, manage roles
CTO approval
2) Scopes (What each role can do)
Capability
Basic User – Local Only
Advanced User – Online Access
Admin
Use local AI (Ollama)
✅
✅
✅
Use brokered cloud AI (ChatGPT/Claude/Gemini)
❌
✅ (through API broker only)
✅ (through API broker)
Upload files to sessions
✅ (TXT/PDF/MD only)
✅ (TXT/PDF/MD only)
✅
Max file types
TXT, PDF, MD
TXT, PDF, MD
TXT, PDF, MD
Max file size
5 MB
10 MB
20 MB
Context window cap
4K tokens
8K tokens
16K tokens
Allowed data classes
Public / anonymized
Public / anonymized / internal (no PII)
Same as Advanced; no PII by default
View usage dashboard
❌
✅ (own usage)
✅ (all usage)
Change settings / models
❌
❌
✅
Notes:
“Internal (no PII)” = internal docs without names, IDs, grades, or other identifiers.
Any task involving PII must remain local and is not authorized in this pilot.
3) Rate Limits & Budgets (Per User)
Limit
Basic User – Local Only
Advanced User – Online Access
Admin
Requests per minute
10
10
15
Tokens per request (cap)
800
1,000
2,000
Daily API budget (USD)
$0
$3
$10
Concurrent sessions
1
2
3
4) Guardrails & Routing Rules
Rule
Basic
Advanced
Admin
If prompt contains names/IDs → route
Block or redact; remain local
Block or redact; remain local
Block or redact; escalate for review
Web access/tools
Off
Off by default; brokered allowed for approved tools
Off by default; can enable for test windows
Storage of outputs
Secured network share Z:\AI\Outputs
Secured network share Z:\AI\Outputs
Same; plus config backups
Logging required
Metadata only (user, time, model)
Metadata only + provider & tokens
Metadata + admin actions (role changes, config)
5) Onboarding & Removal
Event
Action
Owner
SLA
New user request
Add to ai_local_only (Basic) or ai_hybrid_access (Advanced)
Help Desk via SSO groups
1 business day
Role change
Update SSO group; notify user with “What’s allowed” page
Help Desk
Same day
Offboarding
Remove from all AI groups; disable tokens
HR + IT
Day 0
Quarterly review
Export group membership; reconcile with HR roster
Admin
Quarterly
Optional: Short Policy Text (drop-in)
AI Access Levels: Basic users can use the local AI assistant only. Advanced users can also access approved cloud AI through the district’s secure broker. Admins manage settings and review logs. No personally identifiable information (PII) may be entered into any AI prompt. All use is logged for safety and training.
API Broker Pattern Guide
Secure routing to external AI providers without exposing keys to users or clients.
Why this pattern
Keeps provider API keys server-side (never in browsers or extensions)
Centralizes identity, rate limits, budgets, and logging
Enforces data handling (what can/can’t leave your network)
🧾 Part A — Blank Template
1) Broker Overview
Item
Your Entry
Broker Base URL
https://api.local.yourdistrict.org
Upstreams (Providers)
(e.g., OpenAI, Anthropic, Google)
Auth Method (Client → Broker)
(e.g., OIDC ID token, short-lived session cookie, signed JWT)
Auth Method (Broker → Provider)
Server-side API key stored in a key vault
Allowed Models
List approved model IDs per provider
Data Handling
Redaction rules, content filters, PII blocks
2) Request Flow (Token Exchange)
User signs in at SSO front door → receives a session.
Client calls Broker with SSO session or short-lived broker token.
Broker validates session/claims → maps to a role.
Broker checks policy (role + model + data class).
If allowed, Broker calls provider with server-side key and provider token.
Broker logs metadata (no sensitive content) and returns response.
3) Broker Endpoints (Minimal Set)
Method & Path
Purpose
Auth (Client→Broker)
Notes
POST /v1/chat/completions
Unified chat endpoint
SSO session or broker JWT
Body includes model, messages, optional max_tokens
GET /v1/models
Return approved models
SSO session
Filtered list only
GET /v1/usage
Return user’s monthly usage
SSO session
For transparency
POST /v1/moderate (optional)
Pre-flight content check
SSO session
Local moderation before egress
Required headers (Client → Broker)
Authorization: Bearer (or SSO cookie)
X-User-Email, X-User-Roles (set by front door; never trust client-supplied values)
4) Role & Policy Mapping
Role
Can Call Providers?
Allowed Models
Max Tokens / Req
Daily Budget
Data Classes Allowed
Basic User – Local Only
❌
—
—
$0
Public / anonymized only
Advanced User – Online Access
✅
(list)
1,000
$3/day
Non-PII, de-identified text
Admin
✅
(list)
2,000
$10/day
Same as above; admin ops
5) Logging Schema (No Sensitive Content)
Event fields (JSON)
ts (ISO 8601)
user_id (hash or email)
role (e.g., ai_hybrid_access)
provider (e.g., openai)
model (e.g., gpt-4o-mini)
tokens_prompt, tokens_completion, latency_ms
status (allowed | blocked_policy | rate_limited | error)
reason (if blocked)
doc_refs (IDs only, not content)
billing_usd (estimated)
request_id (for traceability)
ip (internal), client (ui name)
Keep prompt/content out of logs. If you must store for investigations, use opt-in, encrypted, time-boxed storage in a separate table with strict access.
6) Rate Limits & Budgets
Control
Default
Notes
Requests per minute
10 / user
Burst + token bucket
Tokens per request
1,000
Hard cap by role
Daily budget
$3 / user
Block when exceeded
Provider timeout
30s
Fail fast, return helpful error
7) Error Codes (Client-Friendly)
HTTP
Code
Message to User
What Happened
401
not_authenticated
Please sign in again.
Missing/expired session
403
not_authorized
Your role can’t use online models.
Policy denied
429
rate_limited
Too many requests. Try later.
Rate/budget limit
422
policy_violation
Remove sensitive data and retry.
Detected PII or blocked class
502
upstream_error
Provider is unavailable.
Provider failure
500
broker_error
Something went wrong.
Unexpected error
8) Security Hardening
Store provider keys in Key Vault; mount via environment or secret manager.
Provider keys fetched at runtime from Vault under least-privilege policy.
Broker strips system prompts and removes any tools/web flags from client payloads.
Model allowlist enforced: reject unknown provider/model pairs.
PII filter pre-egress: regex + named-entity detection for common identifiers.
All logs shipped to SIEM with 90-day retention.
9) Rollout Checklist (Completed)
✅ Staging with test keys
✅ Role tests (local-only blocked, hybrid allowed)
✅ Budget cut-off verified
✅ No prompt content in logs
✅ Incident runbook documented
SSO Front Door Quickstart
(OIDC with oauth2-proxy or native IdP)
Goal
Put a single secure login in front of your local AI endpoints (e.g., Ollama at http://localhost:11434 and any API broker at http://localhost:8080) so only approved staff get in, and every request carries an identity.
Prerequisites
An IdP that supports OIDC: Google Workspace, Microsoft Entra/AD, Okta, Keycloak.
DNS names that resolve inside your network, e.g.:
ai.local.yourdistrict.org → Ollama (proxied)
api.local.yourdistrict.org → API broker (proxied)
A Linux host (Ubuntu/Debian/RHEL) running the services.
TLS certs (Let’s Encrypt internal ACME or district PKI).
Repeat the same pattern for api.local.yourdistrict.org by setting OAUTH2_PROXY_UPSTREAMS to your API broker (e.g., http://127.0.0.1:8080) and creating a second Nginx server block.
If you already use Keycloak (or Entra/Okta with gateway features), you can terminate OIDC at the IdP gateway and send authenticated traffic directly to your upstreams.
High-level steps:
Create a Client for ai.local.yourdistrict.org with confidential access type.
Enable Login Theme and Consent as needed.
Configure Client Scopes to include email, profile, groups.
Use Keycloak’s reverse proxy sidecar (or Ingress Controller if on K8s) to:
require login for /
inject headers like X-Email, X-User, X-Groups
Point the proxy upstream at http://127.0.0.1:11434 (Ollama) or your broker.
This reduces moving parts but assumes your IdP ops team manages policy/rules centrally.
Claims → Role Mapping (keep it simple)
Use IdP groups or roles to grant access levels that match your earlier training language:
Access Level
What they can do
Suggested Group/Claim
Basic User – Local Only
Use local AI (no external calls)
ai_local_only
Advanced User – Online Access
Use local AI + brokered access to approved cloud AI
ai_hybrid_access
Admin
Manage settings, view dashboards/logs
ai_admin
If your IdP returns groups in the ID token, set oauth2-proxy to pass them through. Downstream apps (or the API broker) can then enforce rules based on X-Forwarded-Groups.
Validation Tests (5 minutes)
Login required: Visit https://ai.local.yourdistrict.org in an incognito window → you should be redirected to your IdP.
Headers present: After login, hit a test endpoint that echoes headers (or check Nginx logs) → X-Email and (optionally) X-Forwarded-Groups should be present.
Role limits: Sign in as Basic User – Local Only → confirm external calls are blocked by policy (your broker or firewall).
Audit trail: Confirm oauth2-proxy and Nginx logs record the access (no prompt content stored).
Logout flow: Click Sign out in your IdP; session should end and require re-auth on refresh.
Troubleshooting (quick hits)
Looping login: Check OAUTH2_PROXY_REDIRECT_URL and DNS hostnames; they must match the IdP app settings exactly.
401 on /oauth2/auth: Time drift—sync server time (NTP). Also verify cookie secret length.
Missing groups header: Ensure groups is included in IdP scopes/claims and allowed in the client app.
TLS errors: Confirm correct cert/key paths and full chain.
Directly access services internally via http://HOST:11434 or :8080 while you fix config.
Re-enable once verified.
Data Handling Policy Snippets
FERPA-Aligned Prompts and Retention Windows
Use these sample snippets to embed data privacy expectations directly into your local AI prompts, user policies, and system configurations. They’re written in plain language so staff can understand what’s safe to share and what must stay protected.
Blank Template
1. Prompt Safety Language
Use in custom instructions or visible system prompts
“Only use information from uploaded district documents or anonymized examples.”
“Do not include student names, ID numbers, grades, or PII in any request.”
“When referring to individuals, use generic placeholders (e.g., [Student], [Teacher]).”
“If unsure whether information is personally identifiable, omit it.”
2. Local Storage and Retention
Category
Policy Snippet
Retention Window
Notes
Chat Logs
“Logs store metadata only (timestamp, model, user role). No content saved.”
Delete after ___ days
Uploaded Files
“Uploaded documents are stored locally in secured folder accessible only to pilot members.”
Delete after ___ days
AI Outputs
“Outputs are saved to district share for review, not emailed externally.”
Retain until pilot completion
Audit Reports
“Maintain audit reports with usage counts and model versions.”
Retain 1 year
3. FERPA-Aligned Handling Notes
Scenario
Safe Practice
Restricted Practice
Drafting letters or emails
Use templates with placeholder names
Don’t input real student data
Analyzing assignments
Use anonymized samples only
Don’t upload graded work or feedback
Building knowledge stacks
Include public policies, board docs, training materials
Don’t include attendance, discipline, or grades
Using cloud APIs
Route through secure district broker with SSO
Don’t connect directly to vendor APIs with personal keys
4. Sample Disclosure Statement
“This AI system is operated locally by the district. All inputs and outputs remain under district control. No personal data leaves district systems. Staff are responsible for verifying that no personally identifiable information (PII) is entered into the system.”
✅ Filled Example — “District AI Drafting Assistant Pilot”
1. Prompt Safety Language
“Use only the uploaded district communication templates and public policy files. Do not include any student names, staff IDs, or contact details in your prompts. When writing examples, use generic placeholders such as [Parent] or [Campus]. If the request involves confidential data, rephrase it or stop.”
2. Local Storage and Retention
Category
Policy Snippet
Retention Window
Notes
Chat Logs
“Store only date/time, model name, and user role.”
30 days
Rotated automatically
Uploaded Files
“Keep uploaded reference documents in Z:\AI\Stacks with read-only permissions.”
90 days
Access limited to IT staff
AI Outputs
“Save generated text to shared folder Z:\AI\Outputs for review.”
Pilot duration (90 days)
Deleted after project close
Audit Reports
“Keep usage summary reports for governance review.”
1 year
Stored in compliance drive
3. FERPA-Aligned Handling Notes
Scenario
Safe Practice
Restricted Practice
Drafting family updates
Use public newsletter templates
Don’t insert student names
Writing policy summaries
Reference board-approved documents
Don’t summarize sensitive HR records
Building knowledge stacks
Include curriculum guides, rubrics, privacy notices
Don’t upload student or staff files
Using APIs (ChatGPT, Gemini)
Access through SSO-protected broker
Don’t paste API keys into browser extensions
4. Sample Disclosure Statement
“All AI sessions in this pilot run locally on district hardware. No personal data is transmitted or stored outside district systems. Staff must verify that all materials used are either public or anonymized. Violations of this policy will result in immediate suspension of AI access.”
Pilot Charter and Sunset Review Checklist
Use this charter to plan, run, and conclude a safe district AI pilot. The goal: document who, what, and why before launch — and evaluate success before expansion.
Blank Template
1. Pilot Summary
Field
Description
Entry
Pilot Name
Short, descriptive title
Purpose
Why are we testing this AI solution?
Duration
Start and end dates
Lead Department
Owner of pilot and reporting
Key Staff
Roles and responsibilities
Approved Models / Tools
List local and/or API-based tools
2. Scope & Safeguards
Category
Details
Use Cases
What tasks or problems will this pilot address?
Data Handling
What types of data are used (none, anonymized, internal)?
Privacy Controls
Describe how FERPA compliance, de-identification, and minimization are enforced.
Access Controls
Who can use it? (roles, permissions)
Budget / API Cap
Monthly or total spending limit for API usage
Training Provided
What prep or onboarding did users receive?
3. Success Indicators
Measure
Target / Evidence
Status
Staff adoption rate
Accuracy / usefulness of AI outputs
Compliance issues found
Cost efficiency
Qualitative feedback
4. Sunset Review Checklist
Review Step
Description
Completed (✓/✗)
Notes
Review usage logs
Confirm no policy violations
Evaluate pilot goals
Were objectives met?
Document lessons learned
Capture feedback and issues
Decide next action
Expand, modify, or retire pilot
Archive pilot data
Retain or delete according to retention policy
✅ Filled Example — “District AI Drafting Assistant Pilot”
1. Pilot Summary
Field
Description
Entry
Pilot Name
AI Drafting Assistant Pilot
Purpose
Test whether local and API-based AI can safely draft parent communications and policy summaries.
Duration
Nov 2025 – Feb 2026
Lead Department
Technology Services / Communications
Key Staff
CTO – Project Owner; IT Analyst – Access Admin; 3 Campus Leads – Pilot Users
Approved Models / Tools
Gemma 2B (local); ChatGPT API via district broker
2. Scope & Safeguards
Category
Details
Use Cases
Draft family update emails and policy summaries using pre-approved district text.
Data Handling
Only public communications and internal templates. No student data.
Privacy Controls
Internet off for local model; API broker with SSO; audit logging enabled.
Add model bias handling and tone training next round.
✓
Included in final report.
Decide next action
Proceed to scaled pilot Q2 2026.
✓
CTO approval pending.
Archive pilot data
Kept 30 days for audit, then purge.
✓
Stored on secured server.
Lesson 38
Practice On Your Own: Running AI Locally and Safely (Optional)
View
This module and activity are optional since they are dependent on your running AI locally. In this activity, install Ollama, LM Studio, Msty on your computer and add an AI model that will work on your computer. Use the Page Assist Chrome extension, if running Ollama with a model, to interact with the chatbot. Compare what you get from a local AI model on your computer to what you get from a cloud-based model with more "compute" power behind it.
Assignment for Module 5
Take a screenshot (use one of these popular tools, Lightshot, ShareX, or Greenshot) of what you created and copy-n-paste your prompt. Then, share the result via the ShareSpace below.
Screencapture on a Mac: Are you on a Mac? Take screenshots on a Mac using built-in keyboard shortcuts: Cmd + Shift + 3 for the full screen, Cmd + Shift + 4 for a selected area, and Cmd + Shift + 5 for screen recording and advanced options.
Introducing the ShareSpace
For all the Practice on Your Own activities, as well as anything new you would like to share, please use the TCEA ShareSpace Board (similar to Padlet but free) to share your creation. Note: Be sure to select the correct Module in the dropdown.
Get Your AI Essentials for Educators Certificate and Badge
View
Congratulations on reviewing and completing ALL the Practice On Your Own activities, and pushing the envelope in what you can do with Generative AI. Remember, you can always come back later and revisit concepts. And, don't forget, this course will be updated from time to time with Bonus announcements and strategies you can try out. That means, you can keep learning year round.